- 1School of Mechanical Engineering, Nantong University, Nantong, Jiangsu, China
- 2Comac Shanghai Aircraft Manufacturing Co., Ltd., Shanghai, China
- 3Army Acad Armored Forces, Beijing, China
To investigate the surface integrity of 17-7PH stainless steel welded structural components used in aviation, laser shock peening (LSP) with different power densities was applied to stainless steel welded joints. The microstructural morphology, structural features, full-width at half-maximum, microhardness, and surface roughness of the stainless steel welded joint specimens before and after LSP were characterized and measured using SEM, TEM, XRD, a microhardness tester, and a high-resolution confocal microscope. The effects of different laser power densities on the microstructure and properties of the stainless steel welded joints were explored. Results indicate that the stainless steel welded joints exhibit a typical BCC phase. Laser shock peening promotes grain refinement in the welded joints, leading to the phase transformation of residual austenite into martensite. The surface roughness of the specimen is positively correlated with laser power density. At a power density of 5.17 GW/cm2, the surface roughness increased to 1.919 μm, which is 117.08% higher than that of the non-peened specimen. The microhardness of the specimens shows a decreasing trend with increasing power density. When the power density is 2.79 GW/cm2, the microhardness of the specimen significantly increases to 462.94 HV0.5, which is 22.26% higher than that of the non-peened specimen.
1 Introduction
Precipitation-hardened (PH) stainless steels are widely used in the aerospace field due to their high strength, hardness, and corrosion resistance. They are commonly employed in welding applications for critical structural components such as engine casings and landing gear (Xu and Yu, 2008; Daymond et al., 2016; Liu et al., 2016; Ziewiec et al., 2016; Cui et al., 2022; Kugelmeier et al., 2024). In complex environments characterized by high temperatures and humidity, welded joints of structural components usually experience both high static and dynamic stresses (Li et al., 2021; Liu et al., 2023; Xiong et al., 2024). Stress corrosion cracking, fatigue vibration, and overload are major causes of structural failure (Li et al., 2014; Xiao et al., 2019; Chen et al., 2023; Jiang and Yang, 2024). To ensure the safety of aircraft operations, it is crucial to improve the surface quality of stainless steel welded joints and enhance their surface properties.
Laser shock peening (LSP) is an effective approach to improve fatigue resistance, wear resistance, and stress corrosion resistance of metallic materials (Tsuyama, 2016; Dai et al., 2018; Sanchez et al., 2021; Shu et al., 2022; Yoo et al., 2023). Currently, researches on LSP at home and abroad mainly focus on the surface modification of materials. Zhang et al. (2020) and Zhu et al. (2020) have significantly improved the fatigue properties and surface microhardness of materials through LSP technology. Song et al. (2024) used LSP technology to increase the microhardness of the material while reducing the amount of titanium wear by more than 30%. Sundar et al. (2016) and Luet al. (2023) have demonstrated that LSP can reduce the stress corrosion cracking sensitivity of 304 stainless steel. Li et al. (2022) concluded that LSP can significantly improves the electrochemical corrosion performance of stainless steel, with the best results achieved after two impacts. However, in the field of aviation, research on the impacts of LSP on the performance of welded joints is still relatively scarce. Dhakal, Binod et al. (Dhakal and Swaroop, 2018) have discussed the significant effects of LSP on the mechanical properties and microstructure of different welded joints, concluding that LSP can be effectively used for post-weld treatment in industrial manufacturing. Rubio-Gonzalez et al. (2020) used LSP to reduce the fatigue crack propagation rate in stainless steel and improve the fracture toughness of DSS aged samples, significantly mitigating the effects of thermal aging. Zhou et al. (2022) showed that the fatigue limit of the material increased significantly from 289 MPa to 478 MPa. At the same time, LSP promoted the conversion of residual stresses in welds and heat-affected zones into residual compressive stresses of high amplitude. These studies suggest that it is technically feasible to improve the stress corrosion resistance of stainless steel welded joints by LSP. And this technology has provided a new approach for stress corrosion protection in 17-7PH stainless steel welded joints in the field of aviation.
This study investigates the impacts of LSP with optimized laser shock processing parameters on the 17-7PH stainless steel welded joints. XRD, SEM, and TEM were used to characterize and test the diffraction peaks, microstructural morphology, and structural features of the stainless steel welded joints before and after LSP. Digital microhardness tester and high-resolution confocal microscope were employed to measure the microhardness and surface roughness of the stainless steel welded joints. This research aims to study typical microstructural defects, characteristic microstructures, and microstructural evolution, and reveal the mechanisms of performance evolution in stainless steel welded joints. Compared to existing studies, the microhardness of specimens increase significantly and the grain refinement effect is better. Meanwhile, appropriate surface roughness ensures better coating application, thereby enhancing the material’s corrosion resistance. The results provide new solutions for stress corrosion protection treatment in 17-7PH stainless steel welded joints for aerospace applications, offering significant scientific and theoretical value.
2 Experimental materials and methods
2.1 Experimental and sample preparation
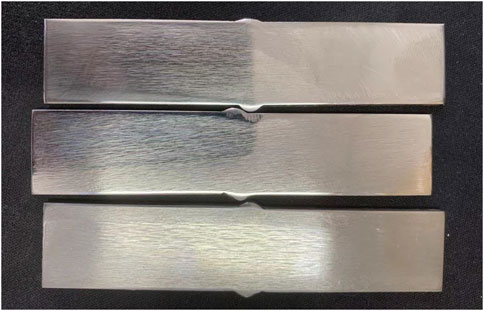
The material used in the experiments was 17-7PH stainless steel, known for its good corrosion resistance and ductility. Its chemical composition and some mechanical properties are shown in Table 1. The 17-7PH stainless steel plates were first pickled and polished to remove the surface oxide layer. The stainless steel plates were then welded by double-sided argon arc welding, and inert gas was used to prevent oxidation of the welds. According to the welding requirements of the specimens, the welding parameters are determined by the material and dimensions of the specimens. The specific welding parameters are shown in Table 2. After welding, the front and back surfaces of the stainless steel welded joints were milled, followed by progressive polishing with 240#, 400#, 800#, and 1,200# sandpapers. Subsequently, The stainless steel welded joints were cleaned with anhydrous ethanol and dried. Finally, the dimensions of 17-7PH stainless steel welded joints shown in Figure 1 are 93 mm × 20 mm × 3 mm.

Table 1. Chemical composition and mechanical properties of 17-7PH stainless steel (% Mass Fraction).
2.2 LSP process
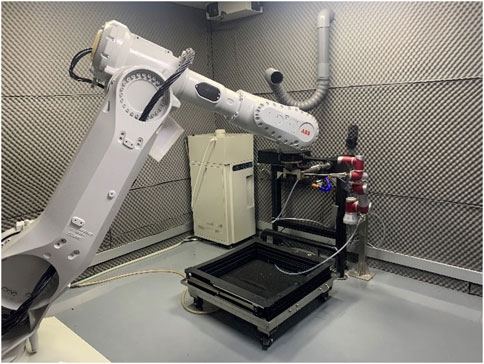
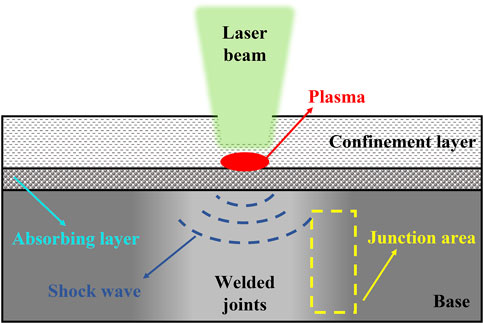
The solid-state laser (YS1505-R200A, Xi’an Tianruida Optoelectronic Technology Co., Ltd., China) was used for the LSP, as shown in Figure 2. The laser has a pulse duration of 20 ns, a wavelength of 1,064 nm, and a spot diameter of 4 mm. The model of laser shock peening 17-7PH Stainless Steel is shown in Figure 3. Based on the extensive research conducted by the research group, optimized laser shock processing parameters were employed to strengthen the 17-7PH stainless steel welded joints. This approach aims to achieve better grain refinement effects, remove residual stresses from the material’s surface, and extend the service life of the material. The optimized laser shock processing parameters are as follows: overlapping rate of 70%, pulse energies of 7 J, 10 J, and 13 J, power densities of 2.79 GW/cm2, 3.98 GW/cm2, and 5.17 GW/cm2, and laser shock peening numbers of 3. In order to completely cover the heat-affected zone of stainless steel welded joints, the area of LSP was set to 14 mm × 14 mm. To prevent laser ablation, the transparent flowing water layer with a 2 mm thickness was used as the confinement layer and the aluminum foil with a 0.1 mm thickness was used as the laser energy absorbing layer.
2.3 Characterization and measurement methods
X-ray diffractometer (Ultima IV, Rigaku, Japan) was used to obtain diffraction patterns of the LSP areas. The scanning angle ranged from 5° to 120°, the step size was 6°/min. A field emission scanning electron microscope (FE-SEM, SU8020, HITACHI, Japan) was used to observe the microstructure of the cross-sections of the stainless steel welded joints after LSP. We employed a field emission high-resolution transmission electron microscope (HRTEM, Tecnai G2 F20, FEI, United States) to analyze the internal structural morphology of the welded joints. Surface topography and roughness of the stainless steel welded joints were measured using a high-resolution confocal microscope (usurf mobile, NanoFocus, Germany).
Microhardness of the surface and cross-sections of the stainless steel welded joints was measured through a digital Vickers microhardness tester (TMVS-1, Beijing Times Technology Co., Ltd., China). The loading time was 15 s with a test force of 0.5 kg. Five points were measured at depths of 100 μm at intervals in the cross-sectional depth direction and their average values were taken as the results of the microhardness measurement.
3 Results and analysis
3.1 Microstructure
The microstructural morphology of the cross-sections of 17-7PH stainless steel welded joints before and after LSP is shown in Figure 4. From Figure 4A, it can be observed that the grain size at the welded joints of the stainless steel is approximately 18 μm. During the process of welding, due to uneven heat conduction and cooling rates, there are some fine weld seams present in the microstructure. The pulsed laser broke down the threshold of the material, generating a plasma and forming a burst wave. According to the Fabbro’s model (Fabbro et al., 1990; Peyre et al., 1996), the peak pressure of the shock wave can be calculated through the following Equation 1.
where
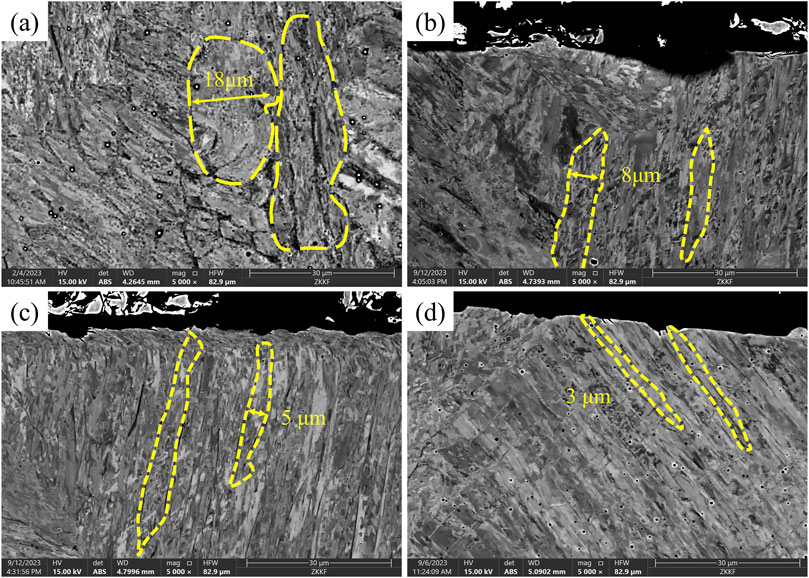
Figure 4. Sem Images of the welded joints before and after LSP (A) No LSP; (B) 2.79 GW/cm2; (C) 3.98 GW/cm2; (D) 5.17 GW/cm2.
Due to the minimal grain refinement observed at lower power densities, only the samples subjected to higher laser power densities were analyzed through TEM. The TEM morphology of the 17-7PH stainless steel welded joints before and after LSP is shown in Figure 5. Figure 5A reveals that the microstructure of the stainless steel welded joint consists of martensitic phases formed by elongated cementite and lamellar ferrite. Given the low carbon content in the stainless steel, the thickness of the cementite layers are approximately 150–350 nm, with some blocky cementite particles precipitating on the ferrite. Combining with the SEM morphology in Figures 4, 5B show that after laser shock peening, the cementite did not completely integrate into the austenite. Instead, the structure remains a heterogeneous mixture of ferrite and cementite. Under the influence of the LSP, an environment with high-temperature, high-pressure, and high-stress is created on the surface of the specimen. This phenomenon results in the generation of numerous dislocations and defects. During rapid cooling, the increased temperature gradient within the material creates a complex stress state, affecting the atomic arrangement of the lattice and significantly lowering the critical temperature and stability of austenite phase transformation. Concurrently, the abundance of dislocations and defects reduces the overall energy of the austenite lattice, facilitating atomic rearrangement and serving as nucleation sites for the new phase. This process promotes the transformation of residual austenite into fine-grained martensitic structure, thereby enhancing the strength and toughness of the material (Ye et al., 2012). Additionally, the high dislocation density in the stainless steel material inhibits dislocation development, and the multiple slip systems of the BCC phase lead to dislocations appearing in a cellular and tangled form (Miura et al., 2009).

Figure 5. TEM Images of the welded joints before and after LSP (A) No LSP; (B) 3.98 GW/cm2; (C) 5.17 GW/cm2.
3.2 Diffraction pattern analysis
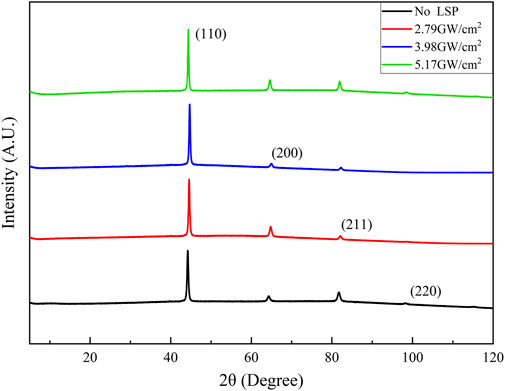
The X-ray diffraction (XRD) pattern of the 17-7PH stainless steel welded joints before and after LSP is shown in Figure 6. Phase analysis reveals that the stainless steel welded joints exhibit a typical body-centered cubic (BCC) structure, specifically the α-Fe phase, with prominent peaks corresponding to the (110), (200), and (211) planes. As the laser power density increases, the intensity of the diffraction peak for the (110) plane gradually increases. This is attributed to the laser shock peening process which promotes grain refinement in the surface layer of the welded joints. Additionally, the formation of precipitated phases during the LSP process may lead to an increase in the diffraction peak intensity for the (211) plane. Compared to the non-peened samples, the laser shock peening results in significant grain refinement and lattice distortion on the material surface. The diffraction peaks tend to show increased intensity and narrowing. After high-power density laser shock peening, deformation textures appear on the surface of the stainless steel welded joints, leading to a preferred orientation of the (110) plane and an increased intensity of the diffraction peaks for this plane.
3.3 Surface integrity analysis
The three-dimensional surface morphology of the 17-7PH stainless steel welded joints before and after LSP is shown in Figure 7. From Figure 7A, it can be seen that the surface of the stainless steel welded joint, which was not subjected to laser shock peening, is relatively smooth with parallel grooves and discrete micro-peaks. These features are likely due to the micro-ploughing of the SiC particles from the sandpaper used during polishing (Duan et al., 2018). Figures 7B, C show that after LSP with lower power densities, the micro-peaks on the surface of the stainless steel welded joints gradually disappear. This is because the laser energy follows a Gaussian distribution, with the energy at the center of the spot being higher than at the edges (Li et al., 2019). This results in slight plastic deformation of the surface. Figure 7D reveals that when the laser power density increases to 5.17 GW/cm2, the micro-grooves on the surface of the stainless steel welded joint almost completely disappear. The relatively high laser power density leads to more pronounced plastic deformation on the surface of the welded joints.
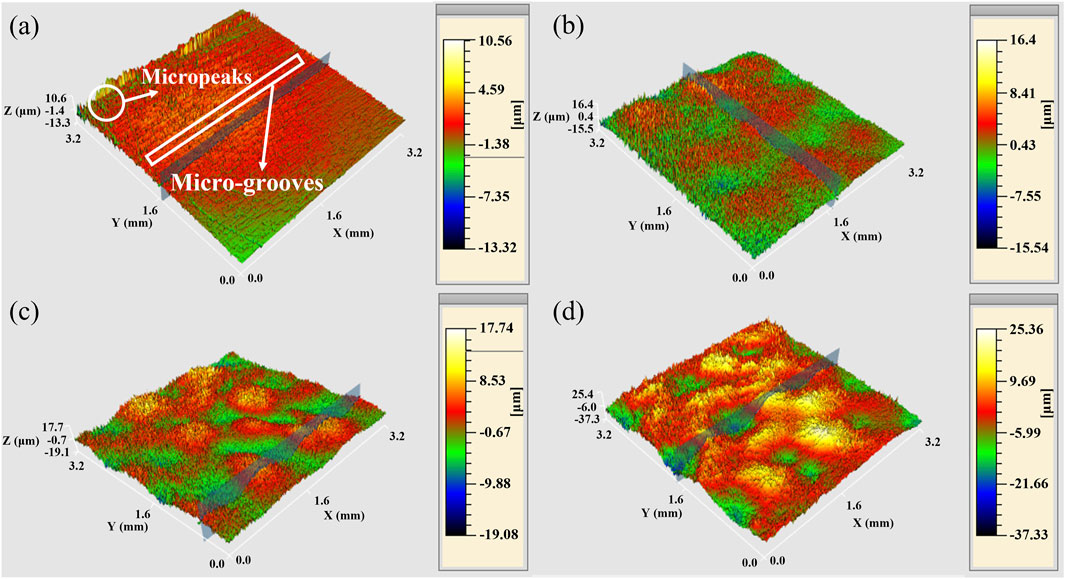
Figure 7. Surface 3D topography of welded joints before and after LSP (A) No LSP; (B) 2.79 GW/cm2; (C) 3.98 GW/cm2; (D) 5.17 GW/cm2.
To further characterize the impacts of Laser Shock Peening (LSP) on the surface morphology of 17-7PH stainless steel welded joints, roughness measurements were taken for the areas observed in Figure 7. The roughness was evaluated based on the arithmetic average roughness (Ra) of the profiles. The surface roughness measurement results of the stainless steel specimens are shown in Figure 8. Based on the three-dimensional surface morphology of the specimens in Figures 6, 8A indicates that the surface roughness of the 17-7PH stainless steel welded joint specimen, which were not subjected to laser shock peening, is 0.884 μm. After LSP with a power density of 2.79 GW/cm2, the surface roughness of the specimen increases to 1.093 μm, which is a 23.64% increase compared to the non-peened specimen. With a laser power density of 3.98 GW/cm2, the surface roughness reaches 1.207 μm, showing a 36.54% increase compared to the non-peened specimen. When the laser power density increases to 5.17 GW/cm2, the surface roughness rises to 1.919 μm, reflecting a 117.08% increase compared to the non-peened specimen. Due to the Gaussian distribution of laser energy, as the laser power density increases, the surface of plastic deformation of the stainless steel welded joints become more severe, resulting in a significant increase in surface roughness.
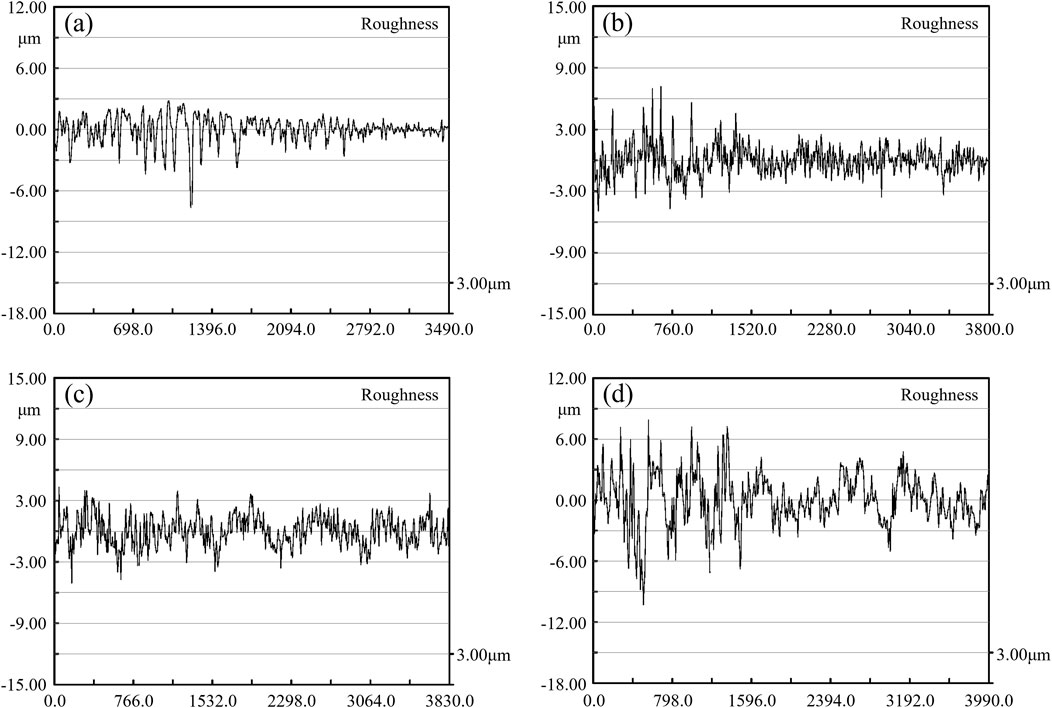
Figure 8. Surface roughness of welded joints before and after LSP (A) No LSP; (B) 2.79 GW/cm2; (C) 3.98 GW/cm2; (D) 5.17 GW/cm2.
Usually, an increase in the surface roughness of the specimen indicates the presence of more micro-grooves and cracks, which can trap moisture and other corrosive agents, creating localized galvanic environments. This can damage the oxide film on the specimen’s surface, thereby reducing its corrosion resistance (Durst et al., 2008). Existing coating technologies can effectively enhance the corrosion resistance of the specimen, and an appropriate level of roughness can improve the adhesion and mechanical interlocking of the coating, providing better protection for the substrate.
3.4 Microhardness
The changes in surface and cross-sectional microhardness of the 17-7PH stainless steel welded joints before and after LSP are shown in Figure 9. Based on the microstructural morphology of the specimens in Figures 4, 9A shows that the surface microhardness of the 17-7PH stainless steel is 241.8 HV0.5. After welding, the surface microhardness increases to 378.64 HV0.5. According to the Hall–Petch Equation 2 (Luong and Hill, 2008):
where
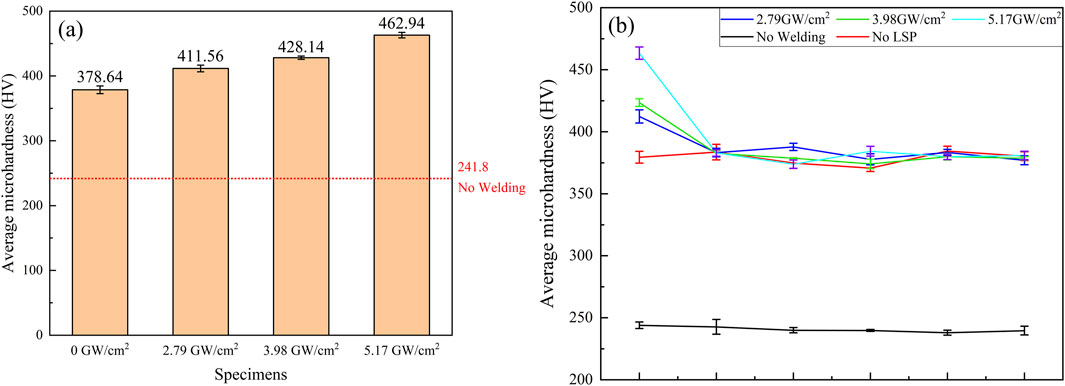
Figure 9. Microhardness of Welded Joints before and after LSP (A) surface microhardness; (B) cross-section microhardness.
Additionally, we observed the martensite-ferrite phase in Figure 5. Combined with the research of P. V. Yasnii et al. (2010), we concluded that the surface of the stainless steel specimen exhibits refined lamellar martensite after LSP, with an increased length of subgrain boundaries. This results in enhanced fracture energy strength and significantly improves the impact toughness of the specimen.
4 Conclusion
1) After laser shock peening, the surface grains of the 17-7PH stainless steel welded joints become refined, with grain size decreasing as the laser power density increases. At a power density of 5.17 GW/cm2, the grain size reduces to 2–5 μm, and the depth of the laser shock peening-affected layer is approximately 50 μm. The residual austenite inside the weld joint undergoes phase transformation to martensite, and cellular and tangled dislocations form between the grains.
2) Due to the Gaussian distribution of laser energy, as the laser power density increases, the plastic deformation on the surface of the stainless steel welded joints intensifies, leading to an increase in surface roughness. At a laser power density of 5.17 GW/cm2, the surface roughness of the stainless steel welded joint rises to 1.919 μm, which is a 117.08% increase compared to the non-peened specimen.
3) The surface microhardness of the 17-7PH stainless steel welded joints is 378.64 HV0.5, significantly higher than the base material microhardness of 241.8 HV0.5. The surface microhardness increases positively with laser power density. At a power density of 5.17 GW/cm2, the surface microhardness of the stainless steel welded joint reaches 462.94 HV0.5, which is a 22.26% increase compared to the non-peened specimen.
4) Laser shock peening significantly improves the performance of critical components such as aircraft landing gear, reducing maintenance costs while enhancing overall aircraft safety. However, current laser shock peening has stringent geometric requirements for the parts, which can lead to uneven strengthening effects.
Data availability statement
The original contributions presented in the study are included in the article/Supplementary Material, further inquiries can be directed to the corresponding authors.
Author contributions
KL: Conceptualization, Investigation, Methodology, Validation, Writing–original draft, Writing–review and editing. WY: Funding acquisition, Validation, Writing–review and editing. YL: Resources, Visualization, Writing–review and editing. HB: Conceptualization, Writing–review and editing. YC: Formal Analysis, Supervision, Validation, Writing–review and editing. YW: Project administration, Writing–review and editing.
Funding
The author(s) declare that financial support was received for the research, authorship, and/or publication of this article. This research was funded by Innovation Fund of National Commercial Aircraft Manufacturing Engineering Technology Research Center (COMAC-SFGS-2022-1972), National Key Research and Development Project of China (No. 2019YFB2005300), Nantong Municipal People’s Livelihood Project (MS22022040). The authors gratefully acknowledge the financial support provided by Comac Shanghai Aircraft Manufacturing Co., Ltd. The funder was not involved in the study design, collection, analysis, interpretation of data, the writing of this article, or the decision to submit it for publication.
Conflict of interest
Authors WY and YL were employed by Comac Shanghai Aircraft Manufacturing Co., Ltd.
The remaining authors declare that the research was conducted in the absence of any commercial or financial relationships that could be construed as a potential conflict of interest.
Publisher’s note
All claims expressed in this article are solely those of the authors and do not necessarily represent those of their affiliated organizations, or those of the publisher, the editors and the reviewers. Any product that may be evaluated in this article, or claim that may be made by its manufacturer, is not guaranteed or endorsed by the publisher.
Supplementary material
The Supplementary Material for this article can be found online at: https://www.frontiersin.org/articles/10.3389/fmats.2024.1484698/full#supplementary-material
References
Chen, Z., Zhou, H., Zhu, Z., Xu, C., and Zhou, Y. (2023). Laser cladding remanufacturing of aircraft landing gear based on 30CrMnSiNi2A steel. Optik 283, 170902. doi:10.1016/j.ijleo.2023.170902
Cui, P., Xing, G., Nong, Z., Chen, L., Lai, Z., Liu, Y., et al. (2022). Recent advances on composition-microstructure-properties relationships of precipitation hardening stainless steel. Materials 15, 8443. doi:10.3390/ma15238443
Dai, F. Z., Geng, J., Tan, W. S., Ren, X. D., Liu, J. Z., and Huang, S. (2018). Friction and wear on laser textured Ti6Al4V surface subjected to laser shock peening with contacting foil. Opt. Laser Technol. 103, 142–150. doi:10.1016/j.optlastec.2017.12.044
Daymond, B. T., Binot, N., Schmidt, M. L., Preston, S., Collins, R., and Shepherd, A. (2016). Development of custom 465A® corrosion-resisting steel for landing gear applications. J. Mater. Eng. Perform. 25, 1539–1553. doi:10.1007/s11665-015-1830-5
Dhakal, B., and Swaroop, S. (2018). Review: laser shock peening as post welding treatment technique. J. Manuf. Process. 32, 721–733. doi:10.1016/j.jmapro.2018.04.006
Duan, H., Luo, K., and Lu, J. (2018). Friction and wear properties of H62 brass subjected to laser shock peening. Guangxue Xuebao/Acta Opt. Sin. 38, 1014002. doi:10.3788/AOS201838.1014002
Durst, O., Ellermeier, J., and Berger, C. (2008). Influence of plasma-nitriding and surface roughness on the wear and corrosion resistance of thin films (PVD/PECVD). Surf. Coat. Technol. 203, 848–854. doi:10.1016/j.surfcoat.2008.05.022
Fabbro, R., Fournier, J., Ballard, P., Devaux, D., and Virmont, J. (1990). Physical study of laser-produced plasma in confined geometry. J. Appl. Phys. 68, 775–784. doi:10.1063/1.346783
Jiang, T.-H., and Yang, Z.-G. (2024). Failure analysis on abnormal cracking of the main landing gear door of a civil aircraft. Eng. Fail. Anal. 160, 108233. doi:10.1016/j.engfailanal.2024.108233
Kugelmeier, C. L., Unti, L. F. K., Junior, E. L. S., Souza, N. M., Jardini, A. L., Avila, J. A., et al. (2024). Microstructure evolution and corrosion resistance evaluation of 17-4 precipitation hardening stainless steel processed by laser powder bed fusion. J. Mater. Eng. Perform. doi:10.1007/s11665-024-09769-w
Li, W., Jia, J., Li, Z., Cui, H., Lu, X., Min, J., et al. (2021). Research on the temperature measurement of C919 aircraft landing gear during heat treatment. High. Temp.-High Press. 50, 197–212. doi:10.32908/hthp.v50.1007
Li, X., He, W., Luo, S., Nie, X., Tian, L., Feng, X., et al. (2019). Simulation and experimental study on residual stress distribution in titanium alloy treated by laser shock peening with flat-top and Gaussian laser beams. Materials 12, 1343. doi:10.3390/ma12081343
Li, X., Zhang, Y., Lu, Y., Chen, J., and Zhou, J. (2014). Research of corrosion resistance for AZ31 magnesium alloy by laser shock processing. Zhongguo Jiguang/Chinese J. Lasers 41, 0403002. doi:10.3788/CJL201441.0403002
Li, Y., Fan, J., Wen, J., Nie, X., and Zhou, L. (2022). Study on the effects of multiple laser shock peening treatments on the electrochemical corrosion performance of welded 316L stainless steel joints. Metals 12, 1215. doi:10.3390/met12071215
Li, Y., Li, J., Dong, H., Zhang, W., and Jin, G. (2024). Simulation and experimental study of nanosecond pulse laser removal of epoxy paint on 6061 aluminum alloy surface. Photonics 11, 25. doi:10.3390/photonics11010025
Liu, H., Liu, J., Luo, C., and Liu, Z. (2016). Microstructure, crystallography of phase transformations and multiple precipitations in PH 15-7Mo stainless steel. J. Alloys Compd. 672, 386–392. doi:10.1016/j.jallcom.2016.02.172
Liu, W., Wang, Y., and Ji, Y. (2023). Landing impact load analysis and validation of a civil aircraft nose landing gear. Aerospace 10, 953. doi:10.3390/aerospace10110953
Lu, J., Luo, K., Feng, A., Zhong, J., Sun, G., Zhang, L., et al. (2010). Micro-structural enhancement mechanism of LY2 aluminum alloy by means of a single laser shock processing. Zhongguo Jiguang/Chinese J. Lasers 37, 2662–2666. doi:10.3788/CJL20103710.2662
Lu, Z., Lin, S., Liang, H., Xu, C., and Wei, S. (2023). Effects of thermal laser shock peening on stress corrosion susceptibility of 304 stainless steel. J. Mater. Eng. Perform. doi:10.1007/s11665-023-08878-2
Luong, H., and Hill, M. R. (2008). The effects of laser peening on high-cycle fatigue in 7085-T7651 aluminum alloy. Mater. Sci. Eng. a-struct. Mater. Prop. Microstruct. process. 477, 208–216. doi:10.1016/j.msea.2007.05.024
Ma, M., Ding, H., Huang, Y., Tian, C. W., and Langdon, T. G. (2020). Microstructural and hardness evolution in a duplex stainless steel processed by high-pressure torsion. Crystals 10, 1138. doi:10.3390/cryst10121138
Miura, T., Fujii, K., Fukuya, K., and Ito, Y. (2009). Characterization of deformation structure in ion-irradiated stainless steels. J. Nucl. Mater. 386–88, 210–213. doi:10.1016/j.jnucmat.2008.12.093
Peyre, P., Fabbro, R., Merrien, P., and Lieurade, H. P. (1996). Laser shock processing of aluminium alloys. Application to high cycle fatigue behaviour. Mater. Sci. Eng. A 210, 102–113. doi:10.1016/0921-5093(95)10084-9
Rubio-Gonzalez, C., Ruiz, A., Granados-Alejo, V., Banderas, J. A., and Vazquez-Becerra, C. (2020). Improvement of fatigue resistance and fracture toughness of thermally aged duplex stainless steel by laser shock peening. J. Mater. Eng. Perform. 29, 53–65. doi:10.1007/s11665-019-04518-w
Sanchez, A. G., Leering, M., Glaser, D., Furfari, D., Fitzpatrick, M. E., Wharton, J. A., et al. (2021). Effects of ablative and non-ablative laser shock peening on AA7075-T651 corrosion and fatigue performance. Mater. Sci. Technol. 37, 1015–1034. doi:10.1080/02670836.2021.1972272
Shu, S., Cheng, Z., Wang, L., Zhan, X., Lyu, F., and Dou, Z. (2022). Relationship between stress state and microstructure of 7B04 aluminum alloy surface fatigue properties by laser shock peening improvement. Coatings 12, 1556. doi:10.3390/coatings12101556
Song, Y., Yan, P., Zhao, W., Guo, Z., Gu, H., Gao, S., et al. (2024). Effect of laser shock peening on cylinder-on-flat torsional fretting wear resistance performance of titanium alloy. Tribol. Int. 198, 109919. doi:10.1016/j.triboint.2024.109919
Sundar, R., Ganesh, P., Kumar, B. S., Gupta, R. K., Nagpure, D. C., Kaul, R., et al. (2016). Mitigation of stress corrosion cracking susceptibility of machined 304L stainless steel through laser peening. J. Mater. Eng. Perform. 25, 3710–3724. doi:10.1007/s11665-016-2220-3
Tsuyama, M. (2016). Effects of laser peening parameters on plastic deformation in stainless steel. JLMN 11, 227–231. doi:10.2961/jlmn.2016.02.0013
Xiao, Z., Zeng, K., He, X., and Zhang, L. (2019). Fatigue strength and failure analysis of weld-bonded joint of stainless steel. J. Adhes. 95, 187–203. doi:10.1080/00218464.2017.1414605
Xiong, Y., Luan, Z., Ma, Y., Li, Y., and Zha, X. (2024). Effect of surface nanocrystallization induced by supersonic fine particles bombardment on corrosion fatigue behavior of 300M steel. Acta Metall. Sin. 60, 627–638. doi:10.11900/0412.1961.2022.00295
Xu, X. L., and Yu, Z. W. (2008). Metallurgical analysis on a bending failed pump-shaft made of 17-7PH precipitation-hardening stainless steel. J. Mater. Process. Technol. 198, 254–259. doi:10.1016/j.jmatprotec.2007.06.085
Yasnii, P. V., Marushchak, P. O., Nikiforov, Y. M., Hlad’o, V. B., and Kovalyuk, B. P. (2010). Influence of laser shock-wave treatment on the impact toughness of heat-resistant steels. Mater. Sci. 46, 425–429. doi:10.1007/s11003-010-9308-y
Ye, C., Suslov, S., Lin, D., and Cheng, G. J. (2012). Deformation-induced martensite and nanotwins by cryogenic laser shock peening of AISI 304 stainless steel and the effects on mechanical properties. Philos. Mag. 92, 1369–1389. doi:10.1080/14786435.2011.645899
Yoo, Y.-R., Choi, S.-H., and Kim, Y.-S. (2023). Effect of laser shock peening on the stress corrosion cracking of 304L stainless steel. Metals 13, 516. doi:10.3390/met13030516
Zhang, J., Cheng, X., Xia, Q., and Yan, C. (2020). Strengthening effect of laser shock peening on 7075-T6 aviation aluminum alloy. Adv. Mech. Eng. 12, 1687814020952177. doi:10.1177/1687814020952177
Zhou, L., Zhao, T., Yu, Y., Liu, P., and Pan, X. (2022). Effect of laser shock peening on high-cycle fatigue performance of 1Cr18Ni9Ti/GH1140 weld. Metals 12, 1495. doi:10.3390/met12091495
Zhu, R., Zhang, Y., and Zhang, C. (2020). Surface residual stress, micro-hardness and geometry of TC6 titanium alloy thin-wall parts processed by multiple oblique laser shock peening. Mater. Res. Express 7, 106526. doi:10.1088/2053-1591/abc2fc
Keywords: laser shock peening, welded joints, surface integrity, microstructure, stainless steel
Citation: Li K, Yu W, Li Y, Bao H, Cao Y and Wang Y (2024) Study on the effects of laser shock peening on the microstructure and properties of 17-7PH stainless steel. Front. Mater. 11:1484698. doi: 10.3389/fmats.2024.1484698
Received: 22 August 2024; Accepted: 04 October 2024;
Published: 21 October 2024.
Edited by:
Xuewei Fang, Xi’an Jiaotong University, ChinaReviewed by:
Armin Asghari Alamdari, Koç University, TürkiyePavlo Maruschak, Ternopil Ivan Pului National Technical University, Ukraine
Copyright © 2024 Li, Yu, Li, Bao, Cao and Wang. This is an open-access article distributed under the terms of the Creative Commons Attribution License (CC BY). The use, distribution or reproduction in other forums is permitted, provided the original author(s) and the copyright owner(s) are credited and that the original publication in this journal is cited, in accordance with accepted academic practice. No use, distribution or reproduction is permitted which does not comply with these terms.
*Correspondence: Yupeng Cao, Y3lwMTk4MTIwMDRAbnR1LmVkdS5jbg==; Yaping Li, bGl5YXBpbmdAY29tYWMuY2M=
 Kangwen Li
 Weichen Yu2
