- School of Mechanical and Electrical Engineering, Shandong Vocational College of Industry, Zibo, China
Introduction: In the actual engineering operation, there are some components facing high frequency friction, which have high damage rate and poor direct replacement benefit. In order to achieve sustainable resource utilization and more effective component remanufacturing, research was conducted on the cladding layer of friction components.
Methods: Based on the idea of remanufacturing, taking 42CrMo as the raw material of engine piston pin hole, laser cladding technology and ultrasonic rolling technology are used to prepare the cladding layers of Fe, Ni and Co three different substrates.
Results and Discussion: The experimental results showed that the Co based cladding layer with ultrasonic rolling technology performed best. The surface roughness reduced by 1.02 μm, only 0.14 μm. The microhardness increased by 101.39%, with 795.38 HV. The friction coefficient was 0.051. The friction rate at high temperature decreased by 85.71%, and it was 1.2%. The friction at high temperature was reduced by 79.24%, with 0.9%.
Conclusion: Co based cladding layer combined with ultrasonic rolling technology shows the best performance, which can effectively realize the remanufacturing of engine piston pin hole, providing technical reference and data support for the remanufacturing process of high-frequency friction components.
1 Introduction
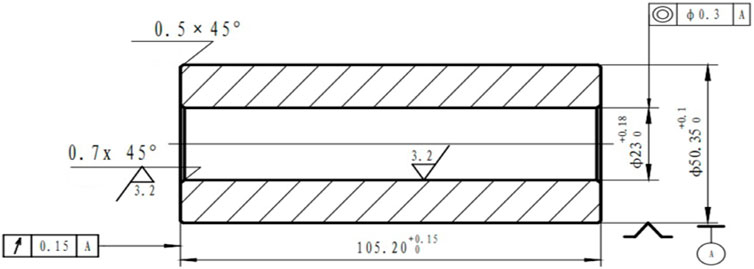
In the actual mechanical engineering, there are often some components that face long-term friction, even high temperature combined with high frequency friction (Zhou et al., 2021). The operating environment of these components is harsh. They are prone to surface damage or even further structural damage, resulting in component damage, equipment shutdown or even scrapping (Wang et al., 2020). The usual solution is to remanufacture these components with high vulnerability rate, but the remanufacturing process is long, and the cost is high. It is not in line with the sustainable development (Liu et al., 2021). For the gasoline engine, the piston pin hole is a typical high-temperature friction component, which is faced with high load, high temperature, high pressure and high frequency friction environment, so that its service life is seriously shortened, easy to occur abnormal damage and wear (Milojević et al., 2022). Figure 1 shows the schematic diagram of the piston pin hole, which is drawn by the author.
If they are simply and roughly treated by scrapping and replacing, they will not only face huge economic costs and replacement cycles, but also cause a great waste of resources. Remanufacturing technology is a technology to extend the service life and value of products by repairing, improving and remanufacturing. Damaged products or parts are treated and improved through a series of process flows, so that they can regain the function and performance of the original product (Wu et al., 2023). Therefore, based on the basic idea of remanufacturing technology, laser cladding (LC) is used to repair the surface of friction components. The ultrasonic rolling technology is used to further improve the surface properties of materials, so as to realize the remanufacturing and utilization of high-frequency friction components. The innovation of the research is that the remanufacturing process of the high-frequency friction component surface is studied. The ultrasonic rolling technology is used to enhance the surface. The study is divided into four parts. The first part is a summary for the research related fields, namely, laser cladding technology and remanufacturing. The second part is the introduction of preparation methods and analysis methods. The third part is the analysis of the research results. The fourth part is the summary and prospect of the research. The main contribution of this study is the development of a remanufacturing process that combines laser cladding technology with ultrasonic rolling technology for repairing friction parts affected by high frequency friction. Compared with the prior art, the process not only reconstructs the surface of the part, but also significantly improves the surface properties of the material through ultrasonic rolling, and enhances the wear resistance and damage resistance. This study is different in its focus on components in high frequency friction environments, as well as its innovative application of laser cladding combined with ultrasonic rolling in remanufacturing processes. The reason for the research is that the existing method of remanufacturing has high cost and long cycle, which is not conducive to sustainable development, but through remanufacturing technology, the cost can be significantly reduced, the waste of resources can be reduced, and it is in line with the concept of environmental protection.
2 Related works
Laser cladding technology is an advanced surface repair and coating technology, which uses the laser beam to melt the powder material and fuse with the substrate to form a dense metal alloy coating. This technology is mainly used to repair and strengthen the surface of metal components to improve their mechanical properties, wear resistance and corrosion resistance. Zhu et al. successfully prepared Co based composite coatings with different proportions on Cr-Zr-Cu alloy by laser cladding technology. The test showed that the coating had better hardness performance, effectively improving the wear resistance and corrosion resistance of the substrate (Zhu et al., 2022). Kai and Zhi successfully prepared Ni based reinforced coating based on Q235 steel by laser cladding technology. The morphology, composition, hardness and wear resistance of the composite coating were tested. The test results showed that the coating enhanced the hardness of steel. The microstructure of the cladding layer was strengthened. The coating had good wear resistance, which could effectively strengthen the strength of components made of Q235 steel and prolong the service life (Kai and Zhi, 2020). For the damaged carbon steel components, Chen et al. prepared TiC-TiB2 composite coating by laser cladding technology. The morphology, composition and mechanical properties of the samples were tested. The test results showed that the composite coating could effectively fill the milling groove on the surface of the component. It had good bonding with the substrate. The hardness of TiC-TiB2 was strengthened and the wear resistance of the material was greatly improved. TiC-TiB2 was a good remanufacturing material for damaged parts (Chen et al., 2022). Deng et al. improved the original porous bioactive ceramic coating in the artificial joint implants. The porous ceramic coating with bioactivity was successfully prepared by adding hydroxyl multi walled carbon nanotubes into it by laser cladding technology. The coating effectively improved the bioactivity of the original matrix, effectively realized the bone integration between the artificial joint implant and the original bone, and promoted the development of the biomedicine and materials science (Deng et al., 2022). Liu et al. successfully prepared the composite reinforced coating for Ti811 titanium alloy components by laser cladding process. In the test of the coating, the composite coating formed a good metal bond with the substrate. Due to the different cooling rate, it showed different structural characteristics, which effectively improved the nano hardness (Liu et al., 2022). Hao et al. applied high-speed laser cladding technology to coat the surface of H13 hot work mold with IN 718, and then applied ultrasonic surface rolling treatment (USRP). The experimental results showed that USRP caused severe plastic deformation of the coating, significantly refined the surface microstructure and particle size, and thus increased the dislocation density and grain boundary density. Enhance the yield strength and high temperature wear resistance of the coating (Hao et al., 2023). Aiming at the surface roughness problem after laser cladding, Shen et al. proposed three surface strengthening processes: normal temperature ultrasonic rolling (URB), warm thermal ultrasonic rolling (UWB) and warm thermal ultrasonic rolling continuous heat treatment (UWB/HT). The experimental results show that UWB/HT has the best performance in improving the surface finish, adhesion behavior and corrosion resistance of laser cladding (Shen et al., 2021). Stojanovic et al. aiming at the friction problem of timing belt drive, proposed the friction characteristics analysis of belt teeth and belt wheel teeth, and proved that rolling and wear would lead to the increase of belt tooth spacing, which would lead to a sharp reduction in life and transmission failure (Stojanovic et al., 2009). In view of the limitations of laser cladding, Mohsan et al. proposed ultrasonic vibration assisted laser cladding (UVALC) technology. The experimental results show that UVALC optimizes the surface quality and grain distribution of the coating (Mohsan et al., 2023). Skulic and Bukvić proposed a kinematic-tribological analysis of piston mechanism based on the wear process of piston-cylinder group in internal combustion engine. Studies have shown that the wear of piston rings, especially the first ring, is the most significant, and is directly affected by pressure, temperature, fuel and combustion products (Skulić and Bukvić, 2016).
Remanufacturing technology is a technology to extend the service life and value of waste products, parts or materials by repairing, improving and remanufacturing. It mainly recycles waste components, evaluates and repairs them, and finally forms remanufactured products with original product functions and performance. Zhang et al. discussed the effects of different ZrC ratios on the reaction process and reaction products. The effects of different ratios on the efficiency of ZrC synthesis and remanufacturing were discussed. The experimental results showed that the C/Zr ratio had a great influence on the synthesis. The control of C/Zr ratio could effectively improve the product synthesis rate and the remanufacturing efficiency of ZrC (Zhang et al., 2021). Qi et al. prepared a new Fe based composite coating based on TiC and CeO2 for high value vulnerable parts of shield machine. The wear performance of the components was improved by adding nano tic and CeO2 with different contents. The test results showed that the strengthened coating could effectively repair the macro defects of the worn components, and effectively enhance the hardness and wear resistance of the components. It provided technical and data support for the preparation of modified Fe based coatings with good performance (Qi et al., 2022). Liu et al. used the laser cladding process to remanufacture and repair the damaged and failed machine tool shaft parts. The experimental results showed that the laser cladding treatment could effectively improve the hardness of the components. It had good friction coefficient and excellent corrosion resistance (Liu L. et al., 2022). The waste lead-acid batteries with serious pollution had poor performance in recycling and remanufacturing lead oxide. By adding nano lead sulfate carbon composites, the cycle life of high rate charging was effectively improved. The experimental results showed that the cycle reversibility of the battery was improved by increasing the active area of the lead carbon electrode. The research results provided technical support for the recovery and utilization of lead resources (Li et al., 2022). Ma et al. repaired and remanufactured the thermal fatigue crack of ductile iron brake disc by laser remelting. The test results showed that laser treatment could effectively restore the thermal fatigue resistance and tensile strength of the material. Compared with the untreated samples, the tensile properties of the samples were improved by 20% (Ma et al., 2020).
To sum up, the current remanufacturing field lacks the repair and utilization of high-frequency friction components. The laser cladding technology is extremely suitable for the remanufacturing and utilization of this component. Therefore, based on the basic idea of remanufacturing, the preparation method of LC cladding layer for friction parts is proposed. The ultrasonic rolling technology is further combined to enhance the surface properties of materials. It is expected to realize the remanufacturing and utilization of high-frequency friction components, improve the economy and environmental friendliness, and implement the basic idea of sustainable development.
3 Preparation and analysis method of friction layer in LC cladding technology
In general, high-frequency friction components also face high temperature and high pressure working environment. The harsh environment shortens the working life of components, resulting in abnormal damage or wear. To improve the recycling rate of damaged parts, LC technology is selected for remanufacturing. The ultrasonic rolling technology is further used to strengthen the surface, meeting the performance requirements of the components. The piston pin hole of the engine is used as a typical component example. The Fe, Ni and Co are used as cladding materials. The surface of the three cladding layers are characterized and analyzed. Then it is compared with the piston pin hole in practical application, so as to explore the optimal cladding material.
3.1 Preparation materials
In the actual engineering operation, generally, the material of the engine piston pin hole is 42CrMo. Therefore, this material is selected as the base material to simulate the piston pin hole. According to the actual engineering application, 42CrMo is processed by lathe. The cylinder is processed into several
3.2 Preparation process
3.2.1 Preparation of LC cladding layer
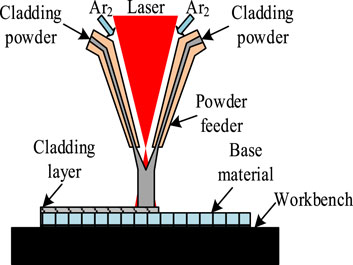
The preparation equipment of LC cladding layer is six axis robot laser cladding workstation (MobiMRO-S). The cost problem of laser cladding technology is mainly focused on the high equipment investment, significant operating costs, and material expenses. The equipment itself is expensive, and the energy consumption during operation is large, and the maintenance cost is not low. According to many practices, the optimal parameter setting of LC cladding is obtained, which is the product of independent research. The specific parameter settings are as follows. The power is 2000 W, the laser spot diameter is set to 3.2 mm, and the scanning speed of the equipment is set to 1500 mm/min. The delivery efficiency of the matrix powder is set to 29 g/min. The powder feeding method is set to synchronous powder feeding. Argon is selected as the protective gas for operation. The flow rate of protective gas is set to 5 L/min. To ensure the quality of the cladding coating, the synchronous powder feeding method is adopted to ensure that the cladding material powder can be melted before the process flow. Before cladding, the surface of the base material is polished to remove the oxide layer on the surface of the material and maximize the cladding efficiency. The cladding powder is dried to remove moisture. The schematic diagram of laser cladding process for synchronous powder delivery is shown in Figure 2, which is drawn by the author.
3.2.2 Ultrasonic rolling surface treatment
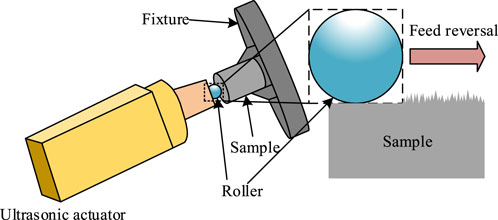
Ultrasonic rolling (UC) is an advanced processing method, which improves the quality and efficiency of rolling processing by using ultrasonic vibration (Liu et al., 2022). The cost of ultrasonic rolling technology is mainly concentrated on the price of the equipment, the equipment price is high, and the operation and maintenance cost is relatively low. This technology is usually used to process metal products, especially steel and aluminum materials. The potential is to improve material strength, reduce defects and prolong material life. The principle of ultrasonic rolling technology is to apply high-frequency vibration to metal materials during rolling, which can promote the rearrangement of material microstructure, so as to improve the fatigue life and strength. Compared with traditional rolling, ultrasonic rolling can further improve the surface quality of materials (Zhu et al., 2022). The ultrasonic rolling surface processing equipment (USP-300) is used for processing. According to the practice, obtain the best UC machining technology operating parameter settings. The setting parameters of ultrasonic rolling processing are follows. The ultrasonic frequency is set to 20 kHz, and the amplitude is set to 7 μm. The feed rate is set to 10 mm/min, the force is set to 320N, and the speed is set to 160 rpm. As shown in Figure 3, it is the schematic diagram of the principle of ultrasonic rolling processing, which is a self-drawn schematic diagram. To further compare the effect of ultrasonic rolling treatment on the samples, Basic represents the basic 42CrMo sample, Fe-No represents the sample with Fe based powder and only LC cladding. Fe-UC represents the sample with ultrasonic rolling treatment. Similarily, Ni-No, Ni-UC, CO-No and Co-UC represent the samples treated by the corresponding technology.
3.3 Analysis method
3.3.1 Surface topography analysis
The surface morphology has an important influence on the friction and wear performance of high frequency friction components. By analyzing the surface morphology, the concavity and the micro characteristics of the surface are learned. This is helpful to judge the friction coefficient, wear mechanism and possible wear of components, so as to predict and improve the life and reliability of components. The surface morphology of the samples is tested by scanning electron microscope (SEM). According to the actual situation, the model of scanning electron microscope is FE-SEM-Sigma360.
3.3.2 Roughness analysis
Roughness refers to the roughness of the material surface, which is usually used to describe the surface quality. It is of great significance to analyze the surface roughness of high frequency friction components. Through the analysis of roughness, the flatness and microscopic characteristics of the surface are learned, so as to judge the wear resistance and friction resistance of the material. This is very important for predicting and improving the life and reliability of components. Rough surfaces may cause high friction coefficient and energy loss, reduce the efficiency of components, and may cause overheating and damage. By analyzing the surface roughness, it can be determined whether surface treatment measures need to be taken to improve the lubrication performance. The white light interferometer was used to test the roughness of the sample. According to the actual situation, the model of the white light interferometer was Atometrics-EX230.
3.3.3 Residual stress analysis
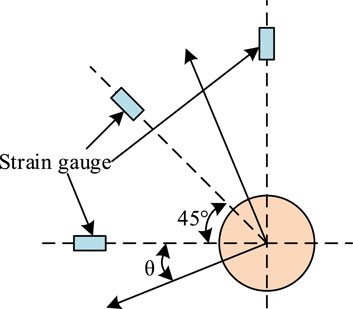
Residual stress refers to the internal stress formed in the material manufacturing. The compression or tensile deformation caused by it exceeds the elastic recovery ability of the material itself. The residual stress may cause irreversible bending or deformation of components (Ming et al., 2023). This may lead to the instability of the component size, and even cause the coordination between components, affecting the joint condition and connection quality of components. The blind hole method is used to analyze the residual stress of the sample. The model of residual stress tester used is HK21b. In the test of blind hole method, the sample is cleaned and dried first. Then the strain gauge and the sample are fixed with a unified adhesive. The connecting wire of the tester and the strain gauge are welded. Then the preset hole of the strain gauge is drilled. At this moment, the residual stress on the sample surface is released slowly and input into the residual stress detector. Figure 4 shows the schematic diagram of the residual stress test by the blind hole method, which is self-drawn by the author.
3.3.4 XRD analysis
XRD analysis can determine the phase composition of high frequency friction components. The composition of the coating layer on the sample surface can be effectively analyzed by analyzing the XRD spectrum of the material. Before XRD analysis, the sample is ultrasonically cleaned with anhydrous ethanol water bath to remove impurities on the sample surface, and then dried for standby. The model of X-ray diffractometer is Bruker, Jordan Valley, Delta-X. According to the actual situation and practical experience, the best XRD test parameters are obtained. The XRD test parameters are set as follows. The diffraction angle is
3.3.5 Microhardness analysis
Microhardness test is a method for measuring the hardness of materials, which can be used to evaluate the compressive properties and wear resistance of materials (Cai et al., 2023). In microhardness testing, the commonly used method is to use microhardness tester (such as Vickers or Knoop) to measure the micro indentation of materials. The instrument model used in the study is Caikon, HV-10. Microhardness testing is more stringent for the surface roughness of samples. Therefore, to ensure the test accuracy, the sample surface is polished with sandpaper before hardness test. According to the actual situation and practical experience, the best microhardness test parameter setting was obtained. The microhardness test parameters are set as follows. The pressure is 500 gf, the ballast time is 10 s, and the test interval is 50 μm.
3.3.6 Mechanical properties
Because the research object is high-frequency friction components, the mechanical properties need to be tested to ensure that the remanufactured components meet the actual engineering requirements (Cao et al., 2022). Based on the actual engineering requirements, the mechanical properties of the samples are tested, including the load-displacement curve. The test instrument is a nano indentation instrument, and the instrument model is FT-MNT03. Berkovich indenter is used for testing. According to the actual situation and experience, obtain the best mechanical property test setting parameters. The test parameters are as follows. The maximum load is 30 mN, the ballast time is 10 s, and the unloading rate after ballast is set to 15 mN/min.
3.3.7 Friction performance analysis
To simulate the working environment of engine piston pin hole, the high temperature friction performance of the sample is analyzed. Before the experiment, to fit the tester, the sample is processed into a uniform shape sample. The oxide layer on the sample surface is removed with sandpaper. Then ultrasonic cleaning is carried out with anhydrous acetone for 10 min. The high temperature friction tester is used to simulate the high temperature and high frequency friction environment of the sample. The model of the high temperature friction tester is Anton Paar-THT. Based on the actual situation and experience, obtain the best setting parameters of high temperature friction test. The high temperature friction test parameters are set as follows. The temperature is 200°C. The friction mode is reciprocating type, the friction distance is 5 mm, the friction ballast force is 150N, the time is 30 min, the frequency is 5 Hz, and the test data reading time interval is 1 s. The friction raw material is Si3N4 sphere with a diameter of 6 mm. In the experiment, to more conform to the actual operating conditions of the engine, the engine oil labeled CH4/15w-40 is added for lubrication treatment.
4 Test results analysis of LC cladding layer for friction parts
4.1 Surface morphology analysis of LC cladding layer for friction parts
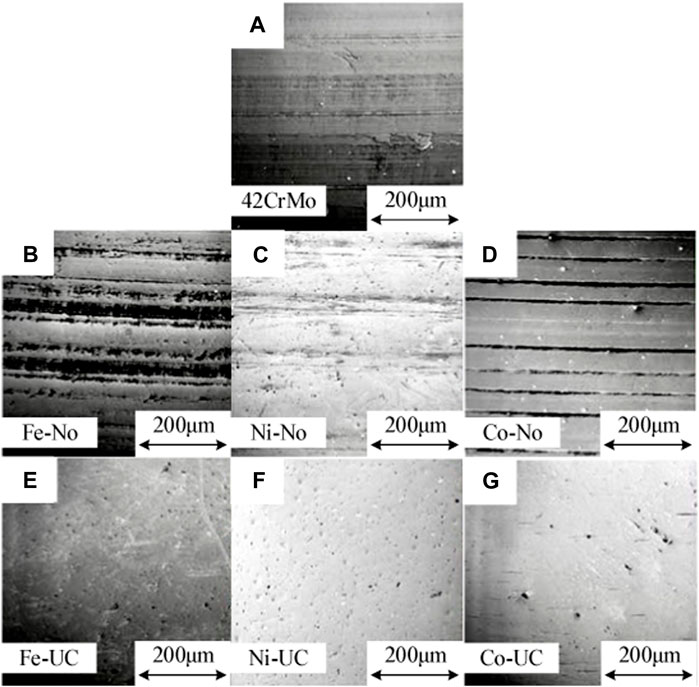
Figure 5 showed the surface morphology of the samples treated by different processes, the figure is obtained from the actual electron microscope and is an independent research result. In Figures 5A–D, the sample surface without ultrasonic rolling technology had very obvious cutting marks. In Figures 5E–G, the ultrasonic rolling technology effectively flattened the surface morphology of the sample, which had a more smooth surface morphology. Through ultrasonic rolling technology, the surface performance of the sample was effectively enhanced. The surface defects of the sample were reduced.
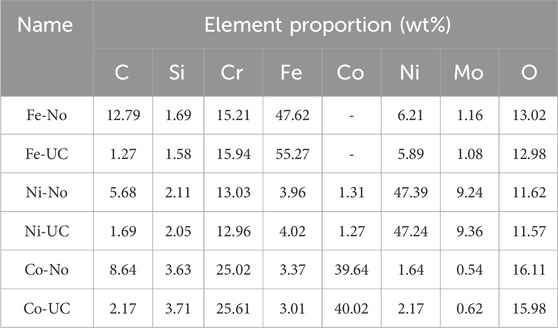
Table 2 showed the proportion of main elements in the cladding layer 1 of the processed sample. Combined with Figure 5, from Table 2, the most obvious element was element C. Table 2 shows the actual test results and independent research results. The ultrasonic rolling technology effectively removed part of the carbon element in the cladding layer of the sample. The porosity of the sample surface was reduced. The physical properties of the sample surface were enhanced.
4.2 Roughness analysis of LC cladding layer for friction parts
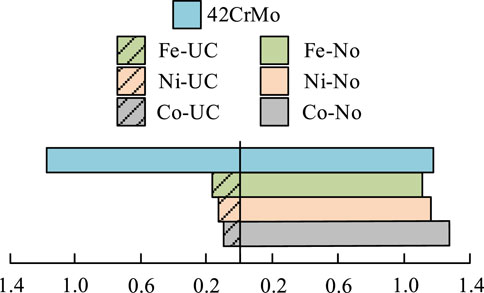
Figure 6 showed the surface roughness of samples treated by different processes, the figure is the result of the actual roughness test and is the result of independent research. From Figure 6, the roughness of 42CrMo was 1.20 μm. The surface roughness of Fe-No, Ni-No and Co-No is 1.11, 1.18, and 1.19 μm respectively. The surface roughness of Fe-UC, Ni-UC and Co-UC with ultrasonic rolling technology was 0.16, 0.15, and 0.14 μm, respectively. UC technology could effectively reduce the surface roughness of about 81.27%–89.56%. It effectively flattened the surface of the sample, eliminated surface defects, and enhanced the surface strength.
4.3 Residual stress analysis of LC cladding layer for friction components
In the residual stress test results of the sample surface treated by different processes were shown in Figure 7, the figure is the result of the actual residual stress test and is the result of independent research. From Figure 7, there were certain residual stresses on the surfaces of all samples. 42CrMo, Fe-No, Ni-No and Co-No were mainly residual tensile stresses, with values of 403.62, 568.15, 574.26, and 118 MPa, respectively.
4.4 XRD analysis of LC cladding layer for friction components
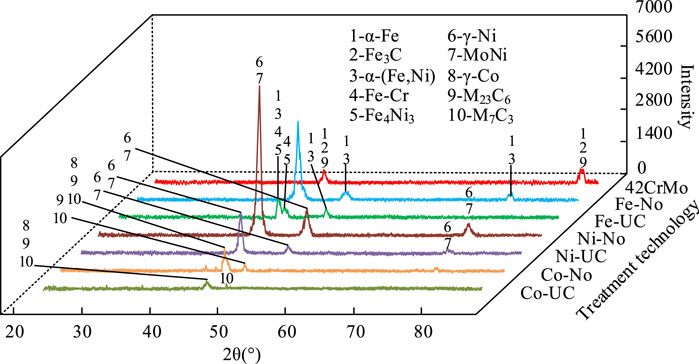
Figure 8 showed the XRD images of samples under different processing technologies, this figure is the result of actual XRD test and is the result of independent research. From Figure 8, different processing technologies had no significant impact on the phase of the cladding layer.
4.5 Microhardness analysis of LC cladding layer for friction components
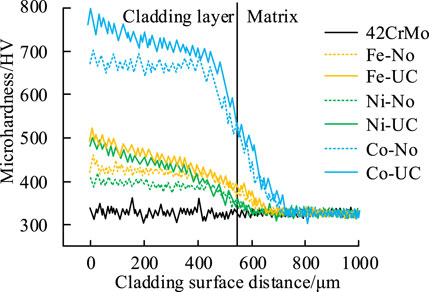
Figure 9 showed the microhardness distribution curves of samples treated by different processes at different depths. This figure is an actual microhardness test result and is the result of independent research. From Figure 9, in general, the microhardness of Co cladding layer was the best, and the surface microhardness reached 795.38 HV. The second was Fe, and the microhardness reached 493.27 HV. Finally, the microhardness of Ni reached 452.61 HV. Among them, the microhardness performance of the samples with ultrasonic rolling technology was obviously better than that of the samples without this technology. With the increase of testing depth, the microhardness of the sample near the substrate showed a rapid decline trend.
4.6 Load-displacement curve analysis of LC cladding layer for friction components
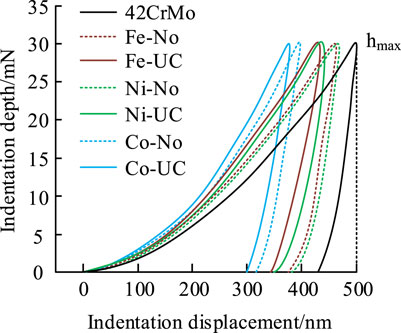
Figure 10 showed the load displacement curves of samples under different processing technologies. hmax represents the maximum deformation of the material. This figure is the result of actual load-displacement test and is the result of independent research. From Figure 10, the ultrasonic rolling technology effectively reduced the indentation displacement distance of the material, improving the strength performance of the material. Among them, the Co based cladding layer had the best indentation displacement performance. The displacement performance was the smallest. The second was Fe based cladding layer, and the last is Ni based cladding layer.
4.7 Friction coefficient analysis of LC cladding layer for friction components
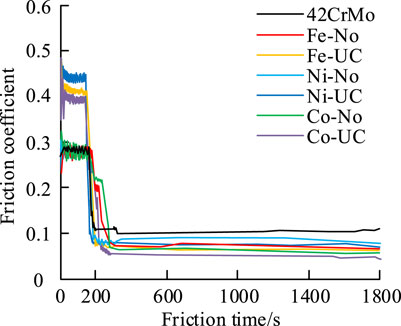
Figure 11 showed the friction coefficient of samples under different processing technologies. The figure is the result of the actual friction coefficient test and is the result of independent research. From Figure 11, the ultrasonic rolling technology effectively reduced the friction coefficient of all samples. The best performance was Co-UC. The final friction coefficient was 0.051. Compared with 42CrMo, Fe-UC and Ni-UC, it was decreased by 0.052, 0.037 and 0.024 respectively.
4.8 High temperature friction performance analysis of LC cladding layer for friction components
Figure 12 showed the high temperature wear depth and high temperature wear rate test of samples under different processing technologies. This figure is the result of actual high temperature friction performance test and is the result of independent research. From Figure 12A, the wear depth of all cladding layers was reduced compared with 42CrMo. The wear depth of the samples treated by ultrasonic rolling technology further reduced. From Figure 12B, the Co-UC sample had the best wear performance. It showed the best high temperature friction performance. The wear depth was the lowest, the wear rate and wear amount were the best, and the hardness performance was the best. In conclusion, Co-UC samples had the best hardness performance. Co combined with ultrasonic rolling technology could effectively improve the surface strength, durability and friction properties of the material.
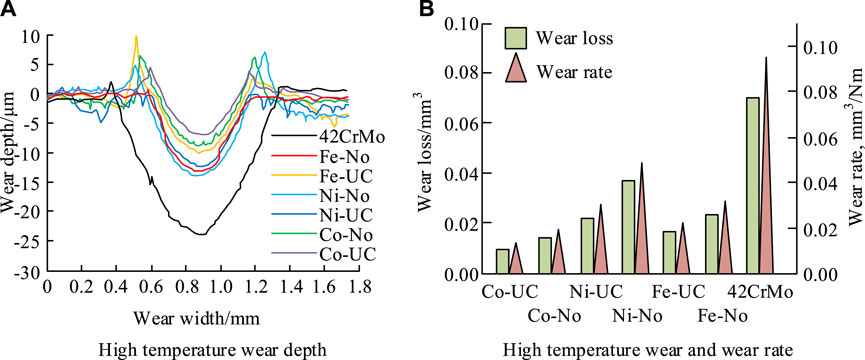
FIGURE 12. High temperature friction performance of LC friction coating samples treated with different processes.
As shown in Table 3, the comprehensive performance test details of the material are compared. It can be seen that the preparation method proposed in this study can effectively enhance the comprehensive performance of the material.
5 Discussion
Ultrasonic rolling technology significantly enhances the surface quality of cladded layers. Typically, the cladding process leads to a rough and uneven surface due to droplet deposition and solidification. However, with ultrasonic rolling, the surface roughness decreases markedly, resulting in a smoother and more refined micro-topography. This technology utilizes high-frequency mechanical vibrations and pressure, causing plastic deformation on the microscopic level, which corrects the original surface irregularities and diminishes defects. Furthermore, it may facilitate the release of carbon elements from the surface, potentially reducing internal stress and improving the material’s physical properties. The effectiveness of ultrasonic rolling is evident in the improved surface smoothness of various samples, such as 42CrMo, Fe-UC, Ni-UC, and Co-UC, with the latter three experiencing substantial surface roughness reductions. This underscores ultrasonic rolling’s capability in mitigating microscopic surface defects and enhancing the material’s finish. Residual stress tests reveal distinct differences in stress levels, with Co-NO exhibiting the least residual tensile stress due to its tight crystal structure, which helps minimize pore-related defects. Contrastingly, Fe-UC, Ni-UC, and Co-UC samples primarily exhibit residual compressive stresses at −317.26, −402.29, and −361.37 MPa, respectively. These stresses, induced by ultrasonic rolling, contribute to grain refinement and a reduction in tensile stress performance. Residual compressive stress is beneficial, as it improves surface strength, deters the propagation of micro-cracks, and augments material durability and wear resistance. X-ray diffraction (XRD) analysis indicates that ultrasonic rolling does not alter the cladding phase but reduces the diffraction peak intensity, suggesting surface lattice distortion and increased micro-strain. This outcome confirms that ultrasonic rolling induces plastic deformation and grain refinement without phase transformation, thus reinforcing the material’s surface strength. In terms of microhardness, Co cladding layers top the chart, followed by Fe and Ni, signifying resistance to deformation—a critical factor in engineering. Ultrasonic rolling treatment enhances microhardness beyond that of untreated samples, likely due to the cold work hardening effect introduced by the process. Load-displacement measurements show that ultrasonic rolling samples undergo less displacement under the same load, indicating increased hardness and compression resistance, with Co-based cladding layers performing exceptionally well. Friction tests demonstrate that ultrasonic rolling effectively reduces friction coefficients, with the most notable decrease seen in Co-UC samples. This reduction is crucial for minimizing wear, conserving energy, and prolonging component lifespan. Lastly, high-temperature wear tests show that ultrasonic rolling improves wear resistance under thermal friction conditions. Co-UC samples excel here, suggesting their potential for high-temperature applications in sectors like automotive, aerospace, and energy, where maintaining robust physical properties is essential.
6 Conclusion
Direct replacement of some vulnerable components has poor economic benefit and long time cycle. Therefore, it is of great significance to explore an efficient remanufacturing process. To improve the remanufacturing efficiency of engine piston pin hole and improve the economy of damaged parts, based on the material 42CrMo of engine piston pin hole, Fe, Ni and CO are selected to prepare LC cladding layer on the surface. UC technology is used to strengthen the surface. Then the mechanical properties are discussed. The experimental results showed that the Co based cladding layer with ultrasonic rolling technology had the best performance. The surface morphology was smooth. The roughness was excellent, only 0.14 μm. The surface residual stress was compressive stress, which was −361.37 MPa. The microhardness was 795.38 HV. Compared with the Fe based and Ni based cladding layers, it increased 302.11 HV and 342.77 HV. The friction coefficient was 0.051. It showed good high temperature friction performance. Compared with 42CrMo, the high temperature wear rate and wear loss were reduced by 85.71% and 79.24%, respectively. It can be observed that there has been a significant decrease in surface roughness, microhardness, and friction coefficient, and the experimental results are consistent with expectations. Therefore, the Co based cladding layer combined with ultrasonic rolling technology can effectively improve the surface strength and durability of the piston pin hole. It can provide data and technical support for the remanufacturing process of friction components. However, the cost of the ultrasonic rolling technology used in the study needs to be optimized, and the cost of the materials used needs to be further optimized if they are put into mass production. In the future research, the cost and benefits of related technologies should be further optimized for this problem, and the application possibilities of more coating materials should be explored.
In summary, the Co based cladding layer prepared by the research combined with ultrasonic rolling technology shows the best mechanical properties. The microhardness is 795.38 HV. In terms of high temperature friction properties, the Co-based cladding layer reduces the high temperature wear rate and wear amount of piston pin holes by 85.71% and 79.24%, respectively, showing a significant durability improvement.
Data availability statement
The original contributions presented in the study are included in the article/Supplementary Material, further inquiries can be directed to the corresponding author.
Author contributions
LJ: Conceptualization, Data curation, Formal Analysis, Methodology, Writing–original draft, Writing–review and editing.
Funding
The author(s) declare that no financial support was received for the research, authorship, and/or publication of this article.
Conflict of interest
The author declares that the research was conducted in the absence of any commercial or financial relationships that could be construed as a potential conflict of interest.
Publisher’s note
All claims expressed in this article are solely those of the authors and do not necessarily represent those of their affiliated organizations, or those of the publisher, the editors and the reviewers. Any product that may be evaluated in this article, or claim that may be made by its manufacturer, is not guaranteed or endorsed by the publisher.
References
Cai, W., Zhang, Y., and Liu, J. (2023). Research on new technology of laser forging coupled arc welding of E690 marine steel. Rapid Prototyp. J. 29 (7), 1523–1535. doi:10.1108/rpj-10-2022-0345
Cao, M., Jiang, F., Guo, C., Li, Y., Yu, T., and Qin, R. (2022). Interface characterization and mechanical property of an aluminum matrix syntactic foam with multi-shelled hollow sphere structure. Ceram. Int. 48 (13), 18821–18833. doi:10.1016/j.ceramint.2022.03.159
Chen, L., Yu, T., Guan, C., and Zhao, Y. (2022). Microstructure and properties of metal parts remanufactured by laser cladding TiC and TiB2 reinforced Fe-based coatings. Ceram. Int. 48 (10), 14127–14140. doi:10.1016/j.ceramint.2022.01.299
Deng, Z., Liu, D., Xiong, Y., Zhu, X., Li, S., Liu, J., et al. (2022). Preparation of a hydroxyapatite–silver gradient bioactive ceramic coating with porous structure by laser cladding: a study of in vitro bioactivity. Ceram. Int. 48 (20), 30468–30481. doi:10.1016/j.ceramint.2022.06.327
Hao, J., Niu, Q., Ji, H., and Liu, H. (2023). Effect of ultrasonic rolling on the organization and properties of a high-speed laser cladding IN 718 superalloy coating. Crystals 13 (8), 1214. doi:10.3390/cryst13081214
Kai, F. D., and Zhi, Q. J. (2020). Microstructure evolution and properties of a laser cladded Ni-Based WC reinforced composite coating. Mater. Test. 62 (11), 1078–1084. doi:10.3139/120.111589
Li, J., Cao, J., Chen, Z., Yu, J., Zhang, J., Chen, B., et al. (2022). Improving the performance of recovered lead oxide powder from waste lead paste as active material for lead-acid battery. Int. J. Energy Res. 46 (10), 14268–14282. doi:10.1002/er.8140
Liu, K., Huo, Y., He, T., Huo, C., Jia, C., Duo, X., et al. (2021). High-temperature deformation behavior and hot-processing map of 25CrMo4 axle steel based on friction correction. Mater. Technol. 55 (6), 843–850. doi:10.17222/mit.2021.253
Liu, L., Xu, D. Y., Xiao, M. L., Shen, L. W., Bin, F. H., Zi, M. Y., et al. (2022b). Research on the friction and wear performance of remanufactured shaft parts of failed machine tools. Ferroelectrics 595 (1), 163–171. doi:10.1080/00150193.2022.2079467
Liu, Y., Wang, Q., Xie, J., Yang, X., Peng, P., Wang, Y., et al. (2022a). Enhanced surface composite coating on Ti811 alloy by laser cladding towards improved nano-hardness. Ceram. Int. 48 (13), 18773–18783. doi:10.1016/j.ceramint.2022.03.152
Liu, Y. X., Zhang, C. C., Wang, R. Z., Zhang, K. M., Wang, J., and Yao, S. L. (2022c). Quantitative evaluations of improved surface integrity in ultrasonic rolling process for selective laser melted in-situ TiB_2/Al composite. J. Manuf. Process. 77 (5), 415–425. doi:10.1016/j.jmaro.2022.03.026
Ma, S. Y., Zhou, T., Zhou, H., Pang, X. Y., Zhi, B. F., and Chang, G. (2020). Thermal fatigue crack resistance of ductile iron biomimetic crack blocked units fabricated by laser remelting. Lasers Eng. 46 (1/4), 225–244.
Milojević, S., Savić, S., Marić, D., Stopka, O., Krstić, B., and Stojanović, B. (2022). Correlation between emission and combustion characteristics with the compression ratio and fuel injection timing in tribologically optimized diesel engine. Teh. Vjesn. 29 (4), 1210–1219. doi:10.17559/TV-20211220232130
Ming, T., Peng, Q., Han, Y., and Zhang, T. (2023). Progress on microstructure and residual stress evolution and corrosion behavior in SP-LSP- and WJP-treated austenitic stainless steels. Anti-Corrosion Methods Mater. 70 (3), 122–128. doi:10.1108/acmm-11-2022-2728
Mohsan, A. U. H., Zhang, M., Wang, D., Zhao, S., Wang, Y., Chen, C., et al. (2023). State-of-the-art review on the ultrasonic vibration assisted laser cladding (UVALC). J. Manuf. Process. 107, 422–446. doi:10.1016/j.jmapro.2023.10.066
Qi, X., Li, Y., Li, F., Du, J., Li, C., Wang, K., et al. (2022). Improving the properties of remanufactured wear parts of shield tunneling machines by novel Fe-based composite coatings. Ceram. Int. 48 (2), 6722–6733. doi:10.1016/j.ceramint.2021.11.223
Shen, X., Su, H., Wang, J., Zhang, C., Wu, C., and Bai, X. (2021). New approach towards the machining process after laser cladding. Archives Civ. Mech. Eng. 21, 8–17. doi:10.1007/s43452-020-00153-8
Skulić, A., and Bukvić, M. (2016). Tribological properties of piston-cylinder set in internal combustion engines. Appl. Eng. Lett. 1 (1), 29–33.
Stojanovic, B., Miloradović, N., and Blagojevic, M. (2009). Analysis of tribological processes at timing belt's tooth flank. Tribol. industry 31, 53–58.
Wang, J., Zhang, B., Yu, Y., Zhang, Z., Wang, Z., Lou, X., et al. (2020). Study of high temperature friction and wear performance of (CoCrFeMnNi)85Ti15 high-entropy alloy coating prepared by plasma cladding. Surf. Coatings Technol. 384 (1), 125337–125348. doi:10.1016/j.surfcoat.2020.125337
Wu, Z., Zhao, Y., and Zhang, N. (2023). A literature survey of green and low-carbon economics using natural experiment approaches in top field journal. Green Low-Carbon Econ. 1 (1), 2–14. doi:10.47852/bonviewglce3202827
Zhang, M., Zhao, X., Wang, H., Yao, H., Ding, Y., and Fang, Y. (2021). Kinetic role of C/Zr ratio in the reaction process, combustion behavior, and synthetic product of 70wt.% (xC–Zr)–30wt.% Cu. Int. J. Appl. Ceram. Technol. 18 (6), 1969–1978. doi:10.1111/ijac.13872
Zhou, J., Xu, H., Zhu, C., Ai, W., and Liu, K. (2021). High-temperature friction characteristics of N-BK7 glass and their correlation with viscoelastic loss modulus. Ceram. Int. 47 (15), 21414–21424. doi:10.1016/j.ceramint.2021.04.151
Zhu, G., Yan, H., Li, Z., Zhang, P., Yu, Z., Lu, Q., et al. (2022a). Evaluation of wear and corrosion resistances of laser cladding TaC/TiC/Stellite X-40 Co-based composite coatings on copper surface. Mater. Technol. 37 (9/10), 980–991. doi:10.1080/10667857.2021.1913318
Keywords: friction, high temperature, remanufacturing, laser cladding, ultrasonic rolling
Citation: Jiang L (2024) Preparation and mechanical properties of LC cladding layer for friction parts. Front. Mech. Eng 10:1354970. doi: 10.3389/fmech.2024.1354970
Received: 13 December 2023; Accepted: 29 January 2024;
Published: 29 February 2024.
Edited by:
Alessandro Ruggiero, University of Salerno, ItalyReviewed by:
Aleksandar Ašonja, Business Academy University, SerbiaSaša Milojević, University of Kragujevac, Serbia
Copyright © 2024 Jiang. This is an open-access article distributed under the terms of the Creative Commons Attribution License (CC BY). The use, distribution or reproduction in other forums is permitted, provided the original author(s) and the copyright owner(s) are credited and that the original publication in this journal is cited, in accordance with accepted academic practice. No use, distribution or reproduction is permitted which does not comply with these terms.
*Correspondence: Lingbo Jiang, amlhbmdsYjIwMjFAMTYzLmNvbQ==
 Lingbo Jiang