- 1Department of Mechanical Engineering, Auckland University of Technology, Auckland, New Zealand
- 2School of Mechanical Engineering, Universiti Sains Malaysia, Nibong Tebal, Malaysia
This paper discusses the experimental procedure and results of an investigation into the sliding wear behavior of Co-Cr-Mo specimens produced by selective laser melting (SLM) process. The sliding wear tests were carried out with different normal loads, sliding frequencies, and temperatures. The results showed that the coefficient of friction decreased as the applied normal load increased due to the temperature effect. The wear rate increased significantly at higher loads due to increased surface stresses. Testing the specimens at elevated temperatures resulted in a decrease in COF due to thermal softening and the formation of an oxide layer on the surface. The wear rate increased for specimens tested at 200°C due to a decrease in hardness and strength, but the wear rate decreased at higher temperatures due to the protective effect of the oxide layer. The obtained results showed the SLM-printed Co-Cr-Mo alloy exhibited good mechanical properties and wear resistance, making it a promising material for tribological applications, especially at elevated temperatures.
1 Introduction
Co-Cr-Mo (Cobalt-Chromium-Molybdenum) alloy is a versatile and highly sought-after material that is used in a variety of industries, primarily due to its exceptional mechanical properties and corrosion resistance (Tonelli et al., 2020; Anuar et al., 2021). The biocompatibility of Co-Cr-Mo alloy is an important feature that makes it an excellent choice for medical applications (Kim et al., 2020). It has been extensively studied and found to be safe for use in orthopedic and dental implants, as well as other medical devices (Hassani et al., 2016; Liverani et al., 2016; Dong et al., 2020; Kim et al., 2020). The excellent corrosion resistance of Co-Cr-Mo alloy ensures that the implants will not corrode or degrade over time (Varano et al., 2006; Liverani et al., 2016), which can lead to complications and implant failure.
The high strength, ductility, and resistance to wear and corrosion of Co-Cr-Mo alloy also make it a preferred material in aerospace, automotive, and industrial applications. In aerospace, Co-Cr-Mo alloy is used to manufacture aircraft engine components, such as compressor blades, turbine blades, and exhaust valves (Varano et al., 2006; Kajima et al., 2021). In the automotive industry, Co-Cr-Mo alloy is used for manufacturing engine and transmission components that are subjected to high temperatures and stresses. In industrial applications, Co-Cr-Mo alloy is used to manufacture a variety of components, such as pumps, valves, and bearings. The excellent wear resistance of Co-Cr-Mo alloy ensures that these components have a long service life and require minimal maintenance (Balagna et al., 2012; Sing et al., 2020).
The manufacturing processes for Co-Cr-Mo alloy include casting, powder metallurgy, and additive manufacturing. The choice of manufacturing process depends on the complexity of the part, the required precision and accuracy, the desired quantity, and the cost. Selective laser melting (SLM) is a popular additive manufacturing technology used to fabricate complex metallic parts with high precision and accuracy (Li et al., 2019a; Korkmaz et al., 2022a). The process involves the use of a high-powered laser beam to selectively melt a bed of metal powder, layer by layer, to build up a three-dimensional (3D) part (Li et al., 2018a; Korkmaz et al., 2022b). Co-Cr-Mo alloy is a common material used in SLM (Roudnicka et al., 2021; Wang et al., 2021). One of the advantages of SLM for Co-Cr-Mo alloy is that it enables the fabrication of complex geometries that would be difficult or impossible to achieve using traditional manufacturing methods. The SLM process also offers advantages in terms of material utilization and waste reduction. Since the powder is selectively melted, only the necessary amount of material is used, reducing waste and material costs. Additionally, the powder that is not melted can be reused in subsequent builds, further reducing material waste (Li et al., 2019b).
Although research has been conducted on the microstructure and mechanical properties of cobalt-chromium alloys produced by SLM (Song et al., 2018; Sing et al., 2020; Takaichi et al., 2020; Tonelli et al., 2020), there is a limited understanding of their tribological performance. While Schwindling et al. (Schwindling et al., 2015) investigated the wear resistance of Co-Cr alloy manufactured by SLM for dental applications and Duran et al. (Duran et al., 2018) studied the tribological performance of Co-Cr-Mo alloys fabricated by SLM and casting, both studies had limitations. Both papers conducted their sliding wear tests at a constant load and sliding speed at room temperature, without studying the wear mechanisms of the alloy.
Fu et al. (Fu et al., 2022) compared the suitability of selective SLM versus traditional casting for producing dental Co-Cr alloys. They evaluated the microstructure, surface composition, mechanical properties, and wear resistance of the alloys and found that SLM alloys exhibited superior wear performance compared to the cast alloys. However, in their study, they did not investigate the effects of load, sliding speed, and temperature on the COF and wear rate, and did not examine the wear morphology and mechanisms.
Tonelli et al. (Tonelli et al., 2022) studied the dry sliding wear behavior of Co-28Cr-6Mo alloy produced by SLM and conventional wrought alloy. They found that the as-built Laser-PBF alloy displayed greater wear resistance than the conventional wrought alloy. The optimized aging treatment significantly altered the as-built Laser-PBF microstructure and generally improved the alloy’s friction and wear behavior. However, their study only investigated the sliding wear behavior at room temperature with no variation in the sliding speed.
The only paper investigating the high-temperature tribology of SLM-printed Co-Cr-Mo alloy was published by Cornacchia et al. (Cornacchia et al., 2022). They investigated the microstructural, mechanical, and tribological characteristics of Co-Cr-Mo alloy produced by SLM under different heat treatment conditions and hot isostatic pressing. A ball-on-disk tribometer was used for the sliding wear tests at a constant load and speed. Specimens were tested at two elevated temperatures of 800°C and 1,150°C. An alumina ball was used as the counter material and the results showed that an oxide film forming on the surface of the wear track could act as a protective layer on the metal surface causing the COF reduction for the specimens, but the wear rate generally increased as the test temperature increased. However, the effects of applied load and sliding speed on the COF and wear rate were not studied. The wear tests were conducted with a total sliding distance of only 50 m and wear mechanisms have not been investigated.
Overall, there is a lack of systematic research on the tribological performance of SLM Co-Cr-Mo alloy under different working conditions, and the wear morphology and mechanisms have not been explored in detail. Therefore, in this paper, we present the results of sliding wear tests of SLM-printed Co-Cr-Mo alloy under various applied loads, sliding speeds, and temperatures. We utilized scanning electron microscopy (SEM) and Energy-dispersive X-ray spectroscopy (EDX) to investigate the wear mechanisms and chemical compositions of the wear tracks. The results can serve as a reference for the selection of appropriate operating conditions to effectively minimize wear in applications involving SLM-printed Co-Cr-Mo alloy.
2 Experimental procedure
The production of the Co-Cr-Mo specimens was carried out using an industrial 3D printer, Ren AM 250 SLM printer model, manufactured by Renishaw (Wotton-under-Edge, England). The SLM printer featured an upgraded laser system capable of delivering a maximum laser power of 400 W. The build volume of the SLM machine was 250 mm × 250 mm × 300 mm (Z-axis). The default laser spot size diameter was Ɵ = 140 μm, allowing for precision in printing.
To ensure optimal printing conditions, the oxygen concentration inside the building chamber was carefully regulated to be below 50 ppm. This was necessary as the presence of oxygen can negatively impact the quality of the printed object, leading to reduced mechanical properties and poor surface finish. As recommended by the manufacturer, the ideal powder for the printer should be spherical in shape and have a particle size range of 15 μm–45 μm, ensuring that the powder can be uniformly distributed and fused together during the printing process.
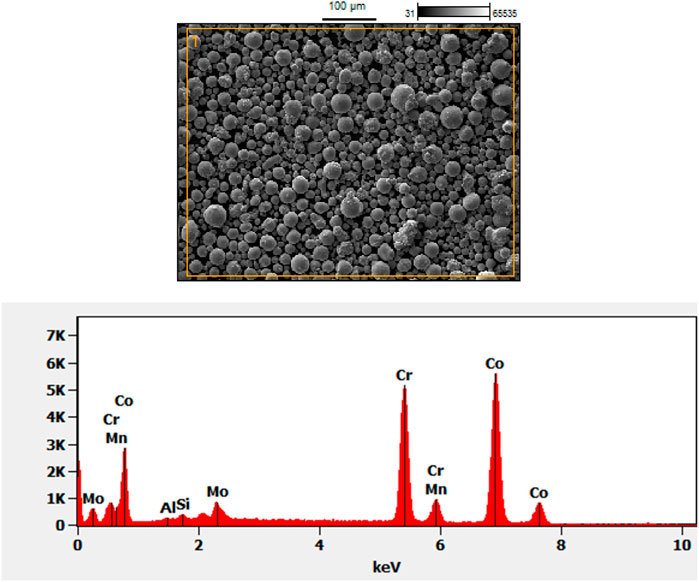
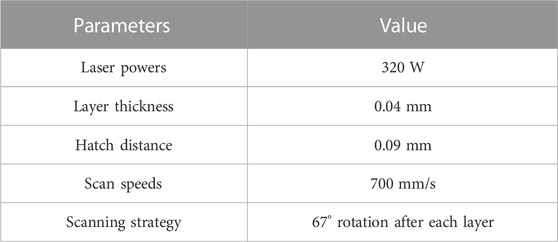
The Co-Cr-Mo specimens had dimensions of 40 mm × 20 mm × 10 mm and were fabricated using a metal powder that complies with the Co-Cr-Mo ASTM F75 standard, which was provided by Renishaw. The powder had a particle size range of 15 μm–45 μm and a nominal composition in wt% of 58.9–69.5 Co, 27.0–30.0 Cr, and 5.0–7.0 Mo, with small amounts of other elements such as Ni, Fe, C, Si, Mg, W, P, S, Al, and Ti (Renishaw, 2023). Figure 1 shows an SEM image of the Co-Cr-Mo powder used in the selective laser melting process and the EDS analysis results. The addition of molybdenum in the Co-Cr-Mo alloy enhances its strength and heat resistance, making it suitable for use in high-temperature environments. Meanwhile, the presence of chromium provides the alloy with resistance to oxidation and corrosion, making it ideal for use in biomedical applications (Anuar et al., 2021). The SLM process parameters used to produce the Co-Cr-Mo specimens are summarized in Table 1. These process parameters are the optimum parameters suggested by the SLM machine manufacturer for this alloy. These parameters ensure minimal defects for the samples produced by the SLM process, thereby contributing to the enhanced integrity and quality of the Co-Cr-Mo specimens.
In this study, polished specimens were tested for their hardness using a Leco LM-800AT microhardness tester with 1 kgf load. A Buehler-EcoMet 30 machine and various Silicon Carbide (SiC) sandpapers with grit sizes of #180, 500, 1,200, and 2,400 were used for grinding the specimens. After the grinding, diamond paste was used to polish the specimens using a Struers-Labopol-2 machine to achieve a high-quality, mirror-like surface finish.
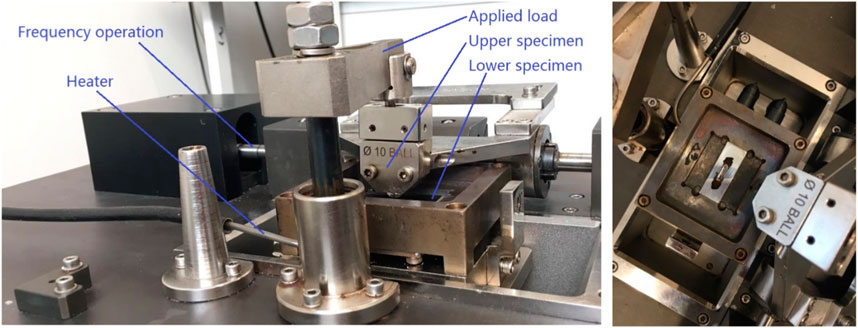
To evaluate the sliding wear resistance of the specimens, experiments were conducted using a Ducom Instruments TR-282 linear reciprocating tribometer as shown in Figure 2. As-printed specimens with no surface modification or polishing were used for the sliding wear tests. The SLM-printed specimens had an average surface roughness (Ra) of 7.3578 µm and a density of 8,125 kg/m3. The sliding wear experiments were carried out with different normal loads of 5N, 10N, and 15N, as well as a sliding frequency of 5 Hz. The tests were performed at varying temperatures of 22°C, 200°C, 400°C, and 600°C. A 10 mm diameter hardened steel ball with an average roughness value of Ra = 1.2 µm was used as the counter material. Hardened stainless steel is widely acknowledged as a benchmark material for wear testing across various industries and its use as a counter material allows for meaningful comparative analysis and benchmarking of our alloy’s tribological performance against established standards. The tribometer was set to generate a wear track (sliding stroke) of 10mm, and the total sliding distance covered was set to 1000 m for all tests. Each test was conducted at least three times, and the average values of the coefficient of friction (COF) and wear rates were recorded and reported in the study.
We conducted dry wear tests as in certain high-temperature applications, such as aerospace and industrial settings, lubrication may not be practical or possible. Therefore, evaluating the material’s performance under dry conditions is crucial as it mirrors real-world scenarios where lubrication might be challenging. Additionally, dry sliding wear tests enable us to examine the material’s inherent tribological behavior without the influence of lubricants, providing valuable insights into fundamental wear mechanisms and material characteristics.
To obtain accurate data on the wear rate of the specimens, a Talysurf 50 stylus profilometer (from Taylor Hobson, Leicester, England) was utilized to measure the cross-sectional area of the wear tracks. To achieve this, five sections of each wear track were scanned by the stylus profilometer, which provided a raw profile graph of the worn surface of the specimen, thereby enabling the depth and width of the wear scars to be determined. To obtain the average wear scar surfaces, the images obtained from the stylus profilometer were analyzed using ImageJ, an image analysis software. The average cross-sectional area of the wear scars was then multiplied by the wear track length of 10mm, which yielded the wear volume. The wear rates (mm3/m) were subsequently calculated by dividing the average wear volume (mm3) by the total sliding wear distance m). The tribological performance of the SLM-printed Co-Cr-Mo alloy has been compared with the same alloy manufactured by the conventional casting process. The Co-29Cr-6Mo plates produced by investment casting were obtained from a local supplier for this purpose.
In order to gain a deeper understanding of the microstructure and wear mechanisms of the tested specimens, a Hitachi SU-70 field emission scanning electron microscope (FE-SEM) was employed. Additionally, energy-dispersive X-ray spectroscopy (EDX) was utilized to identify and quantify the elemental composition of the worn surfaces. The combination of FE-SEM and EDX allowed for a comprehensive analysis of the microstructure and elemental composition of the worn surfaces, which helped to reveal the underlying wear mechanisms.
3 Results and discussion
Figure 3A shows the microstructure and melt pool boundaries of the printed alloy. SLM-printed Co-Cr-Mo alloy typically exhibits a fine cellular dendritic structure, which is due to the rapid solidification of the molten material during the SLM process (Roudnicka et al., 2021). The melt pool boundaries of SLM-printed Co-Cr-Mo alloy are formed by the solidification of the molten material, which results in a characteristic “honeycomb” structure. This structure is a result of the non-uniform cooling of the melt pool, which causes the formation of preferential solidification sites. The fine dendritic structure and honeycomb-like melt pool boundaries contribute to the material’s high strength and ductility (Li et al., 2020).
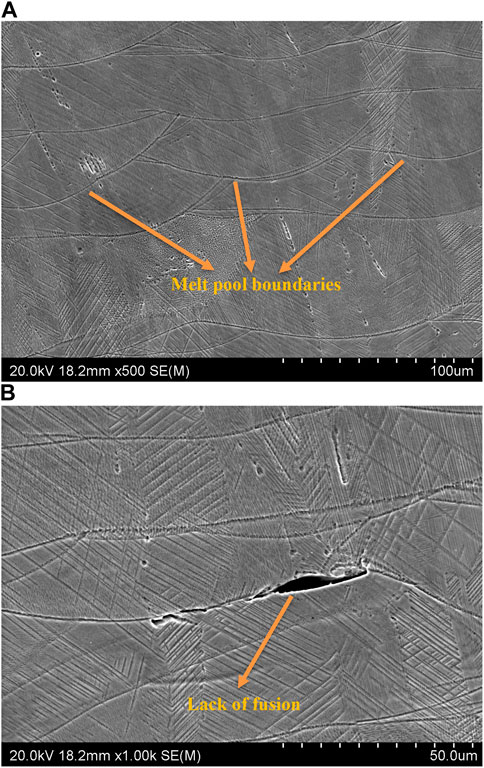
FIGURE 3. SEM micrographs of (A) Melt pools; and (B) lack of fusion of selective laser melted cobalt-chromium-molybdenum alloy specimens (as printed).
Figure 3B shows the lack of fusion in printed specimens. Lack of fusion is a common defect that can occur in SLM-printed Co-Cr-Mo alloy, and it refers to the incomplete melting and bonding of adjacent powder particles during the printing process. This defect can negatively affect the mechanical properties and the overall quality of the printed part (Li et al., 2018b). The microhardness profiles generated revealed a uniform hardness profile across the thickness of the specimen, with an average microhardness value of 409.67 HV. Along the wear track, the average microhardness value was 404.05 HV. The uniform longitudinal and cross-section hardness profiles observed suggest that the material’s microstructure is well-developed, and the material possesses high resistance to plastic deformation.
Figure 4 shows the effect of applied normal load on the coefficient of friction (COF) and wear rate of the SLM-printed specimens, compared to the specimens produced by the conventional casting process. The cast specimens show lower COF, but a similar or higher wear rate compared to the SLM-printed specimens. As the applied normal load increases, the COF between the Co-Cr-Mo plate and the hardened steel ball decreases. This is mainly due to the temperature effect. At higher loads, the temperature at the interface between the two surfaces increases due to frictional heating. This increase in temperature causes the surface to soften and the asperities more easily deform, leading to a reduction in the COF (Li et al., 2023). It can be observed that the change in COF is relatively subtle as we increase the applied load from 10N to 15N. This could be attributed to the fact that at the higher load, the wear rate increases, and the presence of wear debris creates a rougher contact surface that balances the effect of frictional heating for the tests conducted at room temperature.
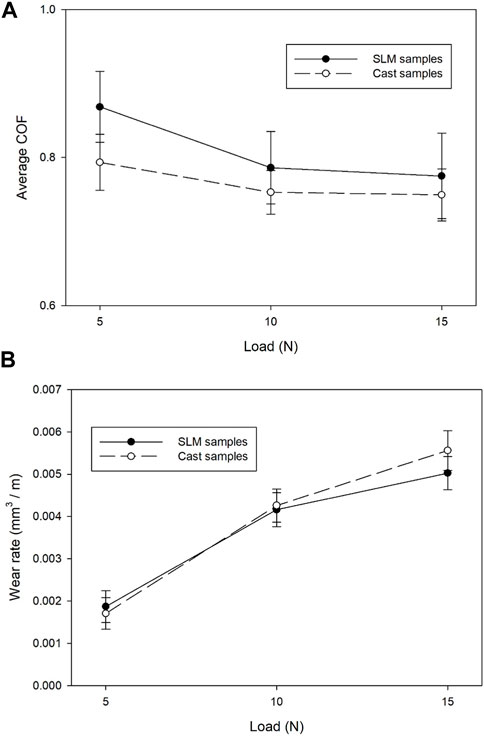
FIGURE 4. Effect of normal load on (A) average coefficient of friction, and (B) wear rate. All tests were conducted at room temperature and 5 HZ frequency in dry contact.
On the other hand, as can be seen from Figure 4B, the wear rate increases significantly at higher loads. This is mainly due to increased surface stresses at higher loads. These stresses can lead to the initiation and propagation of cracks or other defects, resulting in more significant wear. At higher loads, the surfaces in contact may undergo plastic deformation, leading to permanent changes in the surface topography (Li et al., 2018a). This plastic deformation can also increase the roughness of the surfaces, leading to more significant wear.
Figure 5 shows the effect of temperature on the variation of COF with test time. As the temperature increases from room temperature to 600°C, the COF decreases. This is due to a combination of thermal softening and the formation of an oxide layer on the surface. As the temperature increases, the materials in contact can undergo thermal softening, which reduces the contact pressure between the surfaces. A reduction in contact pressure can reduce the frictional forces acting between the surfaces, resulting in a decrease in the coefficient of friction. Testing the specimens at elevated temperatures can also lead to the formation of an oxide layer on the wear track (Li et al., 2023). The oxide layer can have lubricating properties, which can reduce the frictional forces acting between the two surfaces. The oxide layer can act as a solid lubricant by providing a low-friction surface between the two surfaces.
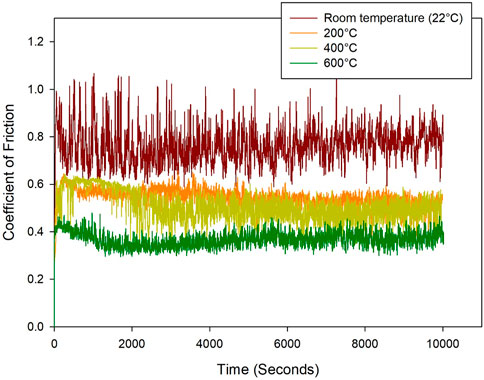
FIGURE 5. Variation of coefficient of friction versus time for SLM specimens tested at different temperatures. All tests were conducted in dry contact under 10 N load and 5 Hz frequency.
It can be seen from Figure 5 that the COF graph at room temperature fluctuates, but the COF curve becomes more stable as the temperature increases. The surface roughness of the two materials in contact can lead to fluctuations in the COF. As the surfaces come into contact, the asperities can interlock and cause the COF to increase (Ramezani et al., 2009a; Ramezani et al., 2009b). As the surfaces slide past each other, the asperities can be released, causing a decrease in the COF. However, as the temperature increases, the materials in contact can undergo thermal softening, resulting in a reduction in surface roughness. The reduction in surface roughness can lead to a more stable COF with less fluctuation.
The fluctuations in COF can also be attributed to the dynamic interactions of debris generated during the sliding movement. It suggests the presence of a third-body effect, indicating the occurrence of three-body abrasive wear as can be later observed in the SEM images of the wear track (Figure 8). In such wear conditions, particles, debris, or contaminants act as intermediaries between the sliding surfaces, affecting their frictional behavior. The intermittent nature of COF oscillations could be linked to variations in the concentration and distribution of these particles within the contact interface during the tribological testing. This dynamic behavior underscores the complexity of the wear mechanisms at play, highlighting the importance of comprehensive analysis and understanding of the tribological processes in the Co-Cr-Mo alloy system.
The decrease in average COF with temperature can also be observed in Figure 6A. As explained, the combination of thermal softening and the formation of an oxide layer can work together to reduce COF. As the temperature increases, the materials in contact undergo thermal softening, reducing the surface roughness and the interlocking of asperities. The formation of the oxide layer on the surface further reduces the adhesion and friction between the two surfaces, leading to a lower COF.
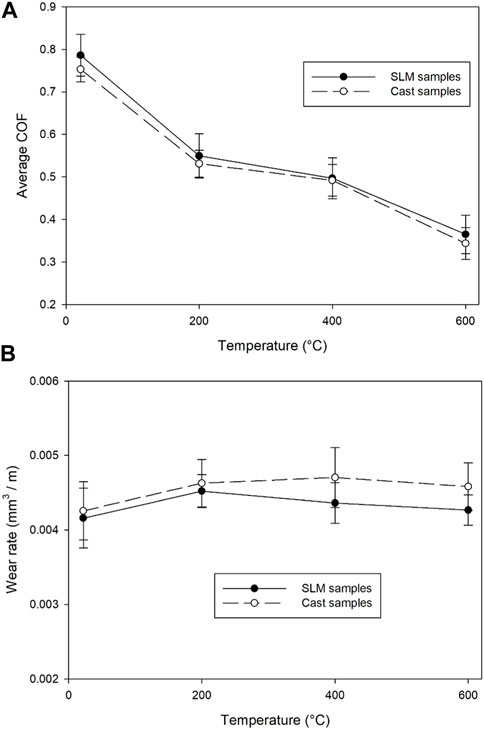
FIGURE 6. Effect of temperature on (A) average coefficient of friction, and (B) wear rate. All tests were conducted under 10 N load and 5 HZ frequency in dry contact.
Despite the decrease in COF, the wear rate slightly increases, as the test temperature increases. As can be seen in Figure 6B, the maximum wear rate is at 200°C and the wear rate then decreases, with almost similar wear rate at room temperature and 600°C. At 200°C, the mechanical properties of the alloy are affected, causing a decrease in its hardness and strength. This results in accelerated wear and tear of the alloy, leading to an increase in wear rate. However, as the temperature increases, the metal reacts with oxygen in the environment to form a thin layer of oxide. The oxide layer that forms on the surface of the alloy can be very thin, typically only a few nanometers thick, but it is very effective in protecting the underlying metal from wear (Yang et al., 2021). This is because the oxide layer is tightly adhered to the metal surface and is very stable, making it resistant to further oxidation and wear. The cast specimens showed similar behavior to the SLM-printed specimens, with slightly lower COF and higher wear rate. The lower wear rate observed in SLM-printed Co-Cr-Mo compared to cast specimens can be attributed to a combination of factors, including a more homogeneous microstructure with fewer defects, finer grain size, and higher strength and hardness. The results of microhardness measurements support this observation, with an average microhardness value of 404.05 HV for SLM-printed specimens along the wear track, compared to the average microhardness of 396.33 HV for the cast specimens.
Figure 7 shows the effect of sliding distance on the wear volume. The sliding wear tests were stopped at 200 m intervals, and the wear volumes were measured using a stylus profilometer, with the process explained in Section 2. In all temperature conditions, the wear volume progressively rises with time. Nevertheless, the rate of wear gradually declines with continued sliding at elevated temperatures. At room temperature, the relationship between wear volume and sliding distance is almost linear. Initially, the wear rate is substantially higher at elevated temperatures, but it gradually reduces over time. The formation of a protective oxide layer causes the wear rate to decrease as the sliding distance increases.
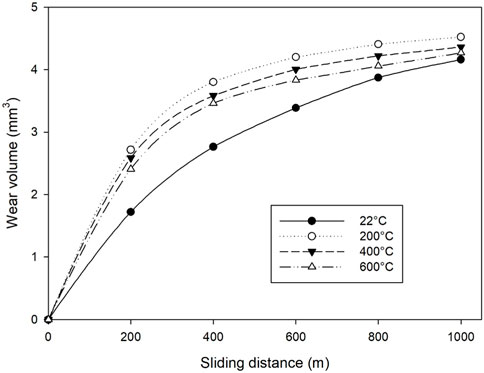
FIGURE 7. Effect of sliding distance on wear volume of SLM specimens at different temperatures. All tests were conducted at 10 N load, 5 Hz frequency, and dry contact.
Figure 8 shows the SEM images of the wear tracks for specimens tested at room temperature and 600°C. At room temperature, the wear mechanism is dominated by abrasive wear, as can be observed by the presence of grooves and wear debris. Galling can also be observed on the wear track in Figure 8A, and the cracks on the surface represent fatigue wear, due to repetitive contact. On the other hand, Figure 8B shows that adhesive wear is the dominant wear mechanism at elevated temperatures. At high temperatures, the surfaces of materials undergo significant changes in their mechanical and physical properties. In particular, the surface layers can soften or deform due to thermal activation, resulting in a higher tendency for adhesive wear.
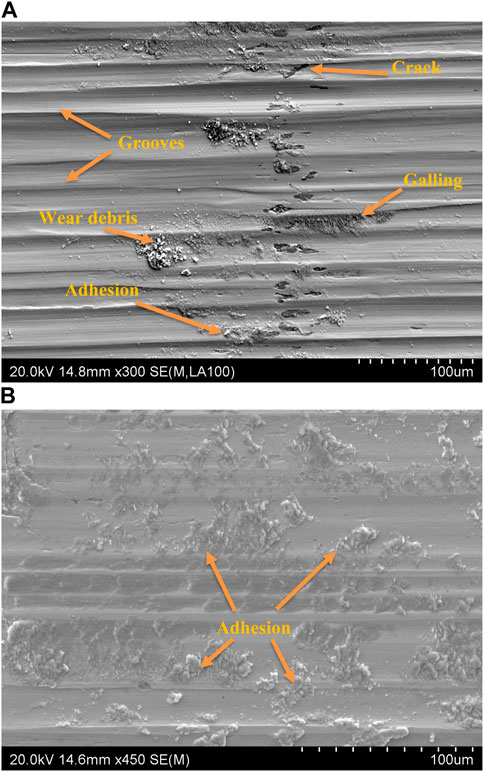
FIGURE 8. Wear tracks after reciprocating sliding wear tests under 10 N applied load and 5 Hz frequency at (A) room temperature, and (B) 600°C.
Figure 9 demonstrates the EDX analysis of a wear track tested at room temperature. The surface of the wear track is primarily composed of chromium (Cr), cobalt (Co), and molybdenum (Mo), which is in line with expectations. However, the analysis also reveals the presence of oxide particles. This can be attributed to the increase in contact interface temperature during reciprocating sliding, leading to the oxidation of wear debris and surface particles. The presence of iron (Fe) element shows material transfer from the counter ball to the Co-Cr-Mo specimen. Figure 10 shows the EDX analysis for a specimen tested at 600°C, with the same chemical elements present, but a higher oxygen level. Figure 10B shows the level of oxygen on the surface of the specimens tested at different temperatures. As can be seen from the figure, as the test temperature increases, the oxide content determined by EDS-ZAF analysis increases. The results represent the formation of a protective oxide layer on the wear track surfaces. The thin oxide layer plays a dual role. Firstly, it functions as a protective shield, guarding the underlying metal from direct wear. Secondly, its rupture during high contact friction generates self-lubricating particles that help reduce frictional forces, thereby enhancing wear resistance in the sliding wear tests.
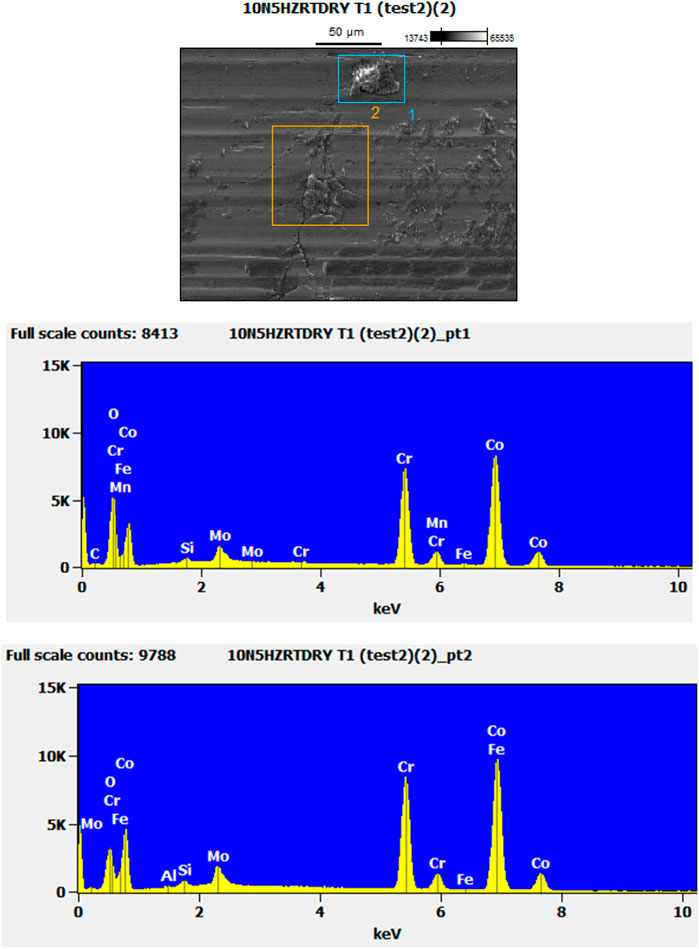
FIGURE 9. EDX analysis of the wear track of a specimen tested at room temperature, under dry contact, 10 N load, and 5 Hz frequency.
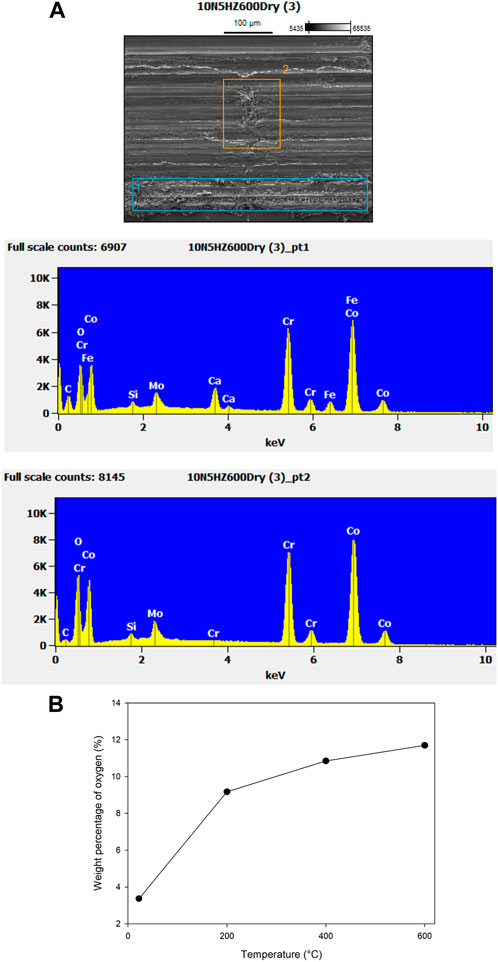
FIGURE 10. (A) EDX spectra of the wear track of a specimen tested under dry contact, 10 N load, and 5 Hz frequency at 600°C; (B) Oxide content determined by EDS-ZAF analysis on wear tracks of specimens tested at different temperatures.
Figure 11 depicts the worn surface of the hardened steel ball. EDX spectra were collected from a small area at the edge of the worn surface, and the distribution of each element in the scanned area is shown in the EDX mapping in Figure 11. The primary element present on the ball is iron (Fe), with traces of Co and Cr wear debris observed on the worn surface. Additionally, the presence of oxygen indicates that the worn particles are being oxidized.
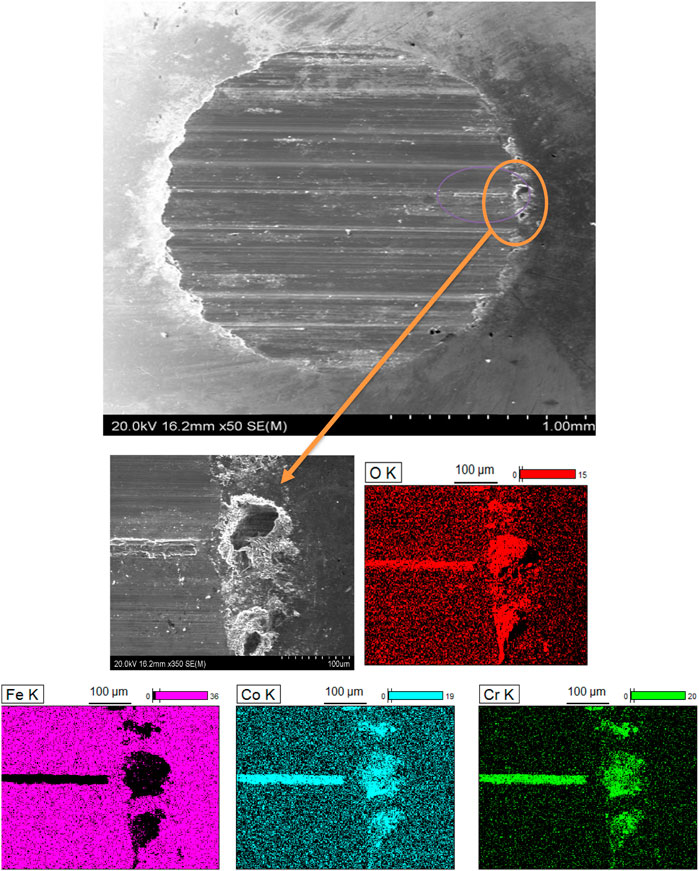
FIGURE 11. SEM images of the hardened steel ball after sliding wear test at the elevated temperature of 600°C, under 5 Hz frequency, 10N load, and dry contact). Cobalt-chromium alloy and oxygen can be observed on the ball surface.
4 Conclusion
This study examined the wear behavior of SLM-printed Co-Cr-Mo alloy. The microstructure of the printed alloy exhibited a fine dendritic structure and honeycomb-like melt pool boundaries, contributing to its high strength and ductility. However, lack of fusion was observed in the printed specimens, which can negatively affect the mechanical properties of the printed part. The material’s microhardness profiles generated revealed a uniform hardness profile across the thickness of the specimen, indicating that the material possesses high resistance to plastic deformation.
The effect of the applied normal load on the COF and wear rate of the SLM-printed specimens was compared to the specimens produced by the conventional casting process. As the applied normal load increases, the COF between the Co-Cr-Mo plate and the hardened steel ball decreases, mainly due to the temperature effect. However, the wear rate increases significantly at higher loads due to increased surface stresses, leading to the initiation and propagation of cracks or other defects.
Testing the specimens at elevated temperatures led to the formation of an oxide layer on the wear track. The oxide layer can have lubricating properties, which can reduce the frictional forces acting between the two surfaces. The combination of thermal softening and the formation of an oxide layer can work together to reduce COF. However, the wear rate slightly increases as the test temperature increases due to the mechanical properties of the alloy being affected, causing a decrease in its hardness and strength. The formation of the oxide layer on the surface of the alloy can be very effective in protecting the underlying metal from wear. The findings suggest that the material possesses high wear resistance, making it suitable for a wide range of load-bearing applications, especially at elevated temperatures.
Data availability statement
The original contributions presented in the study are included in the article/Supplementary material, further inquiries can be directed to the corresponding author.
Author contributions
MR: Conceptualization, Formal Analysis, Investigation, Methodology, Writing–Original Draft, Writing–review and editing. ZM: Conceptualization, Methodology, Writing–review and editing.
Funding
The author(s) declare that no financial support was received for the research, authorship, and/or publication of this article.
Conflict of interest
The authors declare that the research was conducted in the absence of any commercial or financial relationships that could be construed as a potential conflict of interest.
Publisher’s note
All claims expressed in this article are solely those of the authors and do not necessarily represent those of their affiliated organizations, or those of the publisher, the editors and the reviewers. Any product that may be evaluated in this article, or claim that may be made by its manufacturer, is not guaranteed or endorsed by the publisher.
References
Anuar, A., Guraya, T., Chen, Z. W., Ramezani, M., and San Sebastián-Ormazabal, M. (2021). Effect of build direction dependent grain structure on fatigue crack growth of biomedical Co–29Cr–6Mo alloy processed by laser powder bed fusion. J. Mech. Behav. Biomed. Mater. 123, 104741. doi:10.1016/j.jmbbm.2021.104741
Balagna, C., Spriano, S., and Faga, M. G. (2012). Characterization of Co–Cr–Mo alloys after a thermal treatment for high wear resistance. Mater. Sci. Eng. C 32, 1868–1877. doi:10.1016/j.msec.2012.05.003
Cornacchia, G., Cecchel, S., Battini, D., Petrogalli, C., and Avanzini, A. (2022). Microstructural, mechanical, and tribological characterization of selective laser melted CoCrMo alloy under different heat treatment conditions and hot isostatic pressing. Adv. Eng. Mater. 24, 2100928. doi:10.1002/adem.202100928
Dong, X., Sun, Q., Zhou, Y., Qu, Y., Shi, H., Zhang, B., et al. (2020). Influence of microstructure on corrosion behavior of biomedical Co-Cr-Mo-W alloy fabricated by selective laser melting. Corros. Sci. 170, 108688. doi:10.1016/j.corsci.2020.108688
Duran, K., Mindivan, H., Atapek, S. H., Simov, M., and Dikova, T. (2018). Tribological characterization of cast and selective laser melted Co-Cr-Mo alloys under dry and wet conditions. 19th International Metallurgy and Materials Congress. Turkey: Istanbul.
Fu, W., Liu, S., Jiao, J., Xie, Z., Huang, X., Lu, Y., et al. (2022). Wear resistance and biocompatibility of Co-Cr dental alloys fabricated with CAST and SLM techniques. materials 15, 3263. doi:10.3390/ma15093263
Hassani, F. Z., Ketabchi, M., Bruschi, S., and Ghiotti, A. (2016). Effects of carbide precipitation on the microstructural and tribological properties of Co–Cr–Mo–C medical implants after thermal treatment. J. Mater. Sci. 51, 4495–4508. doi:10.1007/s10853-016-9762-5
Kajima, Y., Takaichi, A., Kittikundecha, N., Htat, H. L., Cho, H. H. W., Tsutsumi, Y., et al. (2021). Reduction in anisotropic response of corrosion properties of selective laser melted Co–Cr–Mo alloys by post-heat treatment. Dent. Mater. 37, e98–e108. doi:10.1016/j.dental.2020.10.020
Kim, K.-S., Hwang, J.-W., and Lee, K.-A. (2020). Effect of building direction on the mechanical anisotropy of biocompatible Co–Cr–Mo alloy manufactured by selective laser melting process. J. Alloys Compd. 834, 155055. doi:10.1016/j.jallcom.2020.155055
Korkmaz, M. E., Gupta, M. K., Robak, G., Moj, K., Krolczyk, G. M., and Kuntoğlu, M. (2022a). Development of lattice structure with selective laser melting process: a state of the art on properties, future trends and challenges. J. Manuf. Process. 81, 1040–1063. doi:10.1016/j.jmapro.2022.07.051
Korkmaz, M. E., Gupta, M. K., Waqar, S., Kuntoğlu, M., Krolczyk, G. M., Maruda, R. W., et al. (2022b). A short review on thermal treatments of Titanium and Nickel based alloys processed by selective laser melting. J. Mater. Res. Technol. 16, 1090–1101. doi:10.1016/j.jmrt.2021.12.061
Li, H., Chen, Z., and Ramezani, M. (2023). Effect of temperature on sliding wear behavior of Ti-6Al-4V alloy processed by powder bed fusion additive manufacturing techniques. J. Mater. Eng. Perform. 31, 8940–8954. doi:10.1007/s11665-022-06959-2
Li, H., Ramezani, M., Chen, Z., and Singamneni, S. (2019a). Effects of process parameters on temperature and stress distributions during selective laser melting of Ti–6Al–4V. Trans. Indian Inst. Met. 72, 3201–3214. doi:10.1007/s12666-019-01785-y
Li, H., Ramezani, M., and Chen, Z. (2019b). Dry sliding wear performance and behaviour of powder bed fusion processed Ti–6Al–4V alloy. Wear. 203103, 440–441. doi:10.1016/j.wear.2019.203103
Li, H., Ramezani, M., Li, M., Ma, C., and Wang, J. (2018a). Tribological performance of selective laser melted 316L stainless steel. Tribol. Int. 128, 121–129. doi:10.1016/j.triboint.2018.07.021
Li, H., Ramezani, M., Li, M., Ma, C., and Wang, J. (2018b). Effect of process parameters on tribological performance of 316L stainless steel parts fabricated by selective laser melting. Manuf. Lett. 16, 36–39. doi:10.1016/j.mfglet.2018.04.003
Li, H., Wang, M., Lou, D., Xia, W., and Fang, X. (2020). Microstructural features of biomedical cobalt–chromium–molybdenum (CoCrMo) alloy from powder bed fusion to aging heat treatment. J. Mater. Sci. Technol. 45, 146–156. doi:10.1016/j.jmst.2019.11.031
Liverani, E., Fortunato, A., Leardini, A., Belvedere, C., Siegler, S., Ceschini, L., et al. (2016). Fabrication of Co–Cr–Mo endoprosthetic ankle devices by means of Selective Laser Melting (SLM). Mater. Des. 106, 60–68. doi:10.1016/j.matdes.2016.05.083
Ramezani, M., Ripin, Z. M., and Ahmad, R. (2009a). Computer aided modelling of friction in rubber-pad forming process. J. Mater. Process. Technol. 209 (10), 4925–4934. doi:10.1016/j.jmatprotec.2009.01.015
Ramezani, M., Ripin, Z. M., and Ahmad, R. (2009b). A static friction model for tube bulge forming using a solid bulging medium. Int. J. Adv. Manuf. Tech. 43, 238–247. doi:10.1007/s00170-008-1708-x
Renishaw (2023). Data Sheet: CoCr-0404 powder for additive manufacturing. Available at: https://www.renishaw.com/en/material-and-safety-data-sheets-additive-manufacturing--17862.
Roudnicka, M., Molnarova, O., Drahokoupil, J., Kubasek, J., Bigas, J., Sreibr, V., et al. (2021). Microstructural instability of L-PBF Co28Cr6Mo alloy at elevated temperatures. Addit. Manuf. 44, 102025. doi:10.1016/j.addma.2021.102025
Schwindling, F. S., Seubert, M., Rues, S., Koke, U., Schmitter, M., and Stober, T. (2015). Two-body wear of CoCr fabricated by selective laser melting compared with different dental alloys. Tribol. Lett. 60, 25. doi:10.1007/s11249-015-0601-7
Sing, S. L., Huang, S., and Yeong, W. Y. (2020). Effect of solution heat treatment on microstructure and mechanical properties of laser powder bed fusion produced cobalt-28chromium-6molybdenum. Mater. Sci. Eng. A 769, 138511. doi:10.1016/j.msea.2019.138511
Song, C., Zhang, M., Yang, Y., Wang, D., and Jia-kuo, Y. (2018). Morphology and properties of CoCrMo parts fabricated by selective laser melting. Mater. Sci. Eng. A 713, 206–213. doi:10.1016/j.msea.2017.12.035
Takaichi, A., Kajima, Y., Kittikundecha, N., Htat, H. L., Wai Cho, H. H., Hanawa, T., et al. (2020). Effect of heat treatment on the anisotropic microstructural and mechanical properties of Co–Cr–Mo alloys produced by selective laser melting. J. Mech. Behav. Biomed. Mater. 102, 103496. doi:10.1016/j.jmbbm.2019.103496
Tonelli, L., Ahmed, M. M. Z., and Ceschini, L. (2022). A novel heat treatment of the additively manufactured Co28Cr6Mo biomedical alloy and its effects on hardness, microstructure and sliding wear behavior. Prog. Addit. Manuf. 8, 313–329. doi:10.1007/s40964-022-00334-2
Tonelli, L., Fortunato, A., and Ceschini, L. (2020). CoCr alloy processed by selective laser melting (SLM): effect of laser energy density on microstructure, surface morphology, and hardness. J. Manuf. Process. 52, 106–119. doi:10.1016/j.jmapro.2020.01.052
Varano, R., Bobyn, J. D., Medley, J. B., and Yue, S. (2006). The effect of microstructure on the wear of cobalt-based alloys used in metal-on-metal hip implants. Proc. Inst. Mech. Eng. H. 220, 145–159. doi:10.1243/09544119jeim110
Wang, Z., Tang, S. Y., Scudino, S., Ivanov, Y. P., Qu, R. T., Wang, D., et al. (2021). Additive manufacturing of a martensitic Co–Cr–Mo alloy: towards circumventing the strength–ductility trade-off. Addit. Manuf. 37, 101725. doi:10.1016/j.addma.2020.101725
Keywords: Co-Cr-Mo alloy, selective laser melting, high temperature, sliding wear, tribology
Citation: Ramezani M and Mohd Ripin Z (2023) High-temperature tribological properties of Co-29Cr-6Mo alloy fabricated by selective laser melting process. Front. Mech. Eng 9:1289450. doi: 10.3389/fmech.2023.1289450
Received: 05 September 2023; Accepted: 31 October 2023;
Published: 10 November 2023.
Edited by:
Alessandro Ruggiero, University of Salerno, ItalyReviewed by:
Mihaela Buciumeanu, Dunarea de Jos University, RomaniaMustafa Kuntoğlu, Selcuk University, Türkiye
Amit Rai Dixit, Indian Institute of Technology Dhanbad, India
Copyright © 2023 Ramezani and Mohd Ripin. This is an open-access article distributed under the terms of the Creative Commons Attribution License (CC BY). The use, distribution or reproduction in other forums is permitted, provided the original author(s) and the copyright owner(s) are credited and that the original publication in this journal is cited, in accordance with accepted academic practice. No use, distribution or reproduction is permitted which does not comply with these terms.
*Correspondence: Maziar Ramezani, bWF6aWFyLnJhbWV6YW5pQGF1dC5hYy5ueg==
 Maziar Ramezani
 Zaidi Mohd Ripin2