- 1Department of Mechanical Engineering, Imperial College London, London, United Kingdom
- 2School of Materials Science and Engineering, Harbin Institute of Technology, Harbin, China
- 3School of Mechanical Engineering, Xi’an Jiaotong University, Xi’an, China
- 4Department of Mechanical and Manufacturing Engineering, University of Cyprus, Nicosia, Cyprus
Tube hydroforming has been widely applied by the automotive sector to produce hollow parts. As a popular tube hydroforming test method, tube hydro-bulging needs an analytical failure model to analyze the formability of tubular materials. In the present work, a failure prediction model has been developed to predict the bulging height limit (BHL) of the hydro-bulging test. The model utilized Hill’s orthogonal anisotropic model to characterize the tube material, a geometry model to characterize the non-loading path and the M-K model to predict failure. Defects in multiple directions were taken into consideration. The developed model was applied on two tubes of different materials as case studies to verify its validity. It is shown that the developed model is capable of predicting the forming limit or determining the imperfection factor of tubular materials.
1 Introduction
Hydroforming technology has been widely adopted by the automotive sector in recent decades due to the capability of forming complex geometries from lightweight materials, whilst avoiding joining processes. Tube hydroforming (THF) uses tubes as the raw material and applies internal pressure and/or axial compression to form hollow parts, including tubular parts, irregular cross-sections, or multi-way tubes.
Forming limit test methods of THF is essential to the prediction of failure. Nakajima test is the standard way to determine the forming limit (International Standard Organization, 2021) for sheet materials. However, this standard does not apply to tubular materials. One of the most popular methods to solve this problem is the tube hydro-bulging test (or hydraulic/tube bulge test). Numerous research studies have developed experimental devices to perform such tests (Fuchizawa et al., 1993; Sokolowski et al., 2000; Fllice et al., 2001; Aue-u-lan, 2007), and the hydro-bulging test has been effectively used to predict the forming limit (Zhu et al., 2020).
However, an analytical derivation of the forming limit prediction for the hydro-bulging test has not been developed yet, which is the primary aim of the article. There are many existing analytical models for forming limit prediction, including Swift’s diffuse necking model (Swift, 1952), Hill’s localized necking model (Hill, 1948), and the M-K model (Marciniak and Kuczyński, 1967). The original M-K model assumes that an imperfection area only exists across the width of the sheet. Hutchinson and Neale (1978) modified the M-K model by assuming that the imperfection area direction is arbitrary. The modified M-K model was adopted in the present work to study the potential necking behavior in all directions.
The M-K model takes the loading path of a point as input. In the context of the hydro-bulging test, the point is the pole point, as it undergoes the largest deformation. The loading path of the point can be obtained from stress and strain analysis, which depends on the geometry model of the tube. The key difference between the published geometries is the assumption of the bulging zone’s profile, such as the circular arc (Boudeau and Malécot, 2012), cosine-like function (Strano and Altan, 2004), and elliptical curve (Hwang and Lin, 2007; He et al., 2014a). He et al. (2014a) proposed two models with elliptical curve assumption. The first assumed that the filleted corner was negligible, and the bulging tube can be approximated by only one elliptic arc. The second took the filleted corner into account, and the bulging profile was approximated by the combination of two circular arcs and an elliptic arc. The latter geometry model has better accuracy and was adopted in the present study.
After determining the geometry model, stress and strain analysis should be conducted at the pole point to obtain the loading path. As one of the most important conditions to be analyzed, the end-conditions have four different types, namely, free-ends (Imaninejad, Subhash and Loukus, 2004), closed-ends (Fuchizawa, Narazaki and Yuki, 1993), fixed-ends (Sokolowski et al., 2000; Imaninejad, Subhash and Loukus, 2004; Hwang and Lin, 2007; Hwang and Wang, 2009; Boudeau and Malécot, 2012; He et al., 2014a), and forced-ends (Imaninejad, Subhash and Loukus, 2004; Kuwabara et al., 2005), which can be applied in tube hydro-bulging test. The fixed-ends condition was mostly used in previous studies due to the simplest mathematical expression. Thus, it was adopted in the present study.
Hill’s orthogonal anisotropic model (Hill, 1950) was used to describe the plastic mechanical behavior of the tubular material. For the convenience of model derivation, a tube-friendly version of the model was derived in advance.
Combining Hill’s orthogonal anisotropic model, hydro-bulging geometry model, and M-K model, the present study developed a mechanics-based hydro-bulging test failure model to enable the prediction of bulging height limit (BHL) in tube hydro-bulging tests. Two case studies were reviewed to show the prediction capability of the model. The case studies illustrated how to fit initial imperfection factors
2 Mechanics-Based Failure Model
2.1 Hill’s Orthogonal Anisotropic Model for Tubular Materials
The original form of Hill’s orthogonal anisotropic model is too general to be applied in the specific file of the tube hydro-bulging test. In this section, a specific form for tubular materials was derived, as a footstone for further strain and stress analysis.
2.1.1 Derivation of Equivalent Stress
The general form of the Hill yield function (Hill 1950) is as follows:
where
Since the material anisotropy is assumed to be orthogonal, once the uniaxial normal yield stress is achieved, the yield criterion can be expressed as follows:
where
Subsequently, the associated flow rule is applied:
where the ratio between
Note that the last item is not
The wall thickness at the pole point of the tube is low (
by defining the ratio
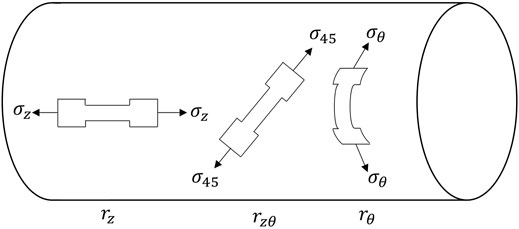
Note that in the uniaxial tensile tests used to calculate
For
where
is the transformation matrix.
By substituting
By eliminating
By defining
Consequently, the associate flow rule Eq. 9 can be expressed by
2.1.2 Derivation of Equivalent Strain Increment
The equivalent stress can also be expressed in matrix notation (Mohr et al., 2010):
where
By applying the associate flow rule under matrix notation, the following is derived:
where
By applying work conjugation
By Substituting
By Applying Work Conjugation
where
Thus, the equivalent strain increment can be expressed as follows:
2.2 Geometry Model of Hydro-Bulging Tube
The geometry model was applied to describe the plastic deformation of the bulging profile. Once the bulging profile can be expressed in mathematical ways, the strain can be calculated, and thus the loading path for the M-K model can be established.
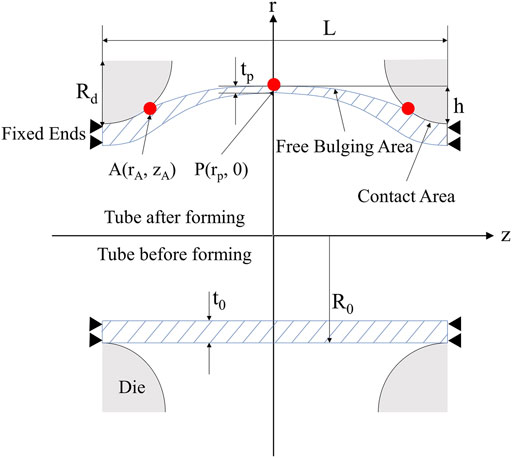
The geometry model adopted in the present study is shown in Figure 2. The failure prediction model begins from the bulging height at the pole point
where
The profile equations can be written in the form of
These functions pass through the intersection point A
The derivative of the two profile functions at point A
Once bulging height and the geometry of the initial tube and die are determined,
where
Substituting the function of the elliptic arc Eq. 36 into
The curvature radius in hoop direction at the same point is as follows:
2.3 Strain and Stress Analysis at the Pole Point
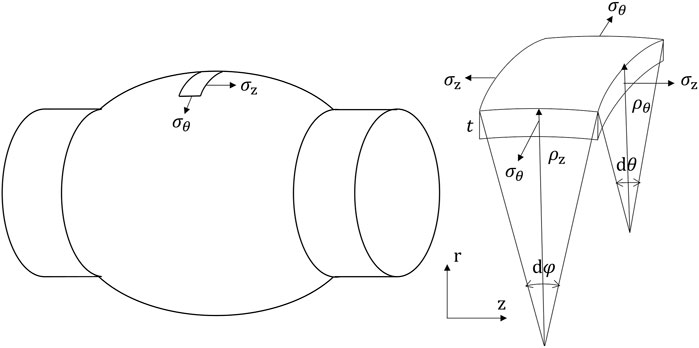
The pole point of the tube-hydro-bugling test undergoes the largest plastic deformation and thus neck first. The loading path of the pole point can be derived based on the geometry model. Figure 3 shows the geometry and stress of the infinitesimal element at the hydro-bulging tube’s pole. By analyzing this infinitesimal element, the expression of stress and strain components can be derived (Hwang and Lin, 2007; He et al., 2014a; He et al., 2014b; Zhu et al., 2020).
Radial strain and hoop strain components on the pole point can be written as follows:
The expression of axial strain can be calculated through volume constancy:
where
The force equilibrium equation in the radial (
where
By applying fixed-ends boundary condition on the axial direction force equilibrium equation, the following is derived:
where
By substituting Eq. 47 into Eq. 45, the hoop stress components can be expressed as follows:
By substituting Eqs 47, 48 into Eq. 23, the associated flow rule can be expressed as follows:
By converting the differential equation into difference form, the associated flow rule can be expressed as follows:
By substituting Eqs 41, 42 into Eq. 50, a non-linear equation with only one unknown,
Once
The Total Equivalent Strain
The equivalent stress in Zone
The flow stress curve of the tubular material was expressed by the following:
where
All the stress components and equivalent stress can be obtained by back substitution of
2.4 M-K Model
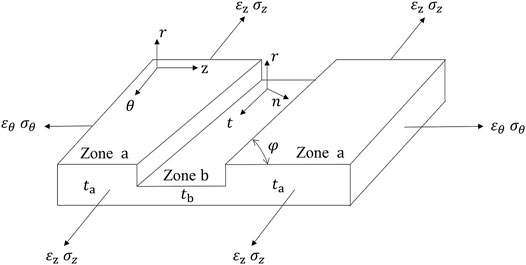
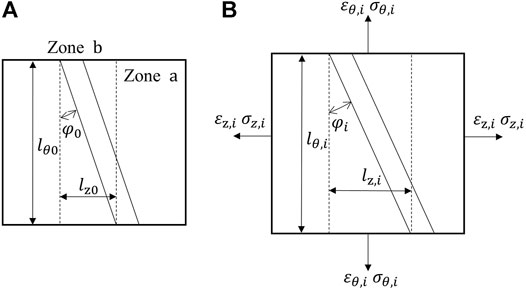
After acquiring the loading path at the pole point, the necking prediction can be started. Hutchinson and Neale (1978) gave a modified M-K model, which is shown in Figure 4.
The necking speed in Zone
By discretising, the following is derived:
Once the fracture criterion is fulfilled, the material is deemed to be necking.
2.4.1 The Imperfection Factor
The initial imperfection factor is defined as follows:
where
Subsequently the relationship between
2.4.2 Strain and Stress Analysis in Zone a
Zone
In order to calculate the strain and stress state in Zone
where
As shown in Figure 5,
Note that the width of Zone
2.4.3 Strain and Stress Analysis in Zone b
The stress and strain states in Zone
where the capital
Eq. 23 in Zone
There are only two equivalence relations and three unknowns (
The equivalent stress and strain increment can be calculated on non-principal axes of anisotropy to make use of the constitutional relationship. The transformed expression of equivalent stress and strain increment components on the axes
where the strain and stress are in matrix form:
The solutions are shown in vector form:
Note that
Thus, by substituting Eqs 79, 80 into Eqs 24, 28, respectively, the equivalent stress and strain increment can be expressed in
The total strain is as follows:
The constitutional relationship in Eq. 55 can be transformed as follows:
It is clear that Eq. 84 is a non-linear equation with
2.5 Numerical Process
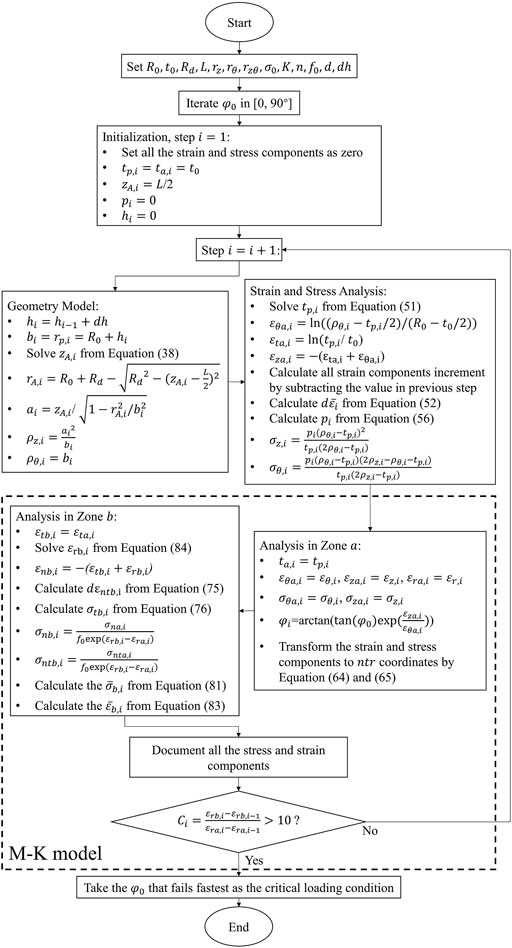
All the equations necessary for the failure prediction model have been derived in the previous sections and the procedure of utilizing the model is demonstrated in the flow chart of Figure 6. The core of the model requires the solution of three non-linear equations, Eq 38, 51, 84. The equations are simplified by eliminating to only one unknown that can be solved numerically.
3 Case Studies
3.1 Case Description
In the case studies, the derived model was applied on two tubes made from annealed C26800 zinc copper and AISI 1215 carbon steel, the material properties and geometry parameters of which are shown in Table 1 and Table 2 (Hwang and Wang, 2009).
3.2 Results and Discussion
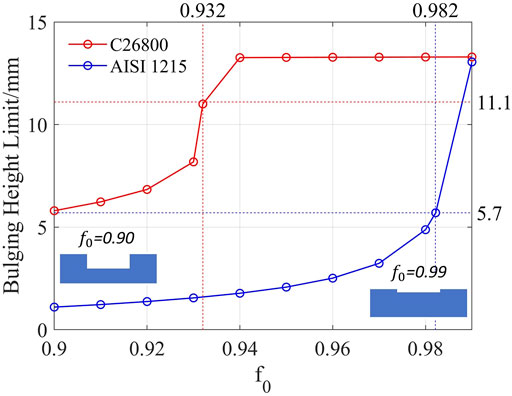
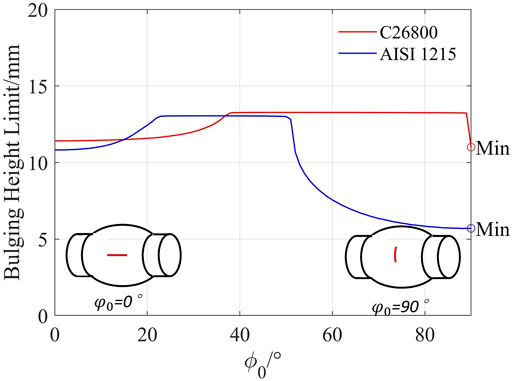
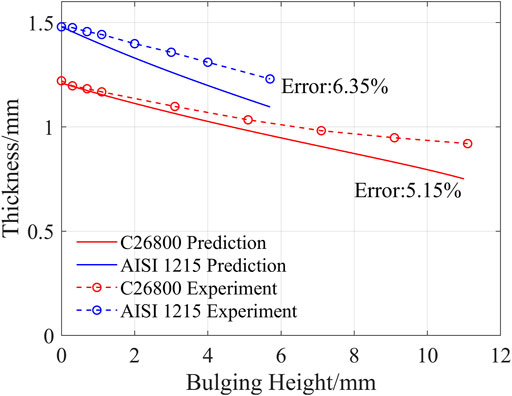
Hwang and Wang (2009) conducted hydro-bulging tests on C26800 and AISI 1215. They provided the evolutions of bulging height, inner pressure, and pole point thickness. The last bulging height recorded for each test was taken as the BHL. Thus, the BHL of C26800 and AISI 1215 are 11.1 and 5.7 mm, respectively. The failures in the experiments are developed along the axial direction. Therefore, Figure 7 used the derived model to predict the BHLs for both tubes under different
After determining
Figure 9 and Figure 10 predict the required pressure and pole point thickness evolution during the predictions under given
4 Conclusion
A failure model to predict the bulging limit of the tube hydro-bulging test is needed to evaluate the formability of a tubular material without conducting real tests. In the present study, a failure prediction model for the tube hydro-bulging test was developed by the combination of Hill’s orthogonal anisotropic model, the geometry model, and the M-K model. The main conclusions can be summarized as follows:
• Given
• By assuming that the necking can only appear along the axial direction, the model can be simplified by stopping the iteration of
• In the case studies, the predictions of the required pressure and the pole point thickness evolution demonstrate marginal errors compared with the experimental results, which are 3.81% and 5.75%, respectively. This verified the validity of the model.
Data Availability Statement
The original contributions presented in the study are included in the article/Supplementary Material; further inquiries can be directed to the corresponding author.
Author Contributions
BD is the main developer of the model and the first author of the article. HL contributed to the discussion part and figures. SD contributed to the establishment of the model. KW contributed to the establishment of the model. XL is the corresponding author of the article. He guided BD in the model derivation and article writing. DP contributed to the checking of the model and its improvement.
Conflict of Interest
The authors declare that the research was conducted in the absence of any commercial or financial relationships that could be construed as a potential conflict of interest.
Publisher’s Note
All claims expressed in this article are solely those of the authors and do not necessarily represent those of their affiliated organizations, or those of the publisher, the editors, and the reviewers. Any product that may be evaluated in this article, or claim that may be made by its manufacturer, is not guaranteed or endorsed by the publisher.
References
Aue-u-lan, Y. (2007). Hydroforming of Tubular Materials at Various Temperatures Dissertation/doctoral Thesis. Columbus (OH): The Ohio State University.
Barata da Rocha, A., Barlat, F., and Jalinier, J. M. (1985). Prediction of the Forming Limit Diagrams of Anisotropic Sheets in Linear and Non-linear Loading. Mater. Sci. Eng. 68, 151–164. doi:10.1016/0025-5416(85)90404-5
Boudeau, N., and Malécot, P. (2012). A Simplified Analytical Model for Post-processing Experimental Results from Tube Bulging Test: Theory, Experimentations, Simulations. Int. J. Mech. Sci. 65, 1–11. doi:10.1016/j.ijmecsci.2012.08.002
Fllice, L., Fratini, L., and Micari, F. (2001). A Simple Experiment to Characterize Material Formability in Tube Hydroforming. CIRP Ann. 50, 181–184. doi:10.1016/s0007-8506(07)62100-3
Fuchizawa, S., Narazaki, M., and Yuki, H. (1993). “Bulge Test for Determining Stress-Strain Characteristics of Thin Tubes,” in Advanced Technology of Plasticity, 1, 488–493.
Ganjiani, M., and Assempour, A. (2008). Implementation of a Robust Algorithm for Prediction of Forming Limit Diagrams. J. Materi Eng Perform 17, 1–6. doi:10.1007/s11665-007-9121-4
Gao, H., El Fakir, O., Wang, L., Politis, D. J., and Li, Z. (2017). Forming Limit Prediction for Hot Stamping Processes Featuring Non-isothermal and Complex Loading Conditions. Int. J. Mech. Sci. 131-132, 792–810. doi:10.1016/j.ijmecsci.2017.07.043
Graf, A., and Hosford, W. F. (1990). Calculations of Forming Limit Diagrams. Metallurgical Transactions A 21, 87–94. doi:10.1007/BF02656427
He, Z., Yuan, S., Lin, Y., Wang, X., and Hu, W. (2014a). Analytical Model for Tube Hydro-Bulging Test, Part I: Models for Stress Components and Bulging Zone Profile. Int. J. Mech. Sci. 87, 297–306. doi:10.1016/j.ijmecsci.2014.05.009
He, Z., Yuan, S., Lin, Y., Wang, X., and Hu, W. (2014b). Analytical Model for Tube Hydro-Bulging Tests, Part II: Linear Model for Pole Thickness and its Application. Int. J. Mech. Sci. 87, 307–315. doi:10.1016/j.ijmecsci.2014.05.010
Hill, R. (1948). A Theory of the Yielding and Plastic Flow of Anisotropic Metals. Proc. R. Soc. Lond. Ser. A. Math. Phys. Sci. 193, 281–297. doi:10.1098/rspa.1948.0045
Hutchinson, J. W., and Neale, K. W. (1978). “Sheet Necking-II. Time-independent Behavior,” in Mechanics of Sheet Metal Forming: Material Behavior and Deformation Analysis. Editors D. P. Koistinen, and N. Wang (Boston, MA: Springer US), 127–153. doi:10.1007/978-1-4613-2880-3_6
Hwang, Y.-M., and Lin, Y.-K. (2006). Analysis of tube bulge forming in an open die considering anisotropic effects of the tubular material. Int. J. Mach. Tools Manuf. 46, 1921–1928. doi:10.1016/j.ijmachtools.2006.01.025
Hwang, Y.-M., and Lin, Y.-K. (2007). Evaluation of Flow Stresses of Tubular Materials Considering Anisotropic Effects by Hydraulic Bulge Tests. J. Eng. Mater. Technol. 129, 414–421. doi:10.1115/1.2744406
Hwang, Y. M., and Wang, C. W. (2009). Flow Stress Evaluation of Zinc Copper and Carbon Steel Tubes by Hydraulic Bulge Tests Considering Their Anisotropy. J. Mater. Process. Technol. 209, 4423–4428. doi:10.1016/j.jmatprotec.2008.10.033
Imaninejad, M., Subhash, G., and Loukus, A. (2004). Influence of End-Conditions during Tube Hydroforming of Aluminum Extrusions. Int. J. Mech. Sci. 46, 1195–1212. doi:10.1016/j.ijmecsci.2004.08.001
International Standard Organization (2021). Metallic Materials — Determination of Forming-Limit Curves for Sheet and Strip — Part 2: Determination of Forming-Limit Curves in the Laboratory.
Kuwabara, T., Yoshida, K., Narihara, K., and Takahashi, S. (2005). Anisotropic Plastic Deformation of Extruded Aluminum Alloy Tube under Axial Forces and Internal Pressure. Int. J. Plasticity 21, 101–117. doi:10.1016/j.ijplas.2004.04.006
Marciniak, Z., and Kuczyński, K. (1967). Limit Strains in the Processes of Stretch-Forming Sheet Metal. Int. J. Mech. Sci. 9, 609–620. doi:10.1016/0020-7403(67)90066-5
Mohr, D., Dunand, M., and Kim, K.-H. (2010). Evaluation of Associated and Non-associated Quadratic Plasticity Models for Advanced High Strength Steel Sheets under Multi-Axial Loading. Int. J. Plasticity 26, 939–956. doi:10.1016/j.ijplas.2009.11.006
Mori, K., Maeno, T., and Maki, S. (2007). Mechanism of Improvement of Formability in Pulsating Hydroforming of Tubes. Int. J. Mach. Tools Manuf. 47, 978–984. doi:10.1016/j.ijmachtools.2006.07.006
Sokolowski, T., Gerke, K., Ahmetoglu, M., and Altan, T. (2000). Evaluation of Tube Formability and Material Characteristics: Hydraulic Bulge Testing of Tubes. J. Mater. Process. Technol. 98, 34–40. doi:10.1016/s0924-0136(99)00303-9
Strano, M., and Altan, T. (2004). An Inverse Energy Approach to Determine the Flow Stress of Tubular Materials for Hydroforming Applications. J. Mater. Process. Technol. 146, 92–96. doi:10.1016/j.jmatprotec.2003.07.016
Swift, H. W. (1952). Plastic Instability under Plane Stress. J. Mech. Phys. Solids 1, 1–18. doi:10.1016/0022-5096(52)90002-1
Keywords: tube hydro-bulging test, bulging height limit, Hill’s orthogonal anisotropic model, M-K model, non-linear loading
Citation: Di B, Liu H, Dhawan S, Wang K, Liu X and Politis DJ (2022) Mechanics-Based Failure Model of Tube Hydro-Bulging Test. Front. Mech. Eng 8:908375. doi: 10.3389/fmech.2022.908375
Received: 30 March 2022; Accepted: 30 May 2022;
Published: 05 July 2022.
Edited by:
Amit Bandyopadhyay, Washington State University, United StatesReviewed by:
Heng Li, Northwestern Polytechnical University, ChinaKailun Zheng, Dalian University of Technology, China
Copyright © 2022 Di, Liu, Dhawan, Wang, Liu and Politis. This is an open-access article distributed under the terms of the Creative Commons Attribution License (CC BY). The use, distribution or reproduction in other forums is permitted, provided the original author(s) and the copyright owner(s) are credited and that the original publication in this journal is cited, in accordance with accepted academic practice. No use, distribution or reproduction is permitted which does not comply with these terms.
*Correspondence: Xiaochuan Liu, bGl1eGlhb2NodWFuMjAyMEB4anR1LmVkdS5jbg==
 Bozhou Di
 Heli Liu
 Saksham Dhawan1
 Xiaochuan Liu