- State Key Laboratory of High-Performance Precision Manufacturing, Dalian University of Technology, Dalian, China
Subsurface damage (SSD) is inevitably generated during the grinding process of quartz glass. It has a great impact on sustainability, lifetime and optical performance of quartz glass components and systems. This paper proposes a non-destructive detection method for detecting SSD in ground quartz glass based on polarized laser scattering (PLS). A PLS system was built to detect SSD in ground quartz glass samples prepared with different abrasive particle sizes. The PLS detection signal value had a positive correlation with the SSD depth. The finite-difference time-domain (FDTD) method was used to simulate the laser scattering process at the SSD. The distribution of electric field intensity could reflect the location of SSD. It is concluded that the PLS system can effectively detect SSD in the ground quartz glass.
1 Introduction
Hard and brittle materials including glass, ceramics, and semiconductors are widely used in optical devices, aerospace, microelectronics, and other industrial applications, due to their excellent mechanical, optical, and chemical properties (You et al., 2020). Quartz glass, as an easily available hard and brittle material, has the advantages of high hardness, wear resistance, corrosion resistance, and low thermal expansion coefficient (Sindhu et al., 2020). Currently, grinding is one of the most important technologies in the manufacturing of quartz glass. During the grinding process, it inevitably produces SSD in the quartz glass (Guo et al., 2020), which has a great impact on the sustainability, lifetime, and optical performance of quartz glass components and systems (Chen et al., 2020). To reduce and eliminate quartz glass SSD in the next process, it is important to detect SSD. Therefore, it is of great importance to propose an accurate and efficient method to detect SSD of ground quartz glass to optimize the precision machining process and improve the surface quality and process efficiency of quartz glass.
The current detection methods for SSD in quartz glass are mainly divided into destructive methods and non-destructive methods. In destructive methods, SSD is exposed and then the SSD information is obtained by microscopic observation (Jin et al., 2019). The common methods of destructive detection include cross-sectional microscopy (Esmaeilzare et al., 2014), angular polishing (Guo et al., 2005), HF chemical etching (Zhu et al., 2017), and the combination technology of TEM and FIB (Li et al., 2019; Li et al., 2022). Compared to non-destructive methods, the destructive methods are more mature, but the destruction of the sample may greatly propagate the SSD, which is greatly influenced by the experimental conditions and the operations (Yin et al., 2018). Non-destructive methods could achieve SSD detection with optical and electrical methods. Combined with the existing computer and automation technology, non-destructive methods can achieve full-field detection of SSD in the sample (Zhang et al., 2021).
Non-destructive detection methods for quartz glass SSD mainly include fluorescent penetrant inspection (Shipway et al., 2019), X-ray microscopy (Jaimes et al., 2021), optical coherence tomography (Wang and Tuchin, 2013), total internal reflection technique (Xu et al., 2016), scanning acoustic microscopy (Bauermann et al., 2020) and non-linear acoustics (Klepka et al., 2019). Fluorescence microscopy can provide effective observation of surface extension damage, but it is difficult for the fluorescent agent to penetrate the SSD and detect them accurately. X-ray microscopy is inefficient and can only detect samples in a certain range of size. Optical coherence tomography can achieve the global damage detection of samples. However, the scattering and reflection of the surface can affect the accuracy of SSD detection. Total internal reflection microscopy can effectively detect damage in large-aperture optical components, but it requires a high level of flatness of the samples, and the test results are greatly affected by the surface roughness. Scanning acoustic microscopy has a high longitudinal resolution, but the detection signal is mainly from the sample interior, which is difficult to accurately detect SSD. Non-linear acoustic-based method is used to detect local damage which is more sensitive and faster than linear techniques, but it is difficult to achieve the exact location of the surface/subsurface damage.
The polarized laser scattering at the SSD leads to laser depolarization (Yin et al., 2019). This method is applicable to hard and brittle materials which can transmit light to a certain depth, such as borosilicate glasses, quartz glasses, silicon wafers, etc., avoiding the influence of surface roughness (Li et al., 2020). In this study, a PLS system was built and used to detect SSD in ground quartz glass. The laser scattering process of polarized laser at different depths of SSD was simulated using the FDTD method. The detection signals are consistent with the simulated results, indicating that the PLS system can effectively detect SSD in ground quartz glass.
2 Experimental procedures
2.1 PLS detection principle and system setup
The principle of PLS is shown in Figure 1. When the polarized light is incident on the surface of the sample, it scatters on the surface, and the polarization state of the emitted light is the same as the polarized light. When the polarized light transmits to the subsurface of the ground quartz glass, it is multi-scattered by the SSD, leading to depolarization, as a result, the polarization state of the emitted light is changed significantly.
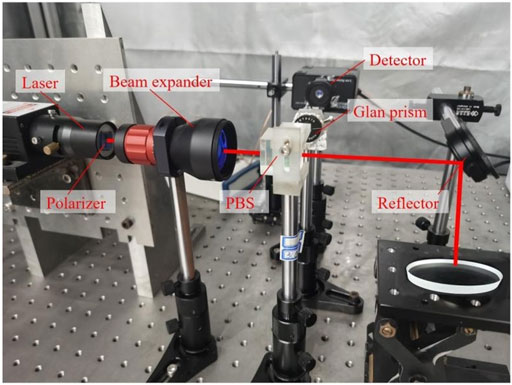
Based on the above principle of PLS, the PLS system was built as shown in Figure 2. The laser emits the detection laser beam, which is changed into P-polarized light by the polarizer. Then the P-polarized light is amplified by the beam expander and passes the polarizing beam splitter. Reflected by the reflector, the P-polarized light irradiates the surface of the ground quartz glass sample, and forms a light spot with a diameter of 1.5 mm. The P-polarized light is single-scattered and reflected on the ground quartz glass surface, and multiple-scattered at the SSD. The polarization state of the single scattered and reflected light on the surface is almost the same as that of the incident P-polarized light, while the polarization state of multi-scattered light is changed significantly. The partially polarized light is separated from the scattered light by the polarizing beam splitter, and then the S-polarized light, which carries the information of the SSD in the ground quartz glass sample, is finally collected by the detector. By controlling the movement of the precision moving stage, the light spot scans over the sample.
In this study, the PLS detection system consisted of a laser model MIL-III-914-50, the output laser power was 15 mW, the polarization laser wavelength was 914 nm, and the beam width of the laser was 1.5 mm. A KG-PR-100MA-FS detector was used to capture the depolarized light signal from SSD and convert the optical signal into an electrical signal. An NI PCIe-6320 data acquisition card was used to collect the detection data. The sample to be detected was placed on a precision moving platform (XYZPPS-20, HAWK, China).
2.2 Sample preparation and PLS detection procedures
To investigate the PLS detection of SSD in ground quartz glass, three sets of grinding experiments were conducted. The samples used in the grinding experiments were double-sided optical grade polished JGS1 quartz glass substrates with a diameter of 15 μm and a thickness of 1.5 μm. A grinder (HD-380X, Hyder, China) was used. The grinding method was free abrasive grinding, and the lapping fluid was diamond abrasive lapping fluid (SO1-1104D, Zhongwei, China). In the quartz glass grinding process, the SSD depth is most significantly affected by abrasive particle size, grinding pressure, and grinding disc speed (Wang et al., 2008). Among them, abrasive particle size has the greatest influence on the depth of SSD (Zhou et al., 2022). In this study, three sets of samples with different SSD depths were obtained by controlling the abrasive particle size (5 μm, 15 μm, and 20 μm) of diamond abrasive particles. Other grinding parameters are shown in Table 1.
The surface roughness of these three sets of prepared ground quartz glass samples was measured by a 3D surface profilometer (New-View 9000, ZYGO, United States). The surface morphology is shown in Figure 3. The surface roughness with abrasive particle sizes of 5 μm, 15 μm, and 20 μm was Ra 81.1 nm, 217.4 nm, and 306.6 nm, respectively.
To investigate the relationship between the SSD depth and the detection signal of the PLS system, the SSD depth was calculated by fracture mechanics. Li et al. (2008) stated that the depth of SSD was positively correlated with the surface roughness, and proposed a model to predict the depth of SSD in grinding, as shown in Eq. 1
where δ is the median damage depth; ψ is the semi-angle of the sharp cone; E, H, and KIC are the elastic modulus, hardness, and fracture toughness of quartz glass, respectively; αK, m are constant coefficients; Ra is the surface roughness. The values of the parameters are shown in Table 2. According to Eq. 1, the SSD depth of the three groups of ground samples was calculated as 1.96 μm, 7.28 μm, and 11.51 μm, respectively.

TABLE 2. Fracture mechanical property parameters of quartz glass (Lambropoulos et al., 1999).
Three groups of quartz glass ground by different abrasive particle sizes were detected by the PLS system. The ground sample was placed on the moving platform. P-polarized light was irradiated on the surface of the sample and scanned over a 4 mm distance. The detection signal was analyzed and processed by the computer.
3 Results and discussions
3.1 Results of PLS detection
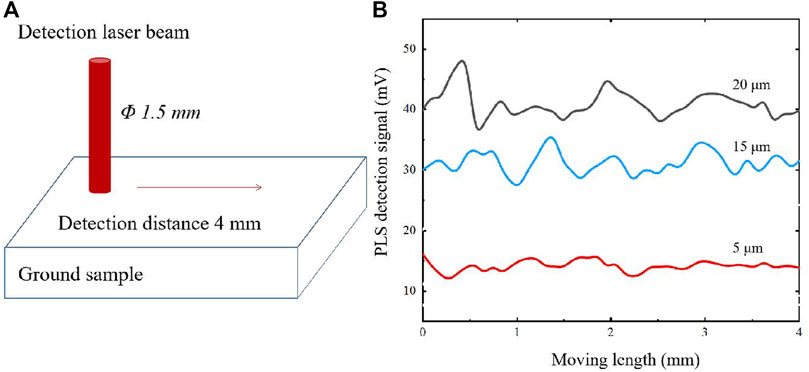
As shown in Figure 4A, three groups of ground quartz glass samples were detected by the PLS system. The detection distance was 4 mm, and the detection width was 1.5 mm. The PLS detection signals of SSD for three quartz glass samples with different abrasive particle sizes are shown in Figure 4B. The signal fluctuated during the detection because the depth of SSD induced by grinding was not uniform (Zhao et al., 2007). It is found that the detection signal value was related to the size of the abrasive particle. According to Eq. 1, the depth of the SSD is increased with the abrasive particle size. Therefore, the PLS system generated a large detection signal when the damage depth was large.

FIGURE 4. (A) Schematic of the detection process (B) PLS detection signals of samples with different abrasive particle sizes.
3.2 FDTD simulation of PLS detection
To verify the feasibility of the PLS system for SSD detection, the scattering process of polarized light at the SSD of quartz glass was simulated by the FDTD method. FDTD method is a rigorous and powerful tool for modeling the effects of scattering, transmission, reflection, and absorption of light. By using this method, Maxwell’s equations are solved directly based on grids without physical approximation (Li et al., 2020).
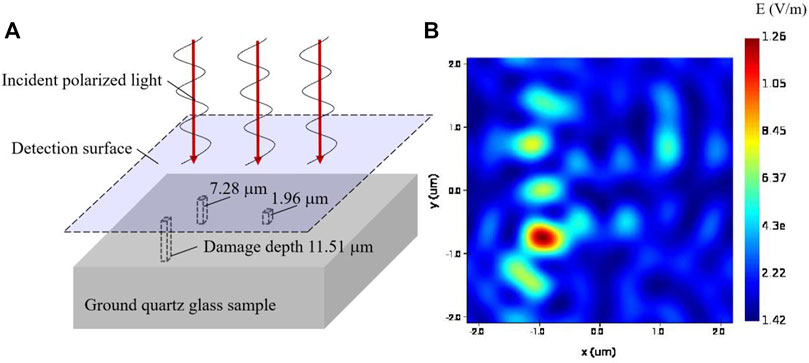
As shown in Figure 5A, in the FDTD simulation, a P-polarized light was used as the incident light. The SSD depths were set to 1.96 μm, 7.28 μm, and 11.51 μm, which were consistent with those in the PLS detection experiment. The FDTD simulation results are shown in Figure 5B. Circles indicate the locations of the SSD. It can be seen that at the locations of SSD, the intensity of the electric field was large. With the increase of the damage depth, the value was increased. When the SSD depth was increased from 1.96 μm to 11.51 μm, the electric field intensity was increased from 6.37 V/m to 12.6 V/m.

FIGURE 5. (A) FDTD simulation model of laser scattering, (B) distribution of electric field intensity of FDTD simulation.
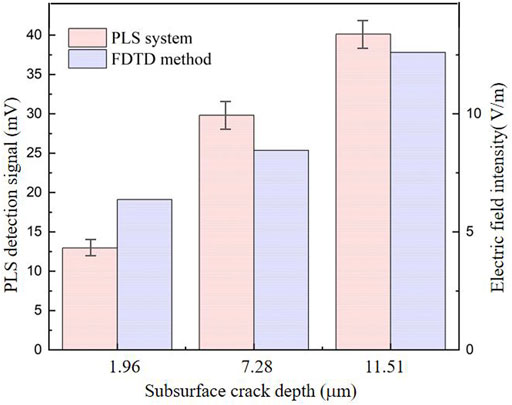
Since the distribution of SSD in the ground glass was uneven due to the random distribution of the abrasive particles, the PLS detection signal in Figure 4B fluctuated during the moving of the precision stage. Therefore, an average value of the PLS signal for each sample was obtained in Figure 6. It is shown that the PLS detection signal and the electric field intensity from the FDTD simulation were consistent. As the increase of the SSD depth, both the PLS detection signal and the electric field intensity increased. The errors were also increased with the increase of the SSD depth, due to the superimposition of SSD induced by larger abrasive particle size. In this study, the resolution of PLS system can reach a micron level, which was on the same order of magnitude as X-ray microscopy (Jaimes et al., 2021), optical coherence tomography (Wang and Tuchin, 2013), total internal reflection technique (Xu et al., 2016), and scanning acoustic microscopy (Bauermann et al., 2020), much higher than fluorescent penetrant inspection (Shipway et al., 2019) and non-linear acoustics (Klepka et al., 2019).

FIGURE 6. Comparison of detection signals and electric field intensity for SSD depth of 1.96 μm, 7.28 μm, and 11.51 μm.
4 Conclusion
In this paper, a PLS system for detecting SSD in ground quartz glass was built. Three samples ground by different abrasive particle sizes were prepared. The SSD of these samples was detected by using the PLS system. FDTD simulation of laser scattering at the damage was conducted. The following conclusions were obtained:
1) The PLS system can detect SSD in ground quartz glass effectively.
2) The PLS detection signal value had a positive correlation with the subsurface depth.
3) The laser scattering model using the FDTD method indicated that the distribution of electric field intensity could reflect the location of SSD.
Data availability statement
The original contributions presented in the study are included in the article/supplementary material, further inquiries can be directed to the corresponding author.
Author contributions
FS wrote the main manuscript text and performed the subsurface quality observation. GQ, QL, and QB provided the idea and assisted with the discussion on results.
Funding
This work was financially supported by the National Key Research and Development Plan of China (2022YFB3403602).
Conflict of interest
The authors declare that the research was conducted in the absence of any commercial or financial relationships that could be construed as a potential conflict of interest.
Publisher’s note
All claims expressed in this article are solely those of the authors and do not necessarily represent those of their affiliated organizations, or those of the publisher, the editors and the reviewers. Any product that may be evaluated in this article, or claim that may be made by its manufacturer, is not guaranteed or endorsed by the publisher.
References
Bauermann, L. P., Mesquita, L. V., Bischoff, C., Drews, M., Fitz, O., Heuer, A., et al. (2020). Scanning acoustic microscopy as a non-destructive imaging tool to localize defects inside battery cells. J. Power Sources Adv. 6, 100035. doi:10.1016/j.powera.2020.100035
Chen, X., Wang, H., and Zhang, W. (2020). Dynamic characteristics of abrasive grains and machined surface features for variable axis diamond grinding of quartz glass. J. Braz. Soc. Mech. Sci. Eng. 42, 421–515. doi:10.1007/s40430-020-02473-5
Esmaeilzare, A., Rahimi, A., and Rezaei, S. M. (2014). Investigation of subsurface damages and surface roughness in grinding process of Zerodur® glass–ceramic. Appl. Surf. Sci. 313, 67–75. doi:10.1016/j.apsusc.2014.05.137
Guo, Q. S., Jin, W. G., and Zhou, Q. Y. (2005). Vision inspection technology of IC die bonder. Equip. Electron. Prod. Manuf. 126, 34–40.
Guo, X., Li, M., Luo, X., Zhai, R., Kang, R., Jin, Z., et al. (2020). Smoothed-particle hydrodynamics investigation on brittle–ductile transition of quartz glass in single-grain grinding process. Nanomanufacturing Metrology 3, 299–306. doi:10.1007/s41871-020-00075-2
Jaimes, A. T. C., de Pablos-Martín, A., Hurle, K., e Silva, J. M. D. S., Berthold, L., Kittel, T., et al. (2021). Deepening our understanding of bioactive glass crystallization using TEM and 3D nano-CT. J. Eur. Ceram. Soc. 41 (9), 4958–4969. doi:10.1016/j.jeurceramsoc.2021.02.051
Jin, Y., Jiao, L., Zhu, Y., and Tong, Y. (2019). “Study on the destructive measurement of subsurface damage for fused silica mirror,” in 9th International Symposium on Advanced Optical Manufacturing and Testing Technologies: Large Mirrors and Telescopes, Chengdu, China, 26-29 June 2018, 341–346.
Klepka, A., Pieczonka, L., Dziedziech, K., Staszewski, W. J., Aymerich, F., and Uhl, T. (2019). “Structural damage detection based on nonlinear acoustics: Application examples,” in Nonlinear ultrasonic and vibro-acoustical techniques for nondestructive evaluation (Berlin, Germany: Springer), 139–174.
Lambropoulos, J. C., Li, Y., Funkenbusch, P. D., and Ruckman, J. L. (1999). “Noncontact estimate of grinding-induced subsurface damage,” in Optical manufacturing and testing III, Denver, Colorado, 20-23 July, 1999, 41–50. SPIE.
Li, C., Li, X., Wu, Y., Zhang, F., and Huang, H. (2019). Deformation mechanism and force modelling of the grinding of YAG single crystals. Int. J. Mach. Tools Manuf. 143, 23–37. doi:10.1016/j.ijmachtools.2019.05.003
Li, C., Piao, Y., Meng, B., Hu, Y., Li, L., and Zhang, F. (2022). Phase transition and plastic deformation mechanisms induced by self-rotating grinding of GaN single crystals. Int. J. Mach. Tools Manuf. 172, 103827. doi:10.1016/j.ijmachtools.2021.103827
Li, J., Guo, L. X., and Zeng, H. (2010). FDTD method investigation on the polarimetric scattering from 2-D rough surface. Prog. Electromagn. Res. 101, 173–188. doi:10.2528/pier09120104
Li, Q., Bai, Q., and Zhang, B. (2020). Detection of subsurface microdamage after grinding of single crystal silicon wafer by polarized laser scattering. Diam. Abrasives Eng. 40, 87–92.
Li, S., Wang, Z., and Wu, Y. (2008). Relationship between subsurface damage and surface roughness of optical materials in grinding and lapping processes. J. Mater. Process. Technol. 205 (1-3), 34–41. doi:10.1016/j.jmatprotec.2007.11.118
Randi, J. A., Lambropoulos, J. C., and Jacobs, S. D. (2005). Subsurface damage in some single crystalline optical materials. Appl. Opt. 44 (12), 2241–2249. doi:10.1364/ao.44.002241
Shipway, N. J., Barden, T. J., Huthwaite, P., and Lowe, M. J. S. (2019). Automated defect detection for fluorescent penetrant inspection using random forest. NDT E Int. 101, 113–123. doi:10.1016/j.ndteint.2018.10.008
Sindhu, D., Thakur, L., and Chandna, P. (2020). Parameter optimization of rotary ultrasonic machining on quartz glass using response surface methodology (RSM). Silicon 12, 629–643. doi:10.1007/s12633-019-00160-2
Wang, R. K., and Tuchin, V. V. (2013). Optical coherence tomography: Light scattering and imaging enhancement. Handb. coherent-domain Opt. methods 2013, 665–742. doi:10.1007/978-1-4614-5176-1_16
Wang, Z., Wu, Y., Dai, Y., Li, S., and Zhou, X. (2008). Rapid detection of SSD of optical materials in lapping process and its influence regularity. Opt. Precis. Eng. 1, 16–21.
Xu, Y., Jiang, Z., Wang, H., and Yong, H. (2016). Theoretical research and experimental analysis on the depth measurement of SSD. Laser & Optoelectron. Prog. 53 (11), 193–200.
Yin, J., Bai, Q., and Zhang, B. (2019). Subsurface damage detection on ground silicon wafers using polarized laser scattering. J. Manuf. Sci. Eng. 141 (10). doi:10.1115/1.4044417
Yin, J. F., Bai, Q., and Zhang, B. (2018). Methods for detection of subsurface damage: A review. Chin. J. Mech. Eng. 31 (1), 41–14. doi:10.1186/s10033-018-0229-2
You, K., Yan, G., Luo, X., Gilchrist, M. D., and Fang, F. (2020). Advances in laser assisted machining of hard and brittle materials. J. Manuf. Process. 58, 677–692. doi:10.1016/j.jmapro.2020.08.034
Zhang, Y., Zhang, L., Chen, K., Liu, D., Lu, D., and Deng, H. (2021). Rapid subsurface damage detection of SiC using inductivity coupled plasma. Int. J. Extreme Manuf. 3 (3), 035202. doi:10.1088/2631-7990/abff34
Zhao, Q., Liang, Y., Stephenson, D., and Corbett, J. (2007). Surface and subsurface integrity in diamond grinding of optical glasses on Tetraform ‘C. Int. J. Mach. Tools Manuf. 47 (14), 2091–2097. doi:10.1016/j.ijmachtools.2007.05.005
Zhou, H., Jiang, W., Ji, J., Ren, X., Zhu, Z., and Zhang, C. (2022). Prediction and experimental investigation of depth of subsurface damage in semi-consolidated abrasive grinding of cleavable gallium oxide crystals. Int. J. Adv. Manuf. Technol. 119, 855–864. doi:10.1007/s00170-021-08311-9
Keywords: polarized laser scattering, non-destructive detection, ground quartz glass, FDTD method, subsurface damage
Citation: Shi F, Qiao G, Lv Q and Bai Q (2023) Polarized laser scattering detection of subsurface damage of quartz glass induced by grinding. Front. Mater. 10:1167271. doi: 10.3389/fmats.2023.1167271
Received: 16 February 2023; Accepted: 13 March 2023;
Published: 29 March 2023.
Edited by:
Huseyin Ozan Tekin, University of Sharjah, United Arab EmiratesReviewed by:
Gokhan Kilic, Eskişehir Osmangazi University, TürkiyeStefan Karlsson, RISE Research Institutes of Sweden, Sweden
Feihu Zhang, Harbin Institute of Technology, China
Copyright © 2023 Shi, Qiao, Lv and Bai. This is an open-access article distributed under the terms of the Creative Commons Attribution License (CC BY). The use, distribution or reproduction in other forums is permitted, provided the original author(s) and the copyright owner(s) are credited and that the original publication in this journal is cited, in accordance with accepted academic practice. No use, distribution or reproduction is permitted which does not comply with these terms.
*Correspondence: Qian Bai, YmFpcWlhbkBkbHV0LmVkdS5jbg==
 Fangyuan Shi
 Guowen Qiao
 Qixin Lv
 Qian Bai


