- 1National Synchrotron Radiation Research Center, Hsinchu, Taiwan
- 2Department of Materials Science and Engineering, National Yang Ming Chiao Tung University, Hsinchu, Taiwan
- 3Metal Industries Research and Development Centre, Kaohsiung, Taiwan
- 4Australian Nuclear Science and Technology Organisation (ANSTO), Lucas Heights, NSW, Australia
- 5School of Civil Engineering, The University of Sydney, Sydney, NSW, Australia
- 6Department of Physics, College of Education, Can Tho University, Can Tho, Vietnam
- 7Department of Materials Science and Engineering, Chungnam National University, Daejeon, South Korea
- 8Department of Mechanical Engineering, National Yang Ming Chiao Tung University, Hsinchu, Taiwan
- 9Department of Engineering and System Science, National Tsing Hua University, Hsinchu, Taiwan
The role of residual stress is critical, particularly for machine tools demanding accuracy below 1 µm. Although minor stresses are subjected to a tiny area, the applied force can cause devastating distortions on the precision components at this length scale. In this research, we systematically investigated the residual stress in a stress frame of the gray iron used in machine tools using synchrotron X-ray and neutron sources. Through the combination of these techniques, the residual stresses on the surface, inside the bulk, and in average were presented. Comprehensive analysis results shed light on the vibratory stress relief technique, which reduced the residual stresses and stabilized them, even materials undergoing cycling heating. Although compressive stresses are not effectively reduced, this technique is useful in improving the mechanical stability of the materials in machine tools.
Introduction
Machine tools including cutting machines and drilling machines are used to manufacture products with specific shapes and dimensional tolerances. The work presented here is not only fundamental in nature but also important to the machine tool industry. The demand of machine tools increases year by year due to technology developments and the associated increased requirements for machining accuracy. According to Mou and Liu, (1992); Mou, (1997); Anderson, (2012), accuracy requirements are routinely 1 µm or less and cyclic stability is also required for high-precision machine tools. To do that, the material components of the machine tools must be stable during operation. Any issues disturbing the stability of the components during casting or machining should be avoided. One such issue is the residual stress existing in the components of machine tools, arising from the manufacturing process. Any release of the residual stress or the interaction between the components may cause a decreased strength or distortion, resulting in reduced accuracy of the machine tools. Controlling the residual stress, thus, becomes crucial to develop high-precision machine tools with both high accuracy and stability during operation.
A number of methods are available for measuring the residual stress, including hole drilling methods reported by Gliha et al., (2013); Huang et al., (2013), contour methods and ultrasonic methods presented by Sanderson and Shen, (2010); Xu et al., (2015), and diffraction techniques utilizing X-ray or neutrons shown by Huang et al., (2011); Lee et al., (2015); Brown et al., (2016); Lee et al., (2017); Seo et al., (2017); Lam et al., (2020). Hole drilling and contour methods as destructive techniques are not well-accepted in the industry. Ultrasonic methods measure the residual stress based on the variation of sound speed after passing through or along the sample. However, the microstructure of the samples will also contribute to variation in ultrasound speed, and it is not easy to distinguish the effect of residual stress and that of microstructure. X-ray diffraction techniques are widely used because they are nondestructive methods and available as portable units, greatly speeding up the generation of results and its application in the industry. However, the resolution of the instrument is often neglected, and thus the value of the measured residual stress is potentially unreliable. In the X-ray diffraction method, resolution is dominated by the energy resolution of the X-ray and angular resolution of the diffractometer, according to Bragg’s Law. The combined energy resolution of the X-ray source and angular resolution of the diffractometer should be kept below 10–4 to determine the residual stress in steels and alloys as the order of the residual strains may be below 10–4. With sufficient resolution, peak shifts arising due to the residual strain can be identified correctly, and thus reasonable values of the residual stress can be obtained.
In-house X-ray diffraction instruments or portable X-ray diffraction instruments with X-ray tubes of the beam size are controlled by slits. The X-ray beam is generally not focused effectively in reducing the flux available for the measurement. A large X-ray beam size, while increasing flux, will result in the diffracted peak being broadened and hinder the identification of peak shift. In addition, the X-ray beam is dispersive as it is emitted from the X-ray tube, which complicates Bragg’s diffraction. The most critical factor of in-house X-ray machines is the energy resolution, which may be insufficient to identify the residual strain/stress precisely. As presented by Ricardo A. Terini et al., (1999), characteristic X-ray spectra emitted from a Philips MCN 421 shows an energy resolution larger than 0.01 keV, which is too large for the residual stress measurement.
Synchrotron X-ray with both high flux and high-energy resolution is a very good source for collecting diffraction patterns, determining peak shifts, and identifying the residual strain in the materials. In this study, we used synchrotron X-ray and a 6-circle diffractometer to collect the diffraction patterns and estimate the residual strain in gray iron, an important property of machine tools. The synchrotron beamline is equipped with a horizontal mirror, vertical mirror, and double crystal monochromator (DCM) to focus the X-ray beam and precisely control the X-ray energy. The energy resolution of synchrotron X-ray is of the order of 10–4 eV. The 6-circle diffractometer with an angular resolution better than 0.003° is used to facilitate sample positioning. Both the X-ray energy resolution and accurate positioning of the samples allow us to obtain reliable values of the residual strain and subsequently stress. The method is successfully used to identify the residual stress in gray iron after vibratory stress relief treatment and cyclic heat treatment. As the penetration of X-ray in the iron-based materials is limited due to the high attenuation of X-ray by iron, the diffraction measurements only provide information on the residual stress state of the sample surface. In addition, we utilized a neutron source and diffraction method to determine the residual strains and subsequently stresses in the gray iron samples. High penetration of neutrons through iron-based materials allows the measurement of bulk stresses within the samples. Both average stresses in the bulk and stresses in the through-thickness of the samples are reported here. The results shown in this study, thus, can be the fundamentals of measuring the residual stress precisely and controlling the stability of components in the machine tools.
The vibratory stress relief technique has been shown to be an effective method for reducing the residual stress in metallic materials; however, the mechanism of stress relief is poorly understood. Comprehensive analyses of the stresses on the surface and inside the bulk of the gray iron samples obtained in this study will provide a new insight into the mechanism of vibratory stress relief.
Materials and Methods
Materials
A gray iron, JIS FC 300, was fabricated by casting in a stress frame mold with a size of 200 mm, 100 mm, and 20 mm (length, width, and thickness, respectively), as shown in Figure 1. The stress frame has two thin rods outside and one thick rod inside to produce compressive stress and tensile stress after casting, respectively, due to different shrinkage suggested by Gustafsson et al., (2009); Pal, (2017). The material after casting was treated with annealing and vibratory stress relief treatment referring to Dawson and moffat, (1980); Wang et al., (2013); Wang et al., (2014); Wang et al., (2015). The samples in each condition (as cast, annealed, and annealed and vibratory stress relief) were subsequently subjected to cyclic heating. The vibratory stress relief treatment was conducted with a modified motor and adapter to vibrate the material at a frequency of 80–120 Hz. The load current of the stress relief motor was controlled to reach an amplitude about ±15 m/s2 gravity acceleration measured by an amplitude sensor. The cyclic heat treatment was applied by heating and cooling from 28 to 90°C for 20 cycles. In this study, the investigated as-cast gray iron comprised presumably large grain sizes with relatively uniform distribution; thus, the effect of the microdefects originating from the heterogenous grain sizes (Wang et al., 2018) can be neglected.
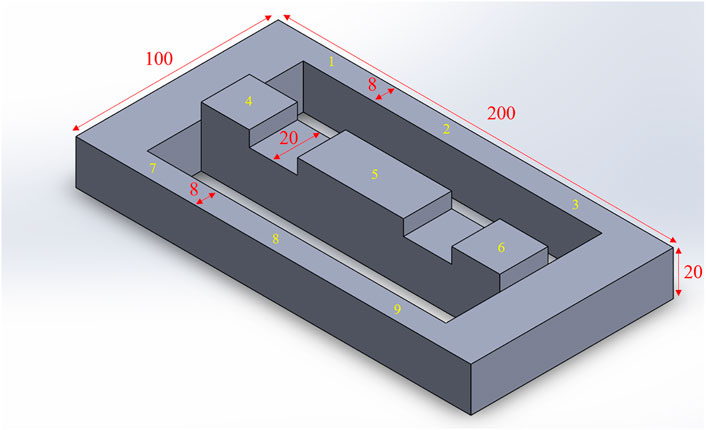
FIGURE 1. Picture of the stress frame (unit: mm). L (longitudinal), N (through-thickness), and T (transverse) stand for the three orthogonal directions in the stress frame.
X-Ray Diffraction Measurement
Synchrotron X-ray measurements were conducted at the BL07 beamline in the National Synchrotron Radiation Research Center (NSRRC), Taiwan. Before measurement, the beamline was optimized by adjusting the vertical focus mirror, horizontal focus mirror, K-B mirror, and Si (111) double crystal monochromator (DCM) to obtain maximum intensity and the smallest divergence of the X-ray beam. The energy resolution of synchrotron X-ray was 10–4 eV at an energy of 18 KeV. The penetration depth was estimated to be 70 µm.
X-ray diffraction patterns were recorded at the BL07 beamline by utilizing a 6-circle diffractometer manufactured by Bruker. The incident and diffracted angles were fixed to collect the α-ferrite (BCC) diffraction peak of (211). Peak position, peak intensity, and peak width were obtained by a single-peak fitting procedure using a pseudo-Voigt function. The lattice strain (elastic strain) was calculated as follows:
where d0,hkl is the stress-free d-spacing.
Plane Stress Condition
Because of the low penetration of X-ray in gray iron, it was assumed that the residual stress was in a plane stress condition. The azimuthal-dependent lattice strains can be expressed as follows:
where
Details of the theory can be found in the references reported by He, (2000); He, (2009). Based on the experimental geometry in this study, a plane stress condition was assumed as the external load to the thin plate sample, where
where,
where θ is the peak position at the azimuthal angle
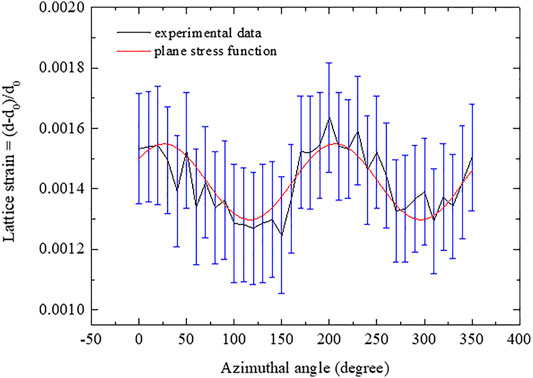
FIGURE 2. Curves of the lattice strain varying with the azimuthal angle. The experimental curve (black line) and the curve calculated by the plane stress function (red line).
Neutron Diffraction Measurement
The residual stress analyses of the gray iron samples using neutron diffraction were carried out at the TG3 beamline using the KOWARI residual strain instrument at the Australian Nuclear Science and Technology Organization (ANSTO), Australia. Due to the long penetration depth of neutrons, the KOWARI instrument can measure the residual stresses within the bulk of the material. By using an appropriate slit size, 3 × 3 mm slits on the primary beam and 3-mm radial collimators on the detector, spatially resolved measurements can be made within the samples. The results can subsequently be averaged to obtain a more generalized picture. The stresses are determined with the equation:
where the strains are calculated via Eq. 1, E and v are Young’s modulus and Poisson’s ratio, respectively.
Initially, the KOWARI instrument was optimized to maximize the neutron flux of the sample at a wavelength of 1.67 Å and to yield an approximately 90° diffraction angle for the α-ferrite diffraction peak of (211) and hence a cuboid gage volume. For a particular crystallographic direction being probed, Young’s modulus and Poisson’s ratio values were calculated using IsoDec software (Kröner model) proposed by Gnäupel-Herold, (2012). The sample was then translated and rotated on a sample stage to map out the strains in the three orthogonal directions.
Determination of Stress-Free D-Spacing
The stress-free d-spacing, d0,hkl, strongly influences the determination of the residual stress. Even a tiny deviation of d0,hkl will cause a serious variation of the lattice strain. According to Withers et al., (2007), there are several reference standards to determine the stress-free d-spacing, including powders, filings, cubes, and combs. The main aim of all these methods is to utilize the free surface, as much as possible, as this is least likely to be constrained. This study probed the stress-free d-spacing by collecting the diffraction patterns from all the three directions at the corner of the samples as close as possible to the surface. The through-thickness direction (the thinnest) was then assumed to be in plain stress, and a d0,hkl was calculated via deconvolution. With this method, a reasonable stress-free d-spacing is achieved.
Results and Discussion
Residual Stresses Measured by Synchrotron X-Ray
The residual stresses measured with synchrotron X-ray, assuming a plane stress condition, in the stress frame of the gray iron are shown in Figure 3. Figure 3A presents the residual stresses at point 2 (outside, thin), point 5 (middle, thick), and point 8 (outside, thin) of the stress frame before cyclic heating. As noted, the annealing process will enlarge the residual stresses and modify the stress distribution on the surface. One can expect this phenomenon, although annealing can facilitate the relaxation of the structure, and the material will experience additional thermal effects during cooling. Different cooling rates on the surface and inside the bulk will give rise to thermally induced residual stresses. Synchrotron X-ray measurement collected the diffraction patterns on the top surface of the sample. The thermal stress issue should be much more serious; thus, higher stress and confused distribution on the surface of the gray iron after annealing can be observed in Figure 3A. It can be realized that the vibratory stress relief technique can reduce the stress effectively. Not only εxx and εyy, shear stress εxy converged to zero when the material suffered from the vibratory stress relief treatment.
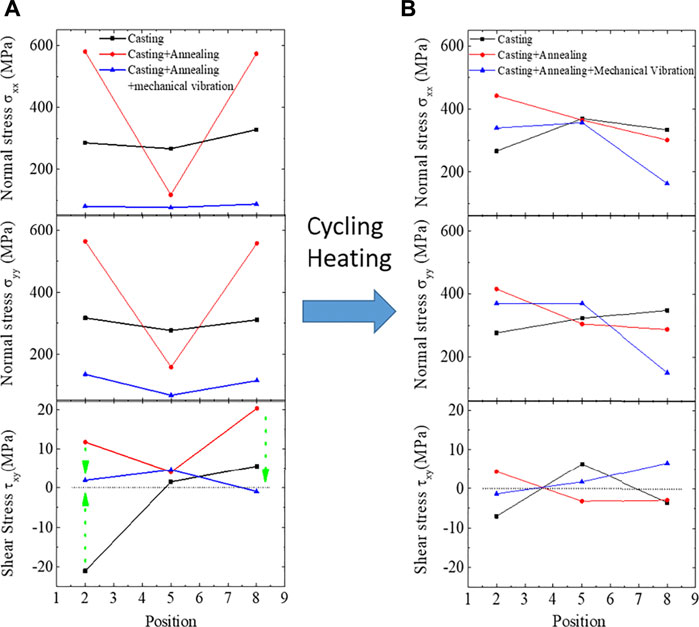
FIGURE 3. Residual stresses at points 2, 5, and 8 of the stress frames (A) Initial stress, (B) Stress after cyclic heating.
Figure 3B shows the residual stresses in the stress frame of the gray iron after cycling heating treatment, probed with synchrotron X-ray. Both the normal and shear stresses between casting, annealing, and annealing associated with the vibratory stress relief technique became unity after cycling heating, and there were no significant differences between them. It means that the cycling heating treatment can maintain and stabilize the residual stress on the surface of the material, even when the value of the stress was still high. The stabilized stress can help stabilize the size variation of the material. Because gray iron is an important material, being the components of machine tools, the stabilized stress and size variation will be very important for the machine tools to maintain high accuracy.
Residual Stresses Measured by Neutron Diffraction
Figure 4 shows the residual stress in the stress frame of the gray iron probed with a neutron diffraction technique. Figures 4A,B display the stresses of the material before and after cycling heating treatment, respectively. The value was obtained by averaging the stress in each depth. As noted in Figure 4A, only the stress component along L-direction manifested the variation of the residual stress at different points of the stress frame. The results meet one’s expectation by using the stress frame which contains two thin plates outside and one thick plate in the middle. Due to different shrinkage as cooling, the outside plates display compressive stress, while the middle plate exhibits tensile stress. The interaction between compressive stress and tensile stress occurs along L-direction. The stress along L-direction of the stress frame was already evidenced by using a strain gage reported by Pal, (2017). The compressive stress state in the outside plates and tensile stress state in the middle plate of the stress frame were also observed in this study. As noted, points 1–3 and points 7–9 in the stress frame reveal the compressive stress, while points 4–6 present the tensile stress condition. Consistent results indicated that the measurement of the residual stress with a neutron source is reliable.
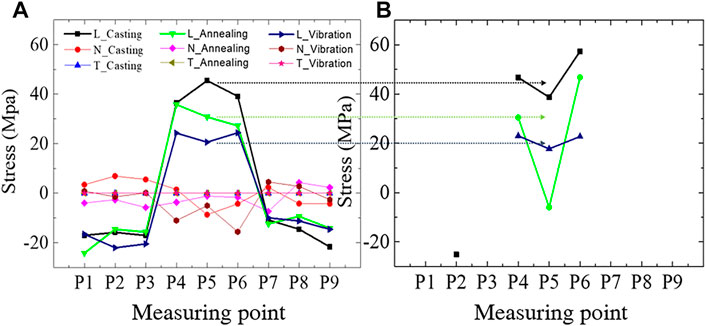
FIGURE 4. Average stress in the stress frame of the gray iron along the three orthogonal directions probed with the neutron diffraction technique (A) before and (B) after cycling heating treatment.
In Figure 4A, annealing and vibratory stress relief treatments can reduce the tensile stress at points 4–6, while the compressive stresses at points 1–3 and points 7–9 do not change evidently. The material with the tensile stress state is instable and the structure is loose. As a result, annealing and vibratory stress relief treatments can rearrange the atoms in the loose structure.
It is very interesting to compare the residual stresses in the gray iron after further cycling heating treatment. As indicated in Figure 4B, the residual stresses in the gray iron with the as-cast state and annealing state are altered violently after the cycling heating. The residual stress at points 4–6 becomes highly nonuniform after cycling heating. Only the gray iron with the vibratory stress relief treatment maintains almost the same value of the residual stress after cycling heating. It implies that the vibratory stress relief treatment can stabilize the residual state, even the materials experiencing further cyclic change in temperature.
The phenomenon was also revealed in the depth profile analysis of the residual stress in the gray iron after cycling in Figure 5. Gray iron with the vibratory stress relief treatment shows similar residual stress distribution in depth, at point 5, after cycling heating, while the residual stresses in the other two states of materials vary irregularly with depth after cycling heating treatment. The results imply that the vibratory stress relief technique stabilizes the residual stress on the surface or inside the bulk of the gray iron, with the materials experiencing further cyclic heating treatment. It is interesting that the depth profile analysis does not disclose the specifically compressive stress on the surface of the material as usual. It is maybe due to the probing depth at the first point of 3 mm, which is not shallow enough to exhibit surface effect.
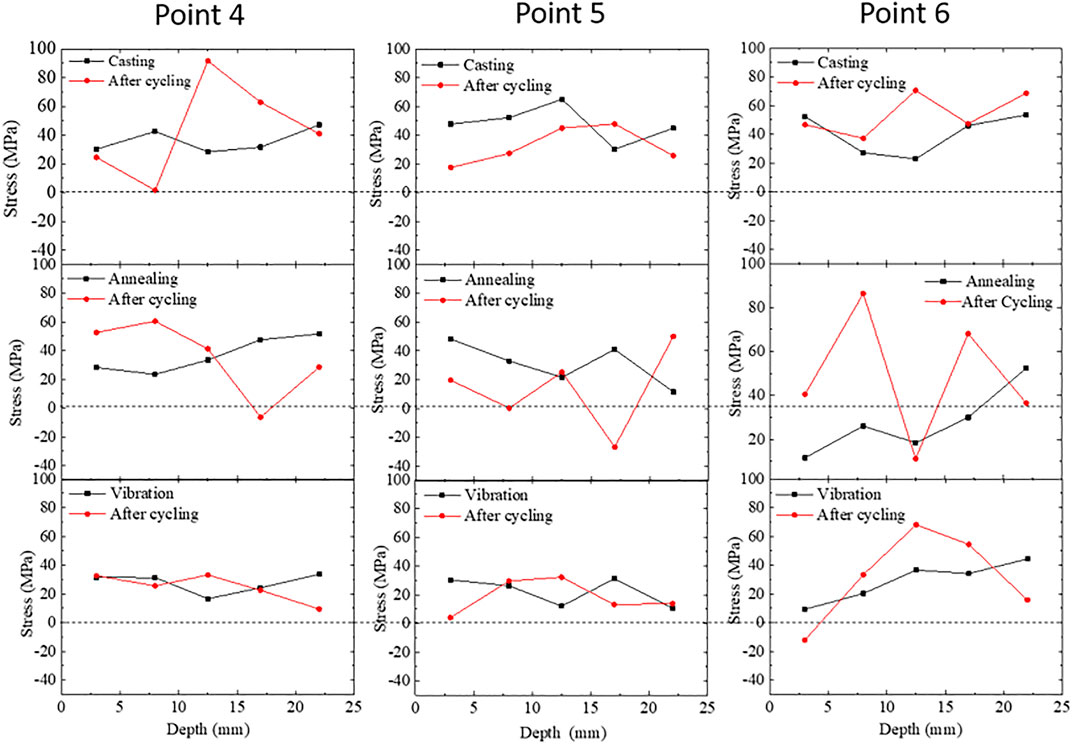
FIGURE 5. Depth profile analysis of the residual stress in the stress frame of the gray iron with the three conditions after cycling heating.
Conclusion
This study probed the residual stress in the gray casting iron with synchrotron X-ray and neutron sources. High-energy resolution of X-ray and neutron allows us to acquire reliable values of the stress. Such comprehensive measurements display the stress on the top surface, inside the bulk, and in average. The results indicated that the vibratory stress relief technique, rather than the annealing process, can effectively reduce the stress on the surface of the gray iron and stabilize the stress on the surface or inside the bulk, with the material experiencing further cycling heating treatment. The vibratory stress relief treatment can stabilize the size of the gray iron, a component of the machine tools. Therefore, the machine tools are characterized by high accuracy and stability.
Data Availability Statement
The original contributions presented in the study are included in the article/Supplementary Material; further inquiries can be directed to the corresponding authors.
Author Contributions
Conceptualization: S-WC, E-WH, and S-MC. Data analysis: S-WC, E-WH, S-MC, MR, and AP. Investigation: C-YW and S-CL. Design: S-MC and C-YW. Project administration: S-WC and E-WH. Resources: MR, AP, S-AC, Y-GL, and S-CW. Supervision: S-WC and E-WH. Writing—S-WC and E-WH. Writing—review and editing: T-NL, Y-HW, and SYL. All authors have read and agreed to the published version of the manuscript.
Funding
We thank the Ministry of Science and Technology (MOST) Programs of 108-2221-E-009-131-MY4 and MOST 110-2224-E-007-001. This work was financially supported by the “Center for the Semiconductor Technology Research” from the Featured Areas Research Center Program within the framework of the Higher Education Sprout Project by the Ministry of Education (MOE) in Taiwan. This work was supported by the Higher Education Sprout Project of the National Yang Ming Chiao Tung University and Ministry of Education (MOE), Taiwan. SYL was supported by a National Research Foundation (NRF) grant funded by the Korean government (2021R1A4A1031494, 2020R1I1A2070474).
Conflict of Interest
The authors declare that the research was conducted in the absence of any commercial or financial relationships that could be construed as a potential conflict of interest.
Publisher’s Note
All claims expressed in this article are solely those of the authors and do not necessarily represent those of their affiliated organizations, or those of the publisher, the editors, and the reviewers. Any product that may be evaluated in this article, or claim that may be made by its manufacturer, is not guaranteed or endorsed by the publisher.
Acknowledgments
E-WH thanks the National Synchrotron Radiation Research Center (NSRRC) for Neutron Cultivation Program.
References
Brown, D. W., Bernardin, J. D., Carpenter, J. S., Clausen, B., Spernjak, D., and Thompson, J. M. (2016). Neutron Diffraction Measurements of Residual Stress in Additively Manufactured Stainless Steel. Mater. Sci. Eng. A 678, 291–298. doi:10.1016/j.msea.2016.09.086
Dawson, R., and Moffat, D. G. (1980). Vibratory Stress Relief: A Fundamental Study of its Effectiveness. J. Eng. Mater. Technol. 102, 169–176. doi:10.1115/1.3224793
Gliha, V., Maruschak, P., and Vuherer, T. (2013). Behaviour of Short Cracks Emanating from Tiny Drilled Holes. Mater. Tech. 47, 441–446.
Gnäupel-Herold, T. (2012). ISODEC: Software for Calculating Diffraction Elastic Constants. J. Appl. Crystallogr. 45, 573–574.
Gustafsson, E., Hofwing, M., and Strömberg, N. (2009). Residual Stresses in a Stress Lattice-Experiments and Finite Element Simulations. J. Mater. Process. Tech. 209, 4320–4328. doi:10.1016/j.jmatprotec.2008.11.025
He, B. B. (2000). Stress Measurement with Two-Dimensional Diffraction. P. Int. Cong. Experit. M., 943–945.
Huang, E.-W., Lee, S. Y., Woo, W., and Lee, K.-W. (2011). Three-Orthogonal-Direction Stress Mapping Around a Fatigue-Crack Tip Using Neutron Diffraction. Metall. Mat Trans. A. 43, 2785–2791. doi:10.1007/s11661-011-0904-8
Huang, X., Liu, Z., and Xie, H. (2013). Recent Progress in Residual Stress Measurement Techniques. Acta Mechanica Solida Sinica 26, 570–583. doi:10.1016/s0894-9166(14)60002-1
Lam, T.-N., Lee, S. Y., Tsou, N.-T., Chou, H.-S., Lai, B.-H., Chang, Y.-J., et al. (2020). Enhancement of Fatigue Resistance by Overload-Induced Deformation Twinning in a CoCrFeMnNi High-Entropy alloy. Acta Materialia 201, 412–424. doi:10.1016/j.actamat.2020.10.016
Lee, S.-Y., Ling, J., Wang, S., and Ramirez-Rico, J. (2017). Precision and Accuracy of Stress Measurement with a Portable X-ray Machine Using an Area Detector. J. Appl. Cryst. 50, 131–144. doi:10.1107/s1600576716018914
Lee, S. Y., Huang, E.-W., Woo, W., Yoon, C., Chae, H., and Yoon, S.-G. (2015). Dynamic Strain Evolution Around a Crack Tip under Steady- and Overloaded-Fatigue Conditions. Metals 5, 2109–2118. doi:10.3390/met5042109
Mou, J. (1997). A Systematic Approach to Enhance Machine Tool Accuracy for Precision Manufacturing. Int. J. Machine Tools Manufacture 37, 669–685. doi:10.1016/s0890-6955(95)00106-9
Mou, J., and Richard Liu, C. (1992). A Method for Enhancing the Accuracy of CNC Machine Tools for On-Machine Inspection. J. Manufacturing Syst. 11, 229–237. doi:10.1016/0278-6125(92)90023-9
Pal, A. M. J. (2017). Residual Stresses in Cast Iron Measurements and Simulations of Residual Stresses in Heat Treated Cast Iron Materials. Goeteborg: Department of Materials and Manufacturing Technology Chalmers University of Technology. Master's Thesis.
Sanderson, R. M., and Shen, Y. C. (2010). Measurement of Residual Stress Using Laser-Generated Ultrasound. Int. J. Press. Vessels Piping 87, 762–765. doi:10.1016/j.ijpvp.2010.10.001
Seo, S., Huang, E.-W., Woo, W., and Lee, S. Y. (2017). Neutron Diffraction Residual Stress Analysis during Fatigue Crack Growth Retardation of Stainless Steel. Int. J. Fatigue 104, 408–415. doi:10.1016/j.ijfatigue.2017.08.007
Terini, R. A., Costa, P. R., Furquim, T. A. C., and Herdade, S. B. (1999). Measurements of Discrete and Continuous X-ray Spectra with a Photodiode at Room Temperature. Appl. Radiat. Isot. 50, 343–354. doi:10.1016/s0969-8043(97)10123-3
Wang, J.-S., Hsieh, C.-C., Lai, H.-H., Kuo, C.-W., Wu, P. T.-Y., and Wu, W. (2015). The Relationships between Residual Stress Relaxation and Texture Development in AZ31 Mg Alloys via the Vibratory Stress Relief Technique. Mater. Characterization 99, 248–253. doi:10.1016/j.matchar.2014.09.019
Wang, J.-S., Hsieh, C.-C., Lin, C.-M., Chen, E.-C., Kuo, C.-W., and Wu, W. (2014). The Effect of Residual Stress Relaxation by the Vibratory Stress Relief Technique on the Textures of Grains in AA 6061 Aluminum alloy. Mater. Sci. Eng. A 605, 98–107. doi:10.1016/j.msea.2014.03.037
Wang, J. S., Hsieh, C. C., Liao, C. H., and Wu, W. (2013). The Effects of Waveform in Residual Stress Relief by Vibration Technique. Trends Welding Res., 427–431.
Wang, Y. M., Voisin, T., Mckeown, J. T., Ye, J., Calta, N. P., Li, Z., et al. (2018). Additively Manufactured Hierarchical Stainless Steels with High Strength and Ductility. Nat. Mater 17, 63–71. doi:10.1038/nmat5021
Withers, P. J., Preuss, M., Steuwer, A., and Pang, J. W. L. (2007). Methods for Obtaining the Strain-free Lattice Parameter when Using Diffraction to Determine Residual Stress. J. Appl. Cryst. 40, 891–904. doi:10.1107/s0021889807030269
Wu, W., Chuang, C.-P., Qiao, D., Ren, Y., and An, K. (2016). Investigation of Deformation Twinning under Complex Stress States in a Rolled Magnesium alloy. J. Alloys Comp. 683, 619–633. doi:10.1016/j.jallcom.2016.05.144
Keywords: gray iron, residual stress, synchrotron X-ray, neutron diffraction, machine tools + design
Citation: Chen S-W, Huang E-W, Chiu S-M, Reid M, Wu C-Y, Paradowska AM, Lam T-N, Wu Y-H, Lee SY, Lu S-C, Chen S-A, Lin Y-G and Weng S-C (2022) Diffraction-based Residual Stress Mapping of a Stress Frame of Gray Iron via Vibratory Stress Relief Method. Front. Mater. 9:859342. doi: 10.3389/fmats.2022.859342
Received: 21 January 2022; Accepted: 07 March 2022;
Published: 07 April 2022.
Edited by:
Dongchan Jang, Korea Advanced Institute of Science and Technology, South KoreaReviewed by:
Pavlo Maruschak, Ternopil Ivan Pului National Technical University, UkraineJianan Hu, Independent researcher, Guildford, United Kingdom
Copyright © 2022 Chen, Huang, Chiu, Reid, Wu, Paradowska, Lam, Wu, Lee, Lu, Chen, Lin and Weng. This is an open-access article distributed under the terms of the Creative Commons Attribution License (CC BY). The use, distribution or reproduction in other forums is permitted, provided the original author(s) and the copyright owner(s) are credited and that the original publication in this journal is cited, in accordance with accepted academic practice. No use, distribution or reproduction is permitted which does not comply with these terms.
*Correspondence: Shi-Wei Chen, Y2hlbi5zd0Buc3JyYy5vcmcudHc=; E-Wen Huang, ZXdlbmh1YW5nQG5jdHUuZWR1LnR3; Tu-Ngoc Lam, bGFtdHVuZ29jMTMxMEBuY3R1LmVkdS50dw==
 Shi-Wei Chen
 E-Wen Huang
 Sung-Mao Chiu3