- 1China Academy of Machinery Science and Technology Group Co. Ltd., Beijing, China
- 2National Joint Engineering Research Center for Abrasion Control and Molding of Metal Materials, School of Materials Science and Engineering, Henan University of Science and Technology, Luoyang, China
The effects of carbon contents on microstructure evolution and mechanical properties, including hardness, impact toughness and abrasive impact wear resistance behavior, were investigated for Cr-Si-Mn low alloy cast steels. The results showed that, with the increase of carbon content in the steels, the metallographic structure transformed from lath martensite to acicular martensite gradually. Correspondingly, the hardness increased and impact toughness decreased distinctly due to the increasing of carbon supersaturation and refinement of martensite. Furthermore, the wear resistant increased firstly and then decreased, which can be ascribed to the changing of wear mechanism from plastic fatigue wear to brittle fracture wear.
Background
During the rapid progress of metallurgy and mining industry, the trend of ball mill toward large-scale and heavy-duty is necessary. Therefore, the wear resistant liner, as the key component of the large ball grinding mill to protect the cylinder body, must bear enormous impact loads during the service (Tylczak et al., 1999). The most common failure modes of the wear resistant liner include wear, deformation, and fracture, which is determined by adverse working conditions (Sare and Constantine, 1997). So the material of the wear resistant liner must have good mechanical properties, such as high impact toughness, high hardness, and good wear resistance (Jost, 1990; Natarajan, 1992).
Hadfield steel is one kind of traditional wear resistant material. Due to its remarkable working hardening ability and impact toughness, it is widely used to manufacture different types of wear resistant components especially wear resistant liner for ball grinding mill (Smith and Mackay, 2003; Smith et al., 2004). However, the Hadfield steel liner often has poor wear resistance performance because the impact energy is not high enough to cause the working hardening. Furthermore, excellent impact toughness often causes a large deformation, resulting in difficulty disassembling a used liner (Canadinc et al., 2005; Xu and Li, 2006; Efstathiou and Sehitoglu, 2010; Ge et al., 2017; Xu et al., 2017a). Another common wear resistant material, high chromium cast iron, has high hardness and wear resistance, but its high brittleness often leads to the brittle fracture of the liner. In addition, its high alloy content also means high production costs (Xu and Li, 2006; Huang et al., 2008; Chung et al., 2009; Yi et al., 2014; Xu et al., 2017b).
Low alloy wear resistant cast steels (LAWRCS), which are characterized by excellent comprehensive mechanical performance and low manufacturing cost, have been widely used as wear resistant materials for industrial applications. Compared with Hadfield steel and high chromium cast iron, LAWRCS has both high initial hardness to ensure wear resistant performance and enough toughness to prevent fracture, especially in application of wear resistant liner. Therefore, it has caused wide concern among the wear resistant material researchers (Jiang and Feng, 2006; Deng et al., 2014).
In this paper, a series of LAWRCS with different carbon contents (0.3, 0.35, 0.40, 0.45, 0.55 wt.%) were prepared. Based on the microstructure examination and properties tests, the effect of carbon content on the microstructure, hardness, impact toughness and impact wear resistance was investigated. The above work will provide a reference for the application of Cr-Si-Mn LAWRCS as the material of ball mill liner.
Experimental Technique
To investigate the effects of carbon contents on the microstructures and wear properties, a series of LAWRCS with different carbon contents (0.3, 0.35, 0.40, 0.45, 0.55 wt.%) were designed, based on the conventional 31Mn2Si casting steel. Meanwhile, 0.80 wt.% chromium was added to improve the hardenability and strength of the steels. Table 1 presents the chemical composition of the steels fabricated.
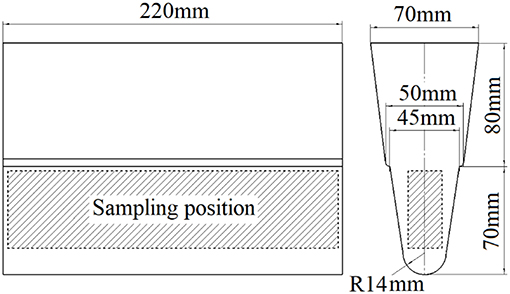
The ingots of the steels were fabricated in a 25 Kg capacity medium-frequency induction heart furnace in the air. For the purpose of decreasing the amount of inclusions, high purity metals (≥99%) such as Fe, Cr, Si, Mn, and C etc. were used as the raw materials. The melting alloys were tapped from the furnace at ~1,650°C and casted into dry sand molds with Y-shape at 1,580°C. Figure 1 shows the dimension of the casting ingot.
The casting ingots were firstly normalized at 890°C for 1 h. The austenitizing treatments were carried out at 890°C for 1 h, and then quenched into oil. The tempered treatments were carried out at 300°C for 2 h and followed by an air cooling.
To avoid the adverse effect of the casting defects on the experiment result, all the tests samples were taken from the specific area beneath the surface 3 mm, as shown in Figure 1.
Finally, heat treated ingots were machined to their final dimensions to conducting V notched Charpy impact tests according to ASTME23-02. Impact wear tests with sizes of: length of 10 mm, width of 10 mm, and height 30 mm. Hardness measurement tests with sizes 10 mm long, 10 mm wide, and 10 mm high.
The impact wear test was conducted on a metallographically polished rectangular specimen using a dynamically loaded abrasive wear tester with the model MDL-10; the schematic diagram was shown as Figure 2. During the test, the specimen was locked in the clamping chuck, and reciprocated up and down with the hammer 100 hits per minute. The impact energy was 4 J. The down specimen was fabricated by GCr15 bearing steel with hardness of 63 HRC. During the impact test, the rotating rate of down specimen was 200 rpm. Silica sand with 3–5 mm particle size was used as an abrasive, and the hardness of the silica sand is 1,000–1,200 HV, and the flowing rate of the abrasives were 50 kg•h−1. The weight loss over 2 h was measured every 15 min using an electronic balance with the resolution of ±0.1 mg. The samples were thoroughly cleaned with acetone in ultrasonic cleaner before and after the wear test.
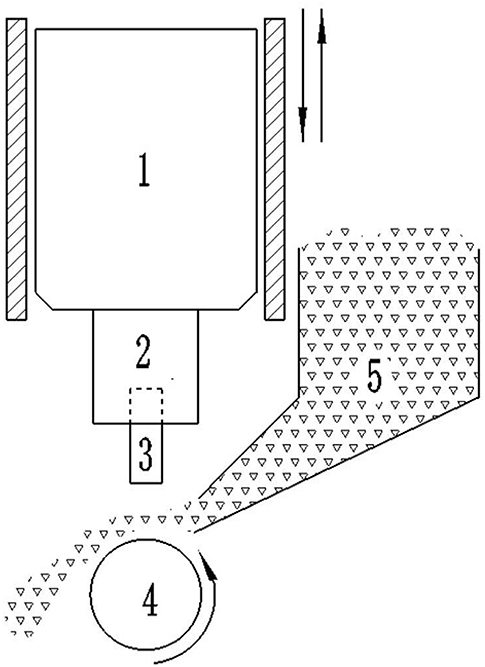
Figure 2. Schematic illustration of the MDL-10 impact wear tester. 1-hammer, 2-clamping chuck, 3-test specimen, 4-down specimen, 5-abrasive.
The impact toughness was measured by using the JB-300B Charpy impact machine tester with the weight of the pendulum of 150 J. The hardness was measured by using the HR150A Rockwell apparatus, with the stress of 150 Kg. The Vickers hardness of the samples was evaluated using a Digital Micro-hardness Tester HVS-1000A using a 25 g load and a holding time of 15 s. The present values of above measures are calculated by the average of five tests for each sample.
The microstructure of the material was investigated using an OLYMPUS PMG3 optical microscopy (OM). The worn surfaces and the worn cross sections were characterized using a TESCAN VEGA3 SBH scanning electron microscopy (SEM).
Using the following Equation (1) to calculate the relative wear resistance.
Where β was the relative wear resistance, wg was the weight loss of the specimen a, wf was the weight loss of the specimen with different carbon content.
Results and Discussion
Scenario 1: Microstructure of LAWRCS
Figure 3 presents the optical microstructural features of the steels with various carbon contents after heat treatment. It can be seen that the metallographic structure is mainly composed of tempered martensite, which has a little change in geometrical morphology with increasing carbon content. At a carbon content of 0.32%, the microstructure is mainly composed of lath martensites, as shown in Figure 3A. As the carbon content increases to 0.35%, acicular martensites begins to appear in the microstructure, as shown in Figure 3B. When the carbon content continues to increase, the dimension and the amount of lath martensites decrease gradually, as shown in Figures 3B–E. It is obvious that steel IV has the most significant refinement of the lath structure of martensite among the all steels (see Figure 3D).
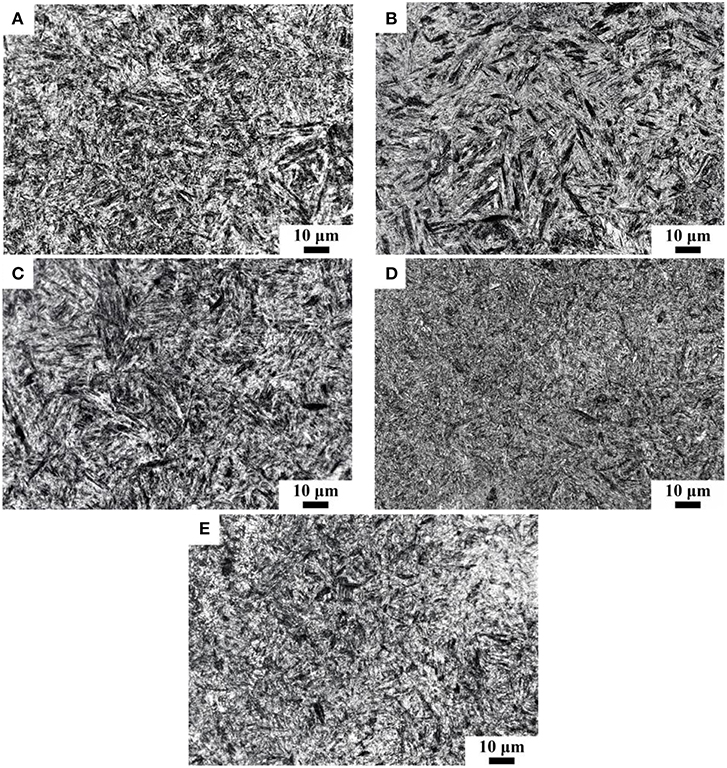
Figure 3. Microstructure of LAWRCS with different carbon contents after heat treatment (A) 0.32 wt%, (B) 0.35 wt%, (C) 0.40 wt%, (D) 0.46 wt%, (E) 0.55 wt%.
Scenario 2: Mechanical Properties and Impact Wear Resistance of LAWRCS
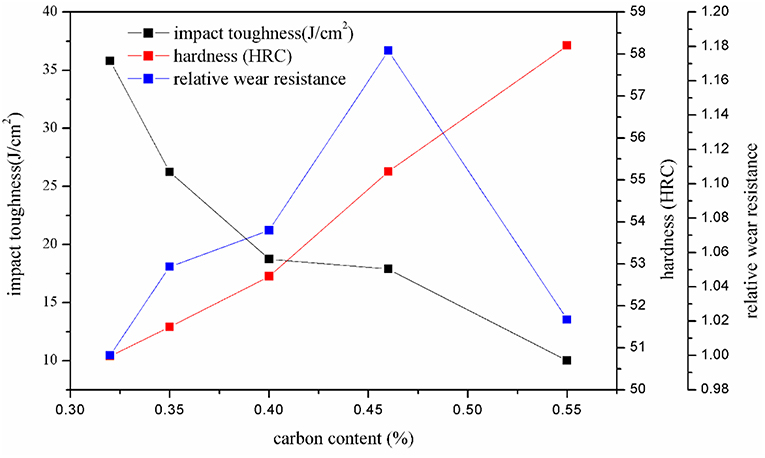
Table 2 shows the hardness and impact toughness of LAWRCS. Meanwhile Figure 4 clearly shows that the hardness, impact toughness, relative wear resistance act as a function of carbon content. Obviously, with increasing carbon contents, the hardness increases obviously, while the impact toughness decreases. The mechanical properties are mainly related to the chemical compositions of the steels and microstructures. Apparently, an increase of carbon contents will results in an increase of carbon supersaturation in the martensite, which lead to more lattice distortion and dislocation, greater internal stress and stacking fault. Meanwhile, the refinement of martensite could generate a remarkable strengthening effect on the steel. Therefore, the increasing of carbon content arouses an increase of the hardness and brittleness (Zhang et al., 2011), but also decreases of the impact toughness of the steel. Being different with the monotone increasing or decreasing of hardness and impact toughness, the relative wear resistance increases firstly and then decreases, which will be interpreted based on the changing of wear mechanism in Scenario 3.
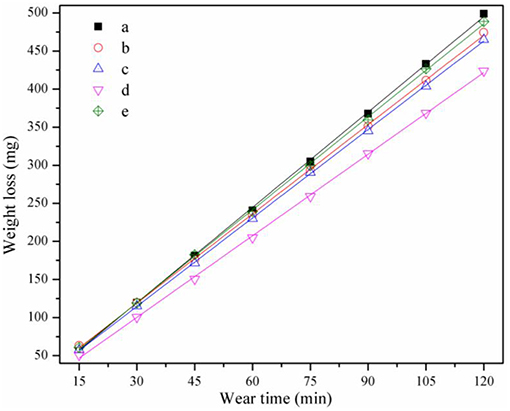
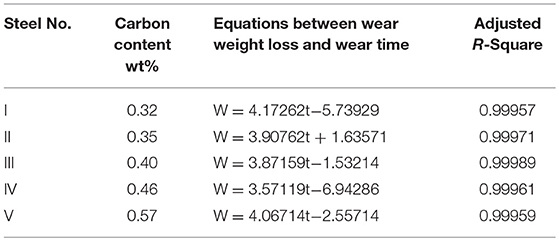
Figure 5 shows the variation of weight loss as a function of wear time for steels with different carbon contents. From Figure 5 it is not difficult to find that, of all samples, the weight loss increases with increasing wear time in a linear relation which can be described by the following Equation (2), the fitting equations and correspondent adjusted R-squares are listed in Table 3.
Where W is the weight loss, t is wear time, A and B are coefficients.
It is observed in Table 3 that, with the increase of carbon contents, the line slope-value decrease gradually as the carbon content increases from 0.32 to 0.46%. However, as the carbon content increases from 0.46 to 0.57%, the slope-value increases. The main reason is that the change of slope is still determined by the wear resistance of each sample. The better the wear resistance is, the smaller the weight loss of the sample per unit time is, and thus the corresponding slope is also smaller. Furthermore, each value of Adjusted R-Square in Table 3 approximate 1, that means the materials undergo a little work hardening from the beginning to the end of wear test, and the wear resistance remains consistent.
Scenario 3: Wear Behavior Analysis
Figure 6 shows the worn surface morphologies of the impact wear samples with different carbon contents. Apparently, the primary abrasion of the worn surfaces are composed of white rims formed by impact fatigue wear, furrows and abrasive imbedding.
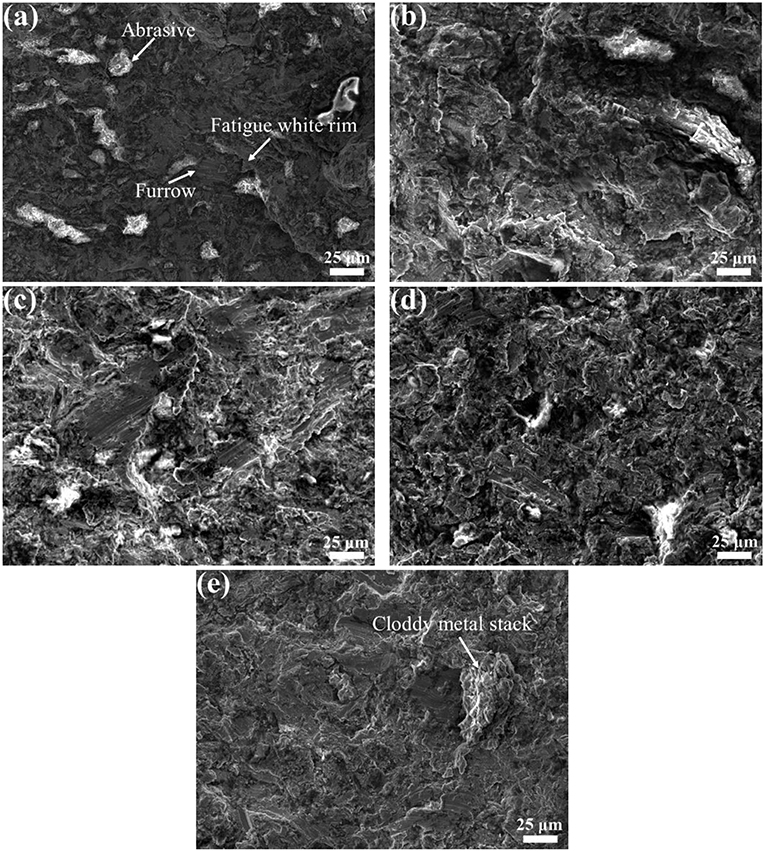
Figure 6. Worn surface of LAWRCS with different carbon content. (a) 0.32 wt.%, (b) 0.35 wt.%, (c) 0.40 wt.%, (d) 0.46 wt.%, (e) 0.55 wt.%.
When the carbon content is <0.40%, because of the lower hardness, the abrasives are so easy to be embedded into the matrix, and obvious metal flows can be found, as shown in Figures 6a,b.
It is observed in Figures 6a–d that white rims formed by impact fatigue wear appear at the end of furrows. With increasing carbon constants, the amounts of white rims increase. However, the areas enclosed by the white rims decrease.
As for the sample steel V, with the carbon content increases to 0.55%, the amounts of the white rims decreases significantly, as shown in Figure 6e. It is worth mentioning that, the cloddy metal stack caused by brittle crush starts to appear at the end region of furrows. The appearance of brittle crush provides an evidence for the transformation of mainly wear mechanism from plastic fatigue wear to brittle fracture wear.
Figure 7 shows SEM images of cross sections of worn steel surfaces with different carbon contents. As can be seen in the figures, among different carbon contents of steels, there is a significant difference characteristics. With the increase of carbon contents, the average widths of deformation band and the depths of microcracks decrease distinctly while the amounts of microcracks in reverse.
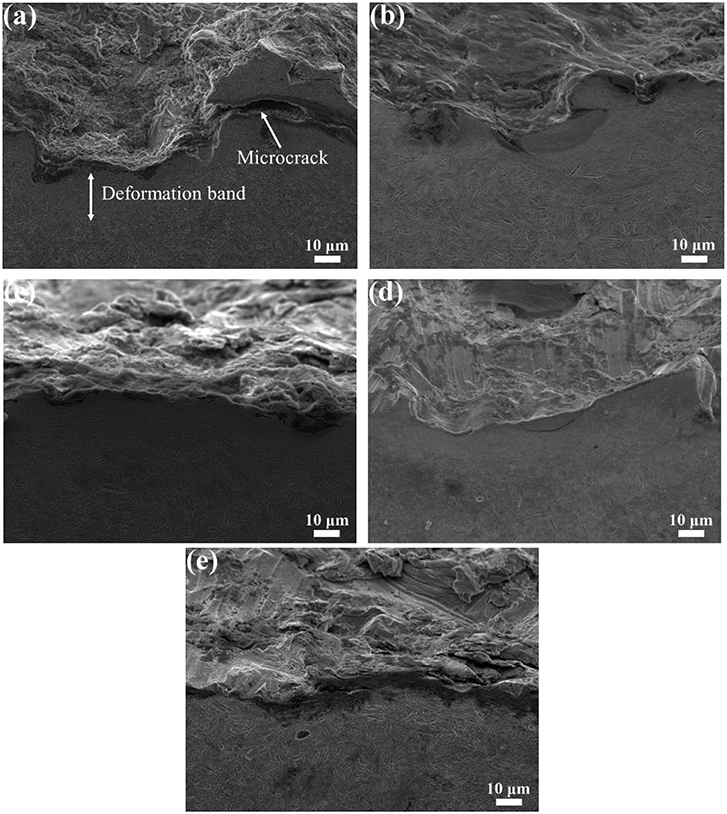
Figure 7. Polished and etched cross sections of worn steel surfaces with different carbon contents as examined in SEM. (a) 0.32 wt.%, (b) 0.35 wt.%, (c) 0.40 wt.%, (d) 0.46 wt.%, (e) 0.55 wt.%.
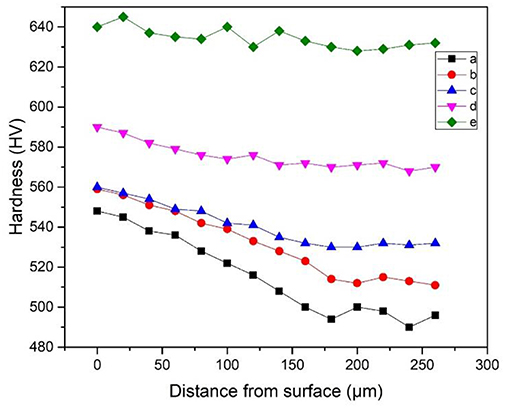
Figure 8 shows microhardness distribution of the worn surface of the steels with different carbon contents. It clearly reveals that all steels experience work-hardening due to the subsurface deformation caused by impact wear. The hardened layer depth of steel I is the deepest, which reached about 200 μm, and the depth decreases with the increasing carbon content. The microhardness of the worn surface is almost similar for steels I, II, and III and their weight loss values differ slightly. On the other hand, comparing steel V with steels I and II, which have almost the same weight loss values, there is quite a difference in the worn surface hardening behavior. This alone cannot explain the different wear behavior. Similar results have been reported by Sundstrom et al. (2001).
According to the discussion mentioned above, it can be concluded that both hardness and impact toughness have an effect on the wear resistance (Straffelini, 2015). But the relationship between wear resistance and the two parameters (hardness and toughness) of the steels investigated is not linear. The mainly wear mechanism of sample I, II, III, and IV is plastic fatigue wear. As for sample V, the mainly wear mechanism transform form plastic fatigue wear to brittle fracture wear due to the greatly reduction of impact toughness.
As a result, the steel IV with a carbon content of 0.46% possesses the best comprehensive mechanical properties among hardness, impact toughness and impact wear resistance.
Conclusions
(1) The microstructure of all steels are mainly composed of tempered martensite. With the increase of carbon content, lath martensite will transforms to acicular martensite gradually.
(2) Due to the increasing of carbon supersaturation and refinement of martensite with the increase of carbon content, the hardness increases and impact toughness decreases gradually.
(3) With the increase of carbon content, impact wear resistance of the steels increases firstly and then decreases. It can be ascribe to the changing of wear mechanism from plastic fatigue wear to brittle fracture wear.
(4) The steel with a carbon content of 0.46% possesses a best comprehensive mechanical properties among hardness, impact toughness and impact wear resistance.
Data Availability
All datasets generated for this study are included in the manuscript and/or the supplementary files.
Author Contributions
XW: experiment operation and mechanism analysis. YC: the formulation of experimental scheme. SW: mechanism analysis. LZ: preparation of specimen and experiment operation. FM: heatment of steel.
Funding
The work was supported by Key Research and Development Plan of Yunnan Province (No. 2017IB021), the Key Scientific and Technological Project of Henan Province (Nos. 192102210009, 182102210043), and open science and technology cooperation project of Henan province (182106000024).
Conflict of Interest Statement
The authors declare that the research was conducted in the absence of any commercial or financial relationships that could be construed as a potential conflict of interest.
References
Canadinc, D., Sehitoglu, H., Maier, H. J., and Chumlyakov, Y. I. (2005). Strain hardening behavior of aluminum alloyed Hadfield steel single crystals. Acta Mater. 53, 1831–1842. doi: 10.1016/j.actamat.2004.12.033
Chung, R. J., Tang, X., Li, D. Y., Hinckly, B., and Dolman, K. (2009). Effects of titanium addition on microstructure and wear resistance of hypereutectic high chromium cast iron Fe-25 wt%Cr-4 wt%C. Wear 267, 356–361. doi: 10.1016/j.wear.2008.12.061
Deng, X.-t., Wang, Z.-d., Han, Y., Zhao, H., and Wang, G.-d. (2014). Microstructure and abrasive wear behavior of medium carbon low alloy martensitic abrasion resistant steel. J. Iron Steel Res. Int. 21, 98–103. doi: 10.1016/S1006-706X(14)60015-7
Efstathiou, C., and Sehitoglu, H. (2010). Strain hardening and heterogeneous deformation during twinning in Hadfield steel. Acta Mater. 58, 1479–1488. doi: 10.1016/j.actamat.2009.10.054
Ge, S., Wang, Q., and Wang, J. (2017). The impact wear-resistance enhancement mechanism of medium manganese steel and applications in mining machines. Wear. 376–377, 1097–1104. doi: 10.1016/j.wear.2017.01.015
Huang, Z., Xing, J., Gao, Y., and Zhi, X. (2008). Effect of titanium on the as-cast microstructure and impact toughness. Rare Metal Mater. Eng. 59, 1221–1226. doi: 10.3139/146.110733
Jiang, Z.-q, Du, J.-m., and Feng, X.-l. (2006). Study and application of heat treatment of multi-element wear-resistant low-alloy steel. J. Iron Steel Res. Int. 13, 57–61. doi: 10.1016/S1006-706X(06)60027-7
Natarajan, K. (1992).Ball wear and its control in the grinding of a lead-zinc sulphide ore. Int. J. Min. Process. 34, 161–175.
Sare, R., and Constantine, A. G. (1997). Development of methodologies for the evaluation of wear-resistant materials for the mineral industry. Wear 203–204, 671–678.
Smith, R. W., DeMonte, A., and Mackay, W. B. F. (2004). Development of high-manganese steels for heavy duty cast-to-shape applications. J. Mater. Process. Technol. 153-154, 589–595. doi: 10.1016/j.jmatprotec.2004.04.136
Smith, R. W., and Mackay, W. B. F. (2003). Austenitic manganese steels-development for heavy haulrail transportation. Can. Metallurg. Quart. 42, 333–342. doi: 10.1179/000844303794406099
Straffelini, G. (2015). Wear Mechanisms. Friction and Wear. Trento: Springer International Publishing, 205–211. doi: 10.1007/978-3-319-05894-8
Sundstrom, A., Rendon, J., and Olsson. (2001). Wear behaviour of some low alloyed steels under combined impact/abrasion contact conditions. Wear 250, 744–754. doi: 10.1016/S0043-1648(01)00712-8
Tylczak, J. H., Hawk, J. A., and Wilson, R. D. (1999). A comparison of laboratory abrasion and field wear results. Wear 225, 1059–1069.
Xu, L., Fan, X., Wei, S., Liu, D., Zhou, H., Zhang, G., et al. (2017a). Microstructure and wear properties of high-speed steel with high molybdenum content under rolling-sliding wear. Tribol. Int. 116, 39–46. doi: 10.1016/j.triboint.2017.07.002
Xu, L., Wei, S., Xiao, F., Zhou, H., Zhang, G., and Li, J. (2017b). Effects of carbides on abrasive wear properties and failure behaviours of high speed steels with different alloy element content. Wear 376, 968–974. doi: 10.1016/j.wear.2017.01.021
Xu, Z., and Li, L. (2006). Wear behavior of austenite steel matrix composite reinforced by in situ granular eutectics in impact abrasion. Mater. Sci. Eng, A 428, 256–261. doi: 10.1016/j.msea.2006.05.006
Yi, D., Xing, J., Zhang, Z., Fu, H., and Yang, C. (2014). Effect of titanium and nitrogen additions on the microstructures and three-body abrasive wear behaviors of Fe–B cast alloys. Tribol. Lett. 54, 107–117. doi: 10.1007/s11249-014-0314-3
Keywords: carbon content, hardness, impact toughness, abrasive impact wear, low alloy wear resistant cast steel
Citation: Wang X, Chen Y, Wei S, Zuo L and Mao F (2019) Effect of Carbon Content on Abrasive Impact Wear Behavior of Cr-Si-Mn Low Alloy Wear Resistant Cast Steels. Front. Mater. 6:153. doi: 10.3389/fmats.2019.00153
Received: 30 April 2019; Accepted: 13 June 2019;
Published: 10 July 2019.
Edited by:
Shengqiang Ma, Xi'an Jiaotong University, ChinaReviewed by:
Dawei Yi, Xi'an University of Science and Technology, ChinaKe Wang, Chongqing University, China
Copyright © 2019 Wang, Chen, Wei, Zuo and Mao. This is an open-access article distributed under the terms of the Creative Commons Attribution License (CC BY). The use, distribution or reproduction in other forums is permitted, provided the original author(s) and the copyright owner(s) are credited and that the original publication in this journal is cited, in accordance with accepted academic practice. No use, distribution or reproduction is permitted which does not comply with these terms.
*Correspondence: Yunbo Chen, d2VibWFzdGVyQGh0Lm9yZy5jbg==; Shizhong Wei, d3N6QGhhdXN0LmVkdS5jbg==
 Xiaodong Wang
 Yunbo Chen1*
