- 1Materials Science and Engineering Department, University of Wisconsin-Milwaukee, Milwaukee, WI, USA
- 2Civil and Environmental Engineering Department, University of Wisconsin-Milwaukee, Milwaukee, WI, USA
Non-contact methods for characterization of metal matrix composites have the potential to accelerate the development and study of advanced composite materials. In this study, diametrical compression of small disk specimens was used to understand the mechanical properties of metal matrix micro- and nanocomposites. Analysis was performed using an inverse method that couples digital image correlation and the analytical closed-form formulation. This technique was capable of extracting the tension and compression modulus values in the metal matrix nanocomposite (MMNC) disk specimens. Specimens of aluminum and aluminum reinforced with either Al2O3 nanoparticles or graphene nanoplatelets were synthesized using a powder metallurgy approach that involved room temperature milling in ethanol and low temperature drying followed by single action compaction. The elastic and failure properties of MMNC materials prepared using the procedure above are presented.
Introduction
Metal matrix nanocomposites (MMNCs) are a new class of metal matrix composite (MMC) materials where the reinforcement and/or matrix phase(s) are nanoscale in at least one dimension. These nanoscale features can lead to desirable mechanical properties due to Hall–Petch strengthening or Orowan strengthening mechanisms. MMNCs are promising materials owing to their potential for high specific strength, stiffness, and wear resistance.
The mechanical properties, such as yield strength, ultimate strength, modulus, and hardness of metals (Ferguson et al., 2014), MMC (Sajjadi et al., 2012), and MMNCs (Derakhshandeh Haghighi et al., 2012), have been investigated by a number of researchers. Ceramic nanoparticles, such as Al2O3, which have high modulus, hardness, and wear resistance, are reinforcements sometimes added to metal matrices to improve mechanical and tribological properties (Aruri et al., 2013; Baradeswaran and Perumal, 2013; Lu et al., 2013). Graphene has also been considered as a constituent in MMCs due to its favorable mechanical, electrical and thermal properties (Shin et al., 2015). The standard methods used to investigate the tensile and compressive behavior of metallic materials have also been used to investigate the mechanical properties of particulate-reinforced MMCs and MMNCs (Tabandeh Khorshid et al., 2010).
Accurately measuring the mechanical properties can be challenging, especially in small specimens typically produced when developing new materials in small quantities (Haj-Ali et al., 2008; Zhang et al., 2013). For example, during the development phases of powder metallurgy-processed materials, specimen sizes in the range of 10–25 mm are typically obtained, that are later consolidated, which make it difficult to obtain large specimens for use in tension or compression tests. The standard specimens also do not consider the multiaxial stress states that are typically present during the application of these materials to actual components and structures. Thus, it would be beneficial in the materials development process if small specimens can be used to characterize the mechanical elastic and plastic properties. For this to be possible, supplemental methods are needed to characterize the materials during the tests. Inverse methods have been proposed for characterization of elastic properties of materials and separating stresses using a variety of full-field methods such as Moire (Wang et al., 2005) and thermoelastic stress analysis (Foust and Rowlands, 2011).
Despite the added utility provided by such techniques, few studies have been published on supplemental non-destructive test methods for characterization of MMCs. El-Daly et al. (2013) synthesized aluminum matrix composite reinforced by nanosized SiC particles using high energy ball milling followed by cold compaction and sintering. The materials were then characterized using pulse echo overlap methods. Jung et al. (2014) used a serial sectioning technique to visualize the 3D structure of aluminum matrix composite reinforced by SiC particles. They simulated the mechanical and thermal properties of these composites by finite element modeling and successfully compared their model results to conventional compression and thermal expansion tests. In another study of non-destructive test methods, Yazzie et al. (2012) used 3D X-ray synchrotron tomography and focused ion beam tomography to visualize and quantify Sn–3.5Ag, Sn–0.7Cu, and Sn–37Pb solder joints. Xu et al. (2014) used a reconstruction algorithm methodology to construct 3D microstructures of samples based on 2D images at the microscale.
In this study, we propose a hybrid method involving diametrical compression of a disk specimen together with the digital image correlation (DIC) method to study the mechanical behavior of MMCs and nanocomposites. DIC is an imaging method by which full-field displacements and then strains can be measured on the surface without the use of strain gages or extensometers (Hung and Voloshin, 2003). In the 3D-DIC implementation of this method, the deformation of the samples during the mechanical test is captured by two charge-coupled device (CCD) cameras.
The DIC method has been used to characterize a variety of materials, in particular composite materials, allowing researchers to determine their deformation behavior. For example, the effect of surface scratches on the failure of laminated carbon-fiber/epoxy composites under tensile loads have been successfully investigated by this method (Shams and El-Hajjar, 2013). It has also been used to study the elastic and failure behavior of quasi-isotropic triaxially braided composites (El-Hajjar et al., 2013). To the knowledge of the authors, there have been no published studies on the use of DIC and the diametrical disk test method to analyze the mechanical behavior of MMCs and MMNCs.
In this study, cylindrical specimens of unreinforced pure aluminum and aluminum reinforced with either Al2O3 nanoparticles or graphene nanoplatelets (GNPs) were synthesized using a room temperature ethanol milling procedure. A hybrid test method using the diametrical compression disk specimen with DIC is used to investigate the mechanical behavior and measure the full-field displacement in the in-plane and out-of-plane directions. Using this information and analytical methods for the diametrical disk under compression, we then extract information about the elastic and plastic behavior and correlate the results with the microstructure and failure modes in these composite cylinders.
Theory
Analytical Solution of Diametrically Loaded Cylinder
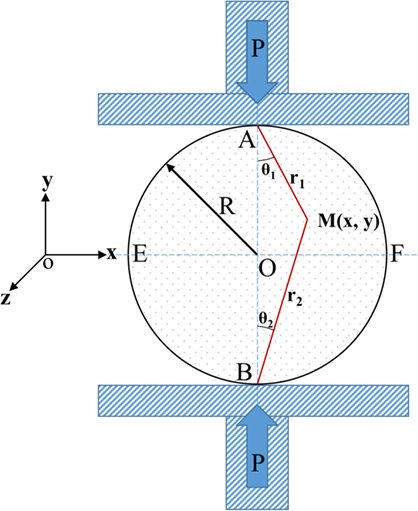
The analytical solution for an isotropic cylindrical disk subjected to a compressive line load (Figure 1) has been previously studied (Muskhelishvili, 2013; Haj-Ali et al., 2016). The distribution of the stresses away from the contact points are given by the following relations and has previously been used to determine the elastic modulus of rock specimens (Jianhong et al., 2009). The stresses in the x–y coordinate system for an arbitrary point in the disk are:
where P is the compression load, t is the thickness of the cylinder, θ1 and θ2 are the angles as indicated in Figure 1, and D is the diameter of the cylinder (D = 2R).
From the triangle ABM in Figure 1, the following relations are obtained:
Substituting Eqs 4–6 into Eqs 1–3, we obtain the following equations:
The relationship between the rectangular coordinate (x, y) and the polar coordinate (r1, θ1) of point M is as follows:
By substituting Eq. 10 into Eqs. 7–9, we have
The modulus can be obtained from the analytical stresses and the measured gage strains from the DIC results. For the tensile modulus (y = 0), the stress distribution at the center of the disk must be accounted for since the compressive stress, σy, exerts tensile strains due to Poisson’s effect. Similarly for the compressive modulus (when x = 0), the tensile stress exerts an additional strain (to a lesser level than for tension) that is accounted for in the expressions below. Et and Ec are the tensile and compressive moduli, respectively, and are expressed as follows:
where L is the half-length of the gage length at the center of the disk, and V is the Poisson ratio (assumed at 0.33 for all disks). εgx and εgy are the gage strains in the x and y directions measured from the DIC over a gage section of length 2L. The gage length L was ~5 mm and evaluated in the center of the disk.
Experimental Method
Fabrication of MMNC Specimens
The primary materials used in this investigation were (a) 99% pure Al powder (Acros Organics, Waltham, MA, USA) with an average particle size of 75 μm, (b) Al2O3 powder (Nanophase, Romeoville, IL, USA) with an average particle size of 47 nm, and (c) GNPs M5 (XG Sciences, Lansing, MI, USA) with average thickness of ~6 nm and average platelet diameter of ~5 μm. The composites were fabricated using a powder metallurgy method. The details of the powder metallurgy method used to synthesize the nanocrystalline metal matrix nanocomposites (NC MMNCs) used in this study have been previously described (Tabandeh-Khorshid et al., 2015, 2016). To produce NC MMNCs, the reinforcements with various wt% [GNPs (0.1 and 5 wt%) and Al2O3 (5 wt%)] were dispersed in 99.5% anhydrous ethanol by ultrasonication. The Al powder and the reinforcement slurry were added to a Szegvari attritor mill equipped with an alumina reservoir and milled for 6 h at 500 rpm using a ball-to-powder weight ratio of 15:1 (5-mm diameter zirconia balls). The milled composite powders were dried at 135°C for 1 h to remove the ethanol. The dried powders were consolidated by single action cold compaction with 200-MPa applied pressure at room temperature followed by single action hot compaction with 500-MPa applied pressure at 525°C for 5 min such that a 25.4-mm diameter cylinder with a height of 8 mm was produced. Unreinforced pure Al was milled and consolidated by the same method to compare with the properties of the composite samples. The hot compacted samples were annealed at 535°C for 24 h to eliminate the effects of cold working. The density of the samples was measured by Archimedes method using a Mettler Toledo AT261 Delta Range Microbalance (Mettler Toledo, Columbus, OH, USA) equipped with a density kit (Mettler Toledo, Columbus, OH, USA).
Physical Characteristics
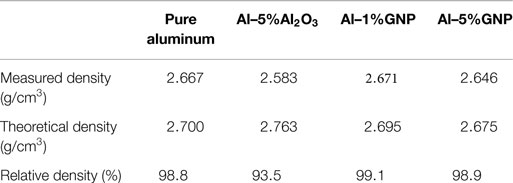
The relative density of the samples after consolidation processing and heat treatment is presented in Table 1.
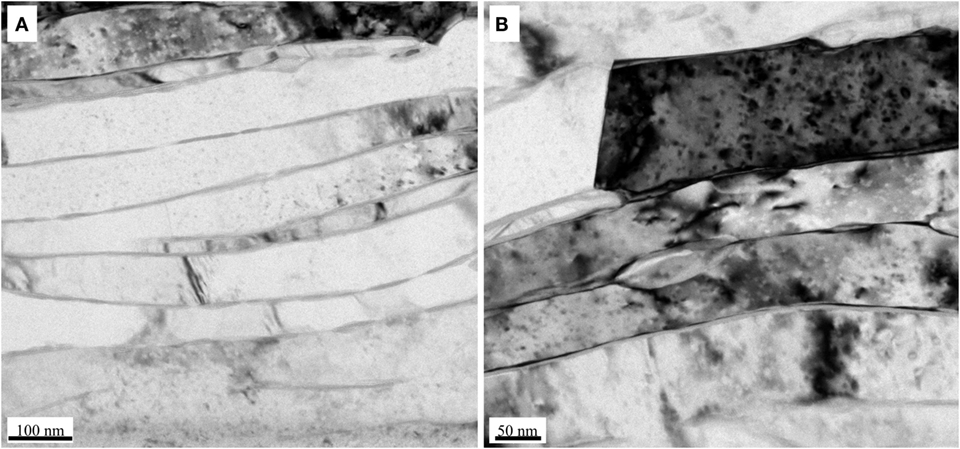
After 6 h of milling, the size and morphology of the aluminum powders changed significantly. It has been shown in a previous work that the morphology of the aluminum powders after attritor milling changes from equiaxed to flake shaped, with thicknesses ranging from 40 to 150 nm, and surface lengths/widths up to several microns (Tabandeh-Khorshid et al., 2015). This results in the layered microstructure observed in the consolidated specimens, as shown in Figure 2.
Testing of MMNC Specimens
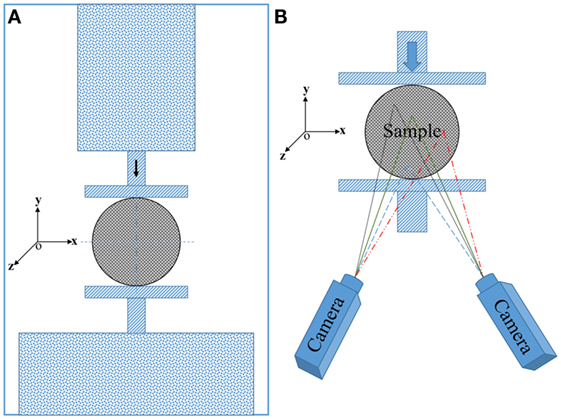
The elastic mechanical properties of the cylindrical specimens were determined by the diametrical compression method. The compression load was applied on the side of the cylinder as shown schematically in Figure 3. An electromechanical universal test machine was used for testing the disk shaped specimens. DIC was used to capture the deformations on the flat ends of the cylindrical specimen.
The optical measurements were performed using a 3D DIC system (Q-400; Dantec Dynamics GmbH, Skovlunde, Denmark and Ulm, Germany). Prior to testing, a white flat spray paint is used to cover the surface of the specimens. This is followed with application of a speckle pattern using black paint to create random small drops. A resolution of 5 megapixels is used for the CCD cameras together with a 35-mm lens on each camera. Figure 3 shows the test specimen in the loading frame with the two CCD cameras used for 3D DIC. Prior to testing of the MMNC specimens, a series of calibration steps are performed on a calibration plate. Calibration is used for determination of the imaging parameters (intrinsic and extrinsic) of each of the cameras in addition to the position of the cameras relative to the overall coordinate system. An acceptable calibration was considered if the residuum was less than 0.3 pixels. An output signal from the loading system for the load and displacement is synchronized with the image correlation system so that each frame is correlated with the actual loads applied to the specimen at that point. The deformations were recorded during each test at a frequency of 0.5 Hz. The initial image in the unloaded state was used for the reference for all the subsequent images. At the post-processing stage, a grid size of 12 pixels and a facet size of 17 pixels were used for the evaluation.
Results and Discussion
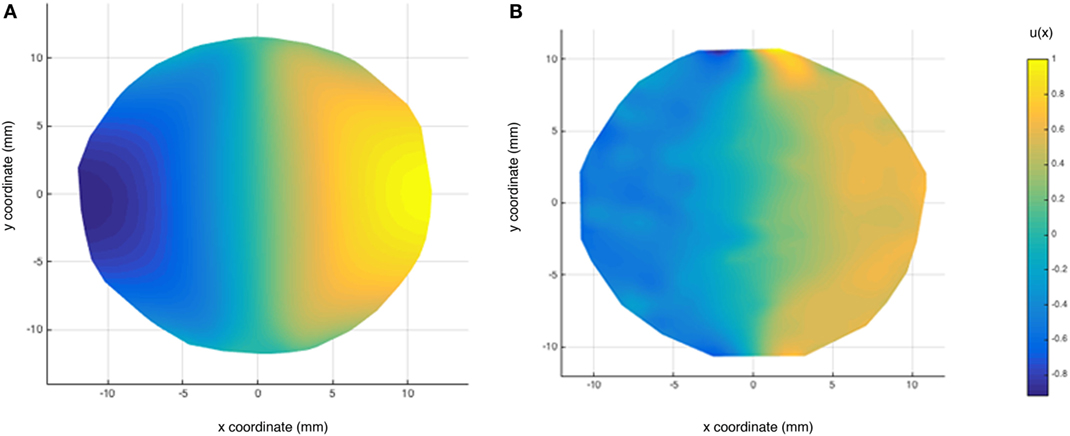
A 3D finite element model was prepared for a disk under the diametrical compression using the p-element approach (Stress Check V9; ESRD, St. Louis, MO, USA). In the p-version implementation, increasing the polynomial degree of elements controls the errors of approximation of the simulation. This is accomplished by having the order of shape functions increased by increasing the nodes in the element. The refinement in these models is based on increasing the polynomial degree of the elements, which is directly related to degrees of freedom in the model. The error in the energy norm was below 2% using the eighth-order polynomial elements. The DIC deformation is compared to those obtained from the finite element model in Figure 4. The elastic displacements are normalized relative to the maximum displacement value. Using the inverse methodology and the finite element results, we were able to obtain the modulus in both directions to a maximum of error of 9%. Note the correlation in the displacement field is primarily away from the loading points. Thus, any analysis of the displacement fields for extraction of elastic material properties did not use the results from near the loading points.
The results summarized in Table 2 show that as the amount of nanosized reinforcements increases, uniform dispersions of the reinforcement become more difficult to obtain. Consequently, agglomerations of particles persist in the final consolidated specimen, which can reduce the strength of the MMNCs by providing sites for crack initiation and stress concentration (Li et al., 2015). In addition, when the amount of reinforcements exceeds a critical value the grain boundaries become saturated with the nano-reinforcements, which may lead to the formation of a continuous phase of agglomerated particles along the grain boundaries (Kang and Chan, 2004; Tabandeh-Khorshid et al., 2015). As a result, the ductility of the MMNCs at high reinforcement contents decreases compared to the monolithic metals. Evidence of these phases is shown in Figure 2, where semi-continuous phases are observed between the sheets of aluminum.
In a previous work by the authors, it was shown that both Al/Al2O3 and Al/GNP nanocomposites are strengthened mainly by the Hall–Petch mechanism (Tabandeh-Khorshid et al., 2016). Porosity can decrease the mechanical properties (Choren et al., 2013), which may also account for the observed variations in the tensile and compressive properties measured in this study.
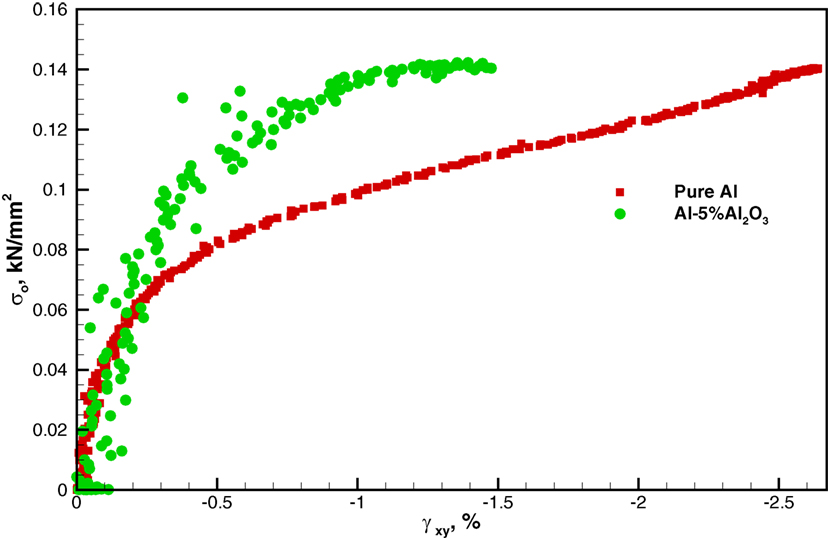
The DIC results of shear strain for the samples are shown in Figure 5. The shear strains in the elastic region (left column) and before failure (right column) are shown in Figure 5 for (Figure 5A) pure aluminum, (Figure 5B) Al–5%Al2O3, and (Figure 5C) Al–5%GNP. The behavior of the pure aluminum and the Al–5%Al2O3 sample was investigated in more detail by DIC in this study. Figure 6 shows the graph of the stress versus shear strain of pure aluminum and the Al–5%Al2O3 samples. Stresses reported in the figures are also normalized with respect to the average stress at the center of the disk. This average stress, σo, is defined here as the load, P, divided by the total cross-sectional area, A, at the center of the disk, or A = Dt = 403.86 mm2 (0.626 in2), where t is the disk thickness and D is the disk diameter.
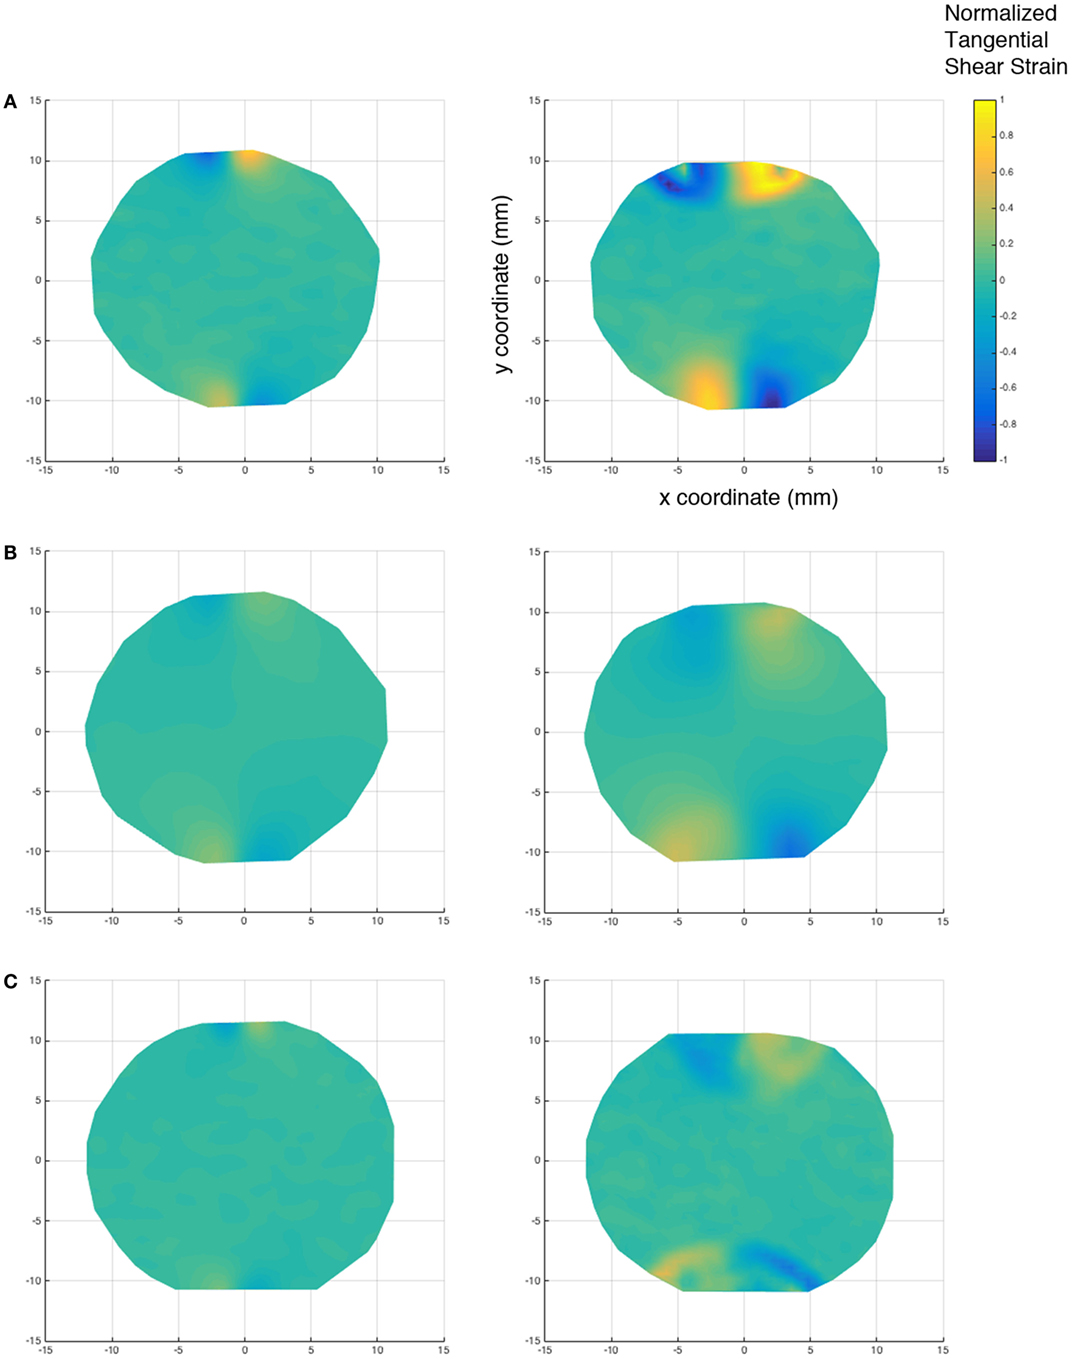
Figure 5. DIC results of shear strain in the elastic region (left column) and before failure (right column) for (A) pure aluminum, (B) Al–5%Al2O3, and (C) Al–5%GNP.
The shear strain behavior of these samples followed the same trend of axial strain behavior. The presence of dispersed Al2O3 nanoparticles at the grain boundaries can act to pin the aluminum grains and prevent them from shearing. As a result, Al–5%Al2O3 shows less shear strain at failure when compared to the pure aluminum sample. This can be seen in the failure sites near the loading pins in the figure. In this figure, a point strain evaluation is taken which accounts for the increased scatter in the measurements.
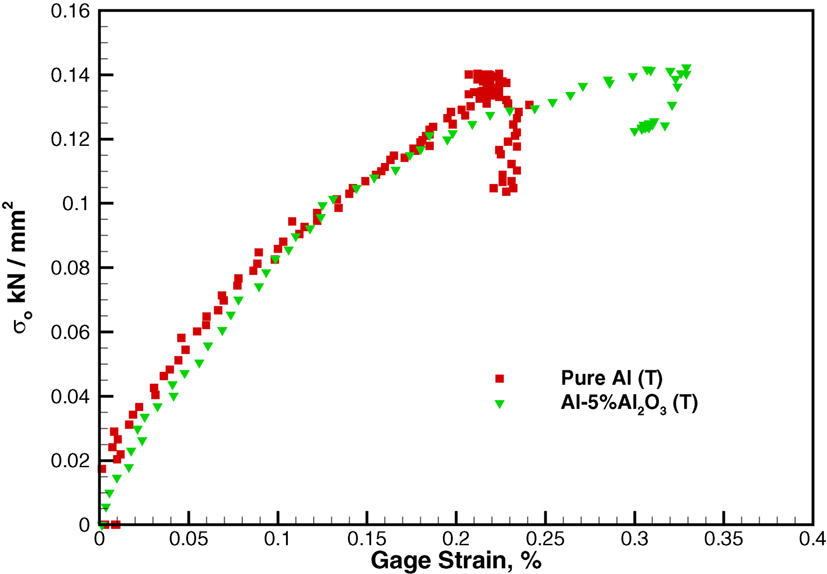
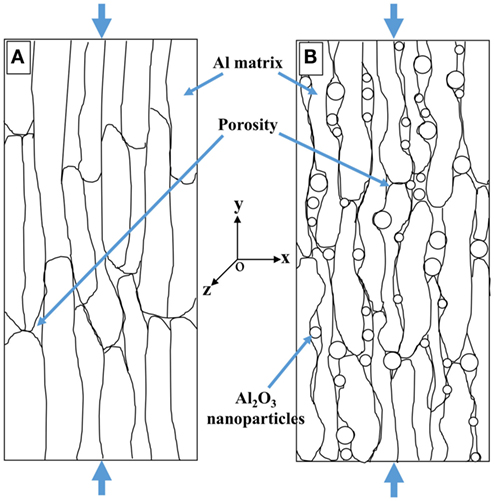
However, the behavior of the pure aluminum and Al–5%Al2O3 sample is different in the transverse (z) direction. Figure 7 shows the graph of average stress versus transverse strain from the DIC results for pure aluminum and Al–5%Al2O3 samples. The graph shows that the transverse strain for the pure aluminum sample is less than that of the Al–5%Al2O3 sample. Note that in this figure, a gage length of ~5 mm is used to evaluate the strain. At the maximum values, the drop in the stress is due to failure near the loading zone. The different strains observed may be due to the presence of porosity in the Al–5%Al2O3 samples. As noted in, the relative density of the Al–5%Al2O3 is only 93.5%, compared to 98.8% for pure Al. This porosity is likely to be concentrated at the regions between the aluminum flakes that were not completely bonded during the consolidation process. This is shown schematically in Figure 8, where the transverse strain is perpendicular to the elongated faces of the aluminum matrix. Compression load in “y” direction causes a tensile strain in “x” direction in all of the samples. Due to the existence of more porosities in the Al–5%Al2O3 sample, the aluminum matrix has more space for deformation in “x” direction. As a result, there is more transverse strain in the Al–5%Al2O3 sample compared to the pure aluminum due to the lower tensile modulus.
While it is expected that composite materials containing high modulus reinforcements, such as Al2O3 or GNP, will exhibit superior tensile and compressive moduli, factors including volume percentage, porosity, material anisotropy, reinforcement distribution, and bonding can each have a significant effect on the modulus of the composite. The tensile and compressive moduli of the composites investigated in this study did not appear to be significantly dependent on the reinforcement content. Future work will investigate the effects of reinforcement content on the stiffness of these nanocomposite systems.
Limitations
The current approach of using this method on MMNC is unable to achieve a tensile failure in the center of the specimen. A flat loading surface may help yield the required stresses in the center of the specimen to obtain tensile yield and failure behavior. Also while the disparity is seen in the tensile and compressive moduli obtained, it is important to note that the analytical solution assumes an isotropic medium. Thus, to further develop this method, an anisotropic model may be necessary to achieve more accurate assessment of the material’s anisotropy. The Poisson ratio may also be obtained using over-deterministic approaches from the full-field data, but this was not investigated in this present study.
Table 2 compares the compressive modulus obtained by the DIC method to that obtained by a uniaxial compression test; however, it should be noted that these two methods cannot be directly compared. Since the mechanical properties of the materials produced in this study are likely anisotropic, the difference in test orientation could have a significant effect on the modulus. It should also be noted that the modulus determined via uniaxial compression was computed based on the cross-head displacement rather than a strain gage measurement, which could lead to errors due to end effects and the small specimen size. Conversely, the modulus values determined via the diametrical disk compression test may be impacted by the assumption that the Poisson ratio of the specimens was constant, as discussed previously.
Conclusion
In this study, cylindrical specimens of unreinforced pure aluminum and aluminum reinforced with either Al2O3 nanoparticles or GNPs were synthesized using a room temperature ethanol milling procedure. A hybrid test method using the diametrical compression disk specimen with DIC is used to investigate the mechanical behavior and measure the full-field displacement in the in-plane and out-of-plane directions. The findings reported in this study are as follow:
1. Al2O3 and GNP-reinforced nanostructured Al nanocomposites were synthesized using a room temperature milling in ethanol/low temperature drying/single action compaction method. This attritor milling powder processing technique at room temperature is thought to be broadly applicable to the synthesis of nanocrystalline materials with enhanced mechanical properties.
2. The diametrical cylinder in compression test coupled with the DIC method can be used to characterize the elastic and failure properties of MMNC materials.
3. The finite element analysis shows that the displacement fields obtained from the diametrical cylinder in compression are in agreement with measured values obtained experimentally using the DIC method.
4. The inverse approach used to predict stiffness is an effective method to obtain the material elastic properties.
5. The DIC fringes show that the ductility of the MMNC material can be investigated by observation of the shear strain fringes in the specimens. Specimens with little plastic deformation show small regions of high shear strain development.
Author Contributions
All authors contributed extensively to the work presented in this paper.
Conflict of Interest Statement
The authors declare that the research was conducted in the absence of any commercial or financial relationships that could be construed as a potential conflict of interest.
References
Aruri, D., Adepu, K., Adepu, K., and Bazavada, K. (2013). Wear and mechanical properties of 6061-T6 aluminum alloy surface hybrid composites [(SiC + Gr) and (SiC + Al2O3)] fabricated by friction stir processing. J. Mater. Res. Technol. 2, 362–369. doi:10.1016/j.jmrt.2013.10.004
Baradeswaran, A., and Perumal, A. E. (2013). Influence of B4C on the tribological and mechanical properties of Al7075–B4C composites. Comp. B Eng. 54, 146–152. doi:10.1016/j.compositesb.2013.05.012
Choren, J. A., Heinrich, S. M., and Silver-Thorn, M. B. (2013). Young’s modulus and volume porosity relationships for additive manufact-uring applications. J. Sci. Mater. 48, 5103–5112. doi:10.1007/s10853-013-7237-5
Derakhshandeh Haghighi, R., Jenabali Jahromi, S. A., Moresedgh, A., and Tabandeh Khorshid, M. (2012). A comparison between ECAP and conventional extrusion for consolidation of aluminum metal matrix composite. J. Mater. Eng. Perform. 21, 1885–1892. doi:10.1007/s11665-011-0108-9
El-Daly, A., Abdelhameed, M., Hashish, M., and Daush, W. M. (2013). Fabrication of silicon carbide reinforced aluminum matrix nanocomposites and characterization of its mechanical properties using non-destructive technique. Mater. Sci. Eng. A 559, 384–393. doi:10.1016/j.msea.2012.08.114
El-Hajjar, R. F., Shams, S. S., and Kehrl, D. J. (2013). Closed form solutions for predicting the elastic behavior of quasi-isotropic triaxially braided composites. Compos. Struct. 101, 1–8. doi:10.1016/j.compstruct.2012.12.036
Ferguson, J. B., Tabandeh-Khorshid, M., Rohatgi, P. K., Cho, K., and Kim, C.-S. (2014). Predicting tensile and compressive mechanical properties of bimodal nano-aluminum alloys. Scr. Mater. 72, 13–16. doi:10.1016/j.scriptamat.2013.10.005
Foust, B., and Rowlands, R. (2011). Thermoelastic determination of individual stresses in a diametrally loaded disk. Strain 47, 146–153. doi:10.1111/j.1475-1305.2008.00480.x
Haj-Ali, R., Wei, B.-S., Johnson, S., and El-Hajjar, R. (2008). Thermoelastic and infrared-thermography methods for surface strains in cracked orthotropic composite materials. Eng. Fract. Mech. 75, 58–75. doi:10.1016/j.engfracmech.2007.02.014
Haj-Ali, R., Eliasi, R., Fourman, V., Tzur, C., Bar, G., Grossman, E., et al. (2016). Mechanical characterization of aerogel materials with digital image correlation. Micropor. Mesopor. Mat. 226, 44–52. doi:10.1016/j.micromeso.2015.12.035
Hung, P.-C., and Voloshin, A. (2003). In-plane strain measurement by digital image correlation. J. Braz. Soc. Mech. Sci. Eng. 25, 215–221. doi:10.1590/S1678-58782003000300001
Jianhong, Y., Wu, F., and Sun, J. (2009). Estimation of the tensile elastic modulus using Brazilian disc by applying diametrically opposed concentrated loads. Int. J. Rock Mech. Min. Sci. 46, 568–576. doi:10.1016/j.ijrmms.2008.08.004
Jung, J. M., Yoo, J. H., Jeong, H. J., Lee, S., and Kim, H. S. (2014). Three-dimensional characterization of SiC particle-reinforced al composites using serial sectioning tomography and thermo-mechanical finite element simulation. Metall. Mater. Trans. A 45, 5679–5690. doi:10.1007/s11661-014-2520-x
Kang, Y.-C., and Chan, S. L.-I. (2004). Tensile properties of nanometric Al2O3 particulate-reinforced aluminum matrix composites. Mater. Chem. Phys. 85, 438–443. doi:10.1016/j.matchemphys.2004.02.002
Li, J., Xiong, Y. C., Wang, X. D., Yan, S. J., Yang, C., He, W. W., et al. (2015). Microstructure and tensile properties of bulk nanostructured aluminum/graphene composites prepared via cryomilling. Mater. Sci. Eng. A 626, 400–405. doi:10.1016/j.msea.2014.12.102
Lu, D., Jiang, Y., and Zhou, R. (2013). Wear performance of nano-Al2O3 particles and CNTs reinforced magnesium matrix composites by friction stir processing. Wear 305, 286–290. doi:10.1016/j.wear.2012.11.079
Muskhelishvili, N. I. (2013). Some Basic Problems of the Mathematical Theory of Elasticity. Netherlands: Springer Science & Business Media. doi:10.1007/978-94-017-3034-1
Sajjadi, S. A., Ezatpour, H., and Parizi, M. T. (2012). Comparison of microstructure and mechanical properties of A356 aluminum alloy/Al2O3 composites fabricated by stir and compo-casting processes. Mater. Des. 34, 106–111. doi:10.1016/j.matdes.2011.07.037
Shams, S. S., and El-Hajjar, R. F. (2013). Effects of scratch damage on progressive failure of laminated carbon fiber/epoxy composites. Int. J. Mech. Sci. 67, 70–77. doi:10.1016/j.ijmecsci.2012.12.008
Shin, S. E., Choi, H. J., Shin, J. H., and Bae, D. H. (2015). Strengthening behavior of few-layered graphene/aluminum composites. Carbon N. Y. 82, 143–151. doi:10.1016/j.carbon.2014.10.044
Tabandeh Khorshid, M., Jahromi, S. J., and Moshksar, M. (2010). Mechanical properties of tri-modal Al matrix composites reinforced by nano- and submicron-sized Al2O3 particulates developed by wet attrition milling and hot extrusion. Mater. Des. 31, 3880–3884. doi:10.1016/j.matdes.2010.02.047
Tabandeh-Khorshid, M., Omrani, E., Menezes, P. L., and Rohatgi, P. K. (2015). Tribological performance of self-lubricating aluminum matrix nanocomposites: role of graphene nanoplatelets. Eng. Sci. Technol. 19, 463–469. doi:10.1016/j.jestch.2015.09.005
Tabandeh-Khorshid, M., Ferguson, J. B., Schultz, B. F., Kim, C.-S., Cho, K., and Rohatgi, P. K. (2016). Strengthening mechanisms of graphene- and Al2O3-reinforced aluminum nanocomposites synthesized by room temperature milling. Mater. Des. 92, 79–87. doi:10.1016/j.matdes.2015.12.007
Wang, Z., Cardenas-Garcia, J., and Han, B. (2005). Inverse method to determine elastic constants using a circular disk and moiré interferometry. Exp. Mech. 45, 27–34. doi:10.1177/0014485105051297
Xu, H., Dikin, D. A., Burkhart, C., and Chen, W. (2014). Descriptor-based methodology for statistical characterization and 3D reconstruction of microstructural materials. Comput. Mater. Sci. 85, 206–216. doi:10.1016/j.commatsci.2013.12.046
Yazzie, K., Williams, J. J., Phillips, N. C., De Carlo, F., and Chawla, N. (2012). Multiscale microstructural characterization of Sn-rich alloys by three dimensional (3D) X-ray synchrotron tomography and focused ion beam (FIB) tomography. Mater. Charact. 70, 33–41. doi:10.1016/j.matchar.2012.05.004
Keywords: nanocrystalline metal matrix nanocomposites, digital image correlation, powder metallurgy, diametrical compression test, mechanical behavior
Citation: Tabandeh-Khorshid M, Schultz BF, Rohatgi PK and Elhajjar R (2016) The Diametrically Loaded Cylinder for the Study of Nanostructured Aluminum–Graphene and Aluminum–Alumina Nanocomposites Using Digital Image Correlation. Front. Mater. 3:22. doi: 10.3389/fmats.2016.00022
Received: 07 March 2016; Accepted: 18 April 2016;
Published: 09 May 2016
Edited by:
Sher Bahadar Khan, King Abdulaziz University, Saudi ArabiaReviewed by:
Tatana Vacková, Academy of Sciences of the Czech Republic, Czech RepublicLiqing Wei, USDA Forest Products Laboratory, USA
Copyright: © 2016 Tabandeh-Khorshid, Schultz, Rohatgi and Elhajjar. This is an open-access article distributed under the terms of the Creative Commons Attribution License (CC BY). The use, distribution or reproduction in other forums is permitted, provided the original author(s) or licensor are credited and that the original publication in this journal is cited, in accordance with accepted academic practice. No use, distribution or reproduction is permitted which does not comply with these terms.
*Correspondence: Rani Elhajjar, ZWxoYWpqYXJAdXdtLmVkdQ==
 Meysam Tabandeh-Khorshid
 Benjamin F. Schultz
 Pradeep K. Rohatgi1
 Rani Elhajjar