- Łukasiewicz Research Network, Krakow Institute of Technology, Kraków, Poland
Surface integrity is important factor for components exposed to wear, like cold working tools, which need to possess high hardness combined with high wear resistance. Surface treatments such as grinding, hard turning, and hard turning with slide burnishing have been developed for its improvement. Vancron 40 and Vanadis 8 tool steels, of different chemical composition and different types and amounts of carbides, were now investigated. Heat treatment was carried out in vacuum furnaces with gas quenching to hardness of Vancron 64 ± 1 HRC and of Vanadis 65 ± 1 HRC. 3D topography, optical and scanning electron microscopy, X-ray diffraction and ball-on-disc tribological tests against Al2O3 and 100Cr6 balls as counterparts were used to examine wear and friction. For both steels, the lowest values of dynamic frictions and wear rates against Al2O3 counterbodies were achieved after sequential process of hard turning with slide burnishing with a burnishing force of 180 N. For alumina balls, the increase of wear resistance, achieved after hard turning plus burnishing in comparison to grinding exceeds 50 and 60%, respectively for Vanadis 8 and Vancron 40 steels.
Introduction
Cold working processes are widely used, among others in mass production of automotive parts, which are required to possess high strength. Of particular concern of designers and tools technologists are components subjected to high surface pressures under unfavourable conditions of boundary friction (Kleiner et al., 2003; Klocke, 2013; Hutchings and Shipway, 2017).
The deterioration of the performance of tools for cold working generally takes place as a result of progressive tribological wear during operation. The catastrophic (dynamic) wear, which can include, chipping of tool edge when the ultimate strength is locally exceeded, or component fatigue failure, may be limited by a careful choice of tool material. In some cases it is necessary to improve tool design and its manufacture. Surface engineering becomes particularly important because cold-working tools are exposed to very high contact stresses occurring during forming and deformation of the workpiece material. The state of technological surface layer (TSL) of tools affects significantly their life (Dearnley, 2017; Burakowski and Wierzchoń, 1999).
The properties of TSL are determined by mechanical processes, often preceded by heat treatment. The surface roughness and the hardness of surface layer play an important role in the wear resistance of cooperating components (Czechowski et al., 2012; Krolczyk et al., 2014). Many types of mechanical finishing treatments create smooth surfaces, although not always guaranteeing a favorable stress condition and adequate hardness of the surface layer. As shown in Table 1, in order to obtain high surface smoothness, burnishing successfully competes with the known and much more expensive abrasive methods, such as grinding or lapping.
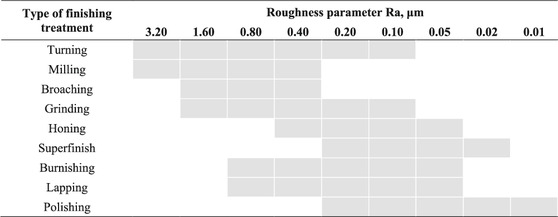
TABLE 1. Ra surface roughness parameter after selected finishing treatments (Czechowski et al., 2012).
Burnishing is a simple and effective method of improving the surface quality. It can be carried out during the manufacturing process without the need to change the machines used in production, such as a lathe or milling machine, or evan purchase new special equipment. Due to its high efficiency, as well as low costs compared to other conventional processes, such as honing and grinding, and favourable surface properties after burnishing (higher abrasion and fatigue resistance), this method is widely used in the engineering, automotive and aviation industries (Mahajan and Tajane, 2013). It should be added, that, this also happens as a result of compression stresses generated in the modified surface layer - an exemplary profile is shown, e.g., on Figure 1.
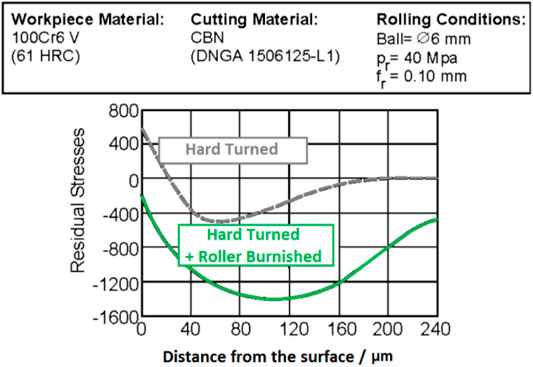
FIGURE 1. Profile of stress distribution in the surface layer of hardened 100Cr6 steel after hard turning and ball burnishing (Byrne et al., 2003).
(Prevéy and Jayaraman, 2005) indicates that static burnishing (including roller and slide burnishing) provides much better properties of surface layer compared to dynamic burnishing (shot peening). Static burnishing makes it possible to control the depth of the plastic deformation, while shot peening generates a high density of dislocations in the surface layer–this is due to internal work-hardening, which in turn causes an unstable state of residual stresses.
(Maximov et al., 2019; Maximov et al., 2021) described in detail the benefits of using slide burnishing. It employs diamond, or similar superhard material, tools with a very low coefficient of friction against metals, as well as high hardness enabling machining even the hardest steels and alloys (Korzyński et al., 2011). During this process, the rounded tip of the tool is pressed and at the same time slides on the machined surface (sliding friction), causing plastic deformation of uneven peaks and smoothing the surface (Korzyński et al., 2009). This method is mainly used for the smooth treatment of hard materials and protective coatings, obtaining a surface with a low roughness of Ra ≈ 0.1 μm.
Considering the roughness parameters related to the material ratio curve, the volume parameters: Vpc, Vmc, Vvc and Vvv are gaining more and more attention of researchers dealing with metrology, tribology and machining processes. Some of these volumetric parameters were used to analyse the clad surface in drilling (Nieslony et al., 2016). The authors stated that by reducing the drilling torque, decreased of the surface roughness parameters can be effected. (Maruda et al., 2015). showed that the changes in surface roughness of the bronze CuSn7Zn4Pb6–stainless steel X10CrNi188 friction were due to the transfer of additives in the emulsion mist. They stated that the emulsion mist provides a decrease in the roughness of the being processed stainless steel surface by more than three times, and the introduction of the additive based on phosphoric acid esters into emulsion causes a decrease by 4–4.5 times.
The correlation between roughness parameters–including skewness and volume parameters–and wettability of a superhydrophobic Cu cone-flower coating was analysed by (Yang et al., 2021). They found that high roughness skewness and void volume ratio are desirable in order to achieve superhydrophobic surfaces. The correlation between wear of cutting tool and surface texture quality was assessed by (Liang et al., 2019), reporting that the machined surface evolves as the tool deteriorates; the analysis included volume parameters (Arantes et al., 2017) studied the surface roughness of the crankcase cylinders of hermetic compressors machined with a conventional and the flexible honing process. They found that volume parameters can be successfully used to characterize honed surfaces as they detect changes resulting from different process steps.
In this paper, we have studied the effect of mechanical processes on surface topographies and their correlations with tribological properties of hardened Vanadis 8 and Vancron 40 tool steels with a similar hardness.
Materials and Methods
Materials
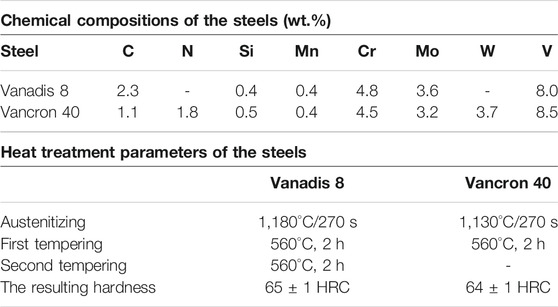
The nominal chemical compositions of our steels are presented in Table 2. Vanadis 8 possesses a very high content of C and V, unattainable in conventional metallurgy steels. Vancron 40 is characterized by similar contents of Si, Mn, Cr, Mo and V, but a lower C content and contains N and W. Samples (ø32 × 12 mm) from both steels were machined and heat treated in vacuum furnaces with gas quenching, at parameters as indicated in Table 2.
Sample Preparation
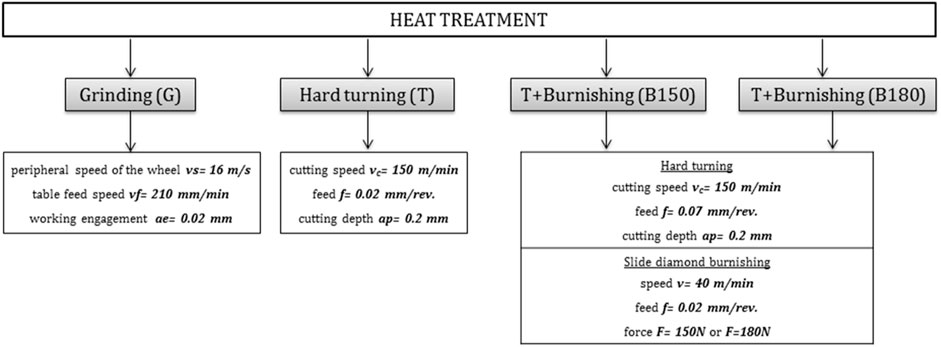
Heat treated specimens were subjected to mechanical processes of surface layer modifications, namely: grinding (G), hard turning (HT), hard turning plus burnishing (HT + B)—see Figure 2. Front face grinding with cBN (cubic boron nitride) wheels with resinous bond was carried out on Universal tool grinder 3E642 type. Mori Seiki NL2000SY turning-milling CNC center, equipped with fixing system described earlier (Toboła et al., 2015; Toboła et al., 2017), was used for hard turning and burnishing on samples end faces. Hard turning was performed with commercial PCBN (polycrystalline cubic boron nitride) cutting inserts NP-DCGW11T302GA2 BC020. Slide diamond burnishing was carried out using diamond tools with the tips in the shape of spherical caps. High pressure-high temperature (HT-HP) Bridgman type apparatus was used to obtain diamond composites with ceramic bonding phase Ti3SiC2. Compacts were sintered at the pressure of 8.0 ± 0.2 GPa and at 1800 ± 50°C for 30 s. Subsequently, their spherical shapes were formed by electrical discharge machining (EDM) (Jaworska et al., 2005; Jaworska et al., 2001).
Microstructure, XRD and Surface Texture Analysis
Metallographic structures and wear tracks were observed with an optical Carl Zeiss Axiovert 100A microscope and a scanning electron microscope (JEOL type JSM-6460LV) equipped with an INCA EDS (energy dispersive X-ray spectrometer).
X-ray diffraction (XRD) analysis and stress measurements were performed with a PANalytical Empyrean diffractometer using copper radiation (λCu = 1.5406 Å).
Surface roughness parameters was measured using a contact profilometer TOPO 01 equipped with a measuring head with a diamond tip radius of 2 μm and a cone angle of 60°. The areas of 4 × 3.4 mm were measured with a sampling density 0.5 and 10 μm, respectively in the measuring and perpendicular direction. Values of selected surface geometrical structure parameters were calculated. Data processing employed the Gaussian filter according with ISO 16610–21 standard for Qualitative changes of machined surfaces, relating to: stereometric and material ratio graphs, contour maps and roughness core.
Tribological Tests
Wear resistance was evaluated by the pin-on-disc method, using a CETR UMT-2MT universal mechanical tester. The loading mechanism applies a controlled load Fn to the pin holder and the friction force is measured continuously by an extensometer. For each test, a new pin was used. The pin and discs were washed in ethyl alcohol and dried. The size of the disc-shaped samples with the surfaces flatness and parallelism within 0.02 mm is illustrated in Figure 3. The following test conditions were: Al2O3 and 100Cr6 ball diameters 10.0 mm and radius of the sliding circles 7.0 and 11.0 mm, applied load = 25.0 N, sliding speed = 0.1 m/s, sliding distance = 2000 m, duration of the test 2·104 s. The tests were carried out at room temperature (25°C ± 2°C) without lubricant, under maximum Hertzian contact pressure of 1,600 MPa. The test conditions were defined that the contact pressure did not exceed the yield strength of the tested steels, to eliminate damage due to plastic deformation.
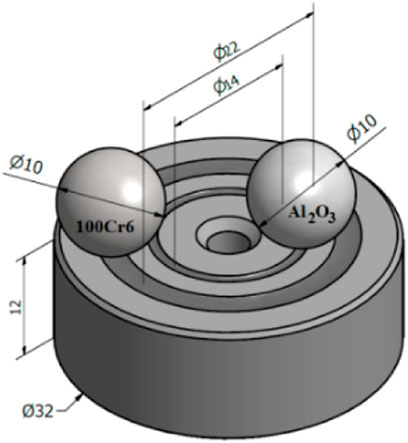
FIGURE 3. An example of a sample used during the pin-on-disc tests and two types of A2O3 or 100Cr6 pins as counterbodies.
Results and Discussion
Microstructure and XRD Analysis
The SEM images of cross-sectional micrographs, for both heat treated steels are shown in Figure 4. In both cases carbide particles within a fine tempered martensite matrix are evident. In Vanadis 8 only MC type carbides rich in V were detected, whereas in Vancron 40, besides MC type carbides, M6C type carbides were found. This was confirmed by X-ray diffraction analysis.
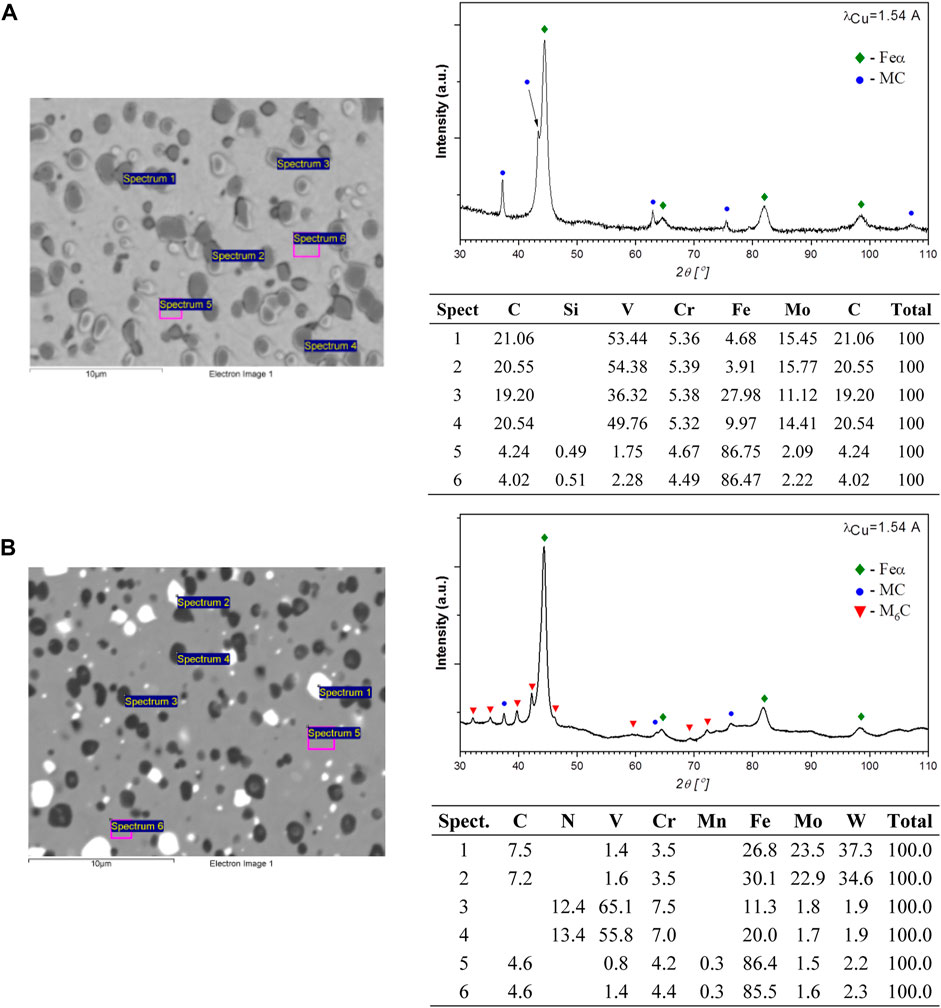
FIGURE 4. XRD patterns and microstructure with EDS analysis of two studied steels: (A) Vanadis 8, (B) Vancron 40.
Surface Geometrical Structure Measurements
Areal roughness and volume parameters were measured and graphs of the surface with material ratio curves are presented. Gaussian Filtration was used before calculation of roughness parameters. 3D roughness parameters, for both steels are given in Table 3. The influence of machining method on 2D roughness profile parameters was analyzed by (Sedlaček et al., 2009); in our work areal roughness parameters and selected volume parameters were taken into account. The former can better describe the character of the surface and also be more sensitive for random defects of the surface, such as spikes (the most often occurs in optical measurement methods) and local small and deep valleys. Increase of surface roughness for samples after sequential process can be observed by comparing G to T for both steels. All roughness parameters related with amplitude have higher values for burnished samples than for other machining processes. The biggest differences were for Sz parameter, which characterizes the height of the greatest amplitude of the surface, and is the most sensitive to its changes.Very similar trend was also found for material volume (Vmc) in roughness core, for which the highest values were determined after T + B150 and T + B180 treatments, respectively for Vanadis 8 and Vancron 40 steels. Correlations may exist between Vmc parameter and wear rate and dynamic friction, especially for T + B180 variant and Vancron 40 samples (Figures 8, 9). The higher value of Vmc, the lower dynamic friction, which leads to a better wear resistance. (Pawlus et al., 2021). showed a correlation between the friction coefficient and the surface roughness height for honed samples. They analyzed the results of the height surface roughness parameters, as well as the possibility of similar application of other roughness parameters. Our results show that the parameters related to the material ratio curve, including the volume parameters, can be successfully correlated with the coefficient of friction and wear resistance also for surfaces after sequential processing.

TABLE 3. Mean values of roughness parameters for Vanadis 8 and Vancron 40 steel samples after selected mechanical processes.
3D topographs and contour line maps after mechanical processes of surface layer modifications are given in Figures 5, 6. All the surfaces have similar texture direction of surface geometric structure. For both tool steels, after slide burnishing, local hills, formed by plastic deformation of surface layer, are visible as red on stereometric graphs and contour maps. This is also shown by values of Vmp and Spk parameters presented in Table 3. In this case burnished surfaces had higher values. Material ratio curves are shown in Figure 7. The height of the roughness core increases for burnished samples, defined by the Sk parameter. This can be explained by the change of material ratio curve–which acquires a symmetrical shape.
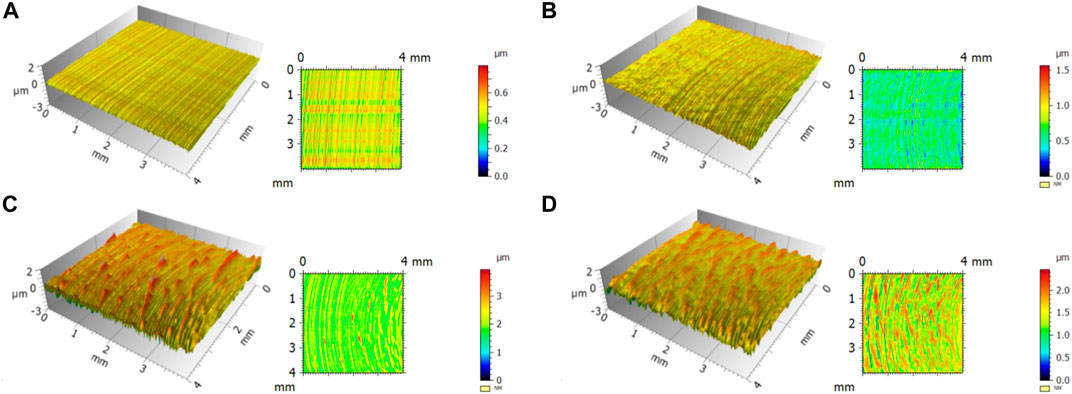
FIGURE 5. Results of 3D topography measurements for Vanadis 8 steel after: (A) G, (B) T, (C) T + B150, (D) T + B180.
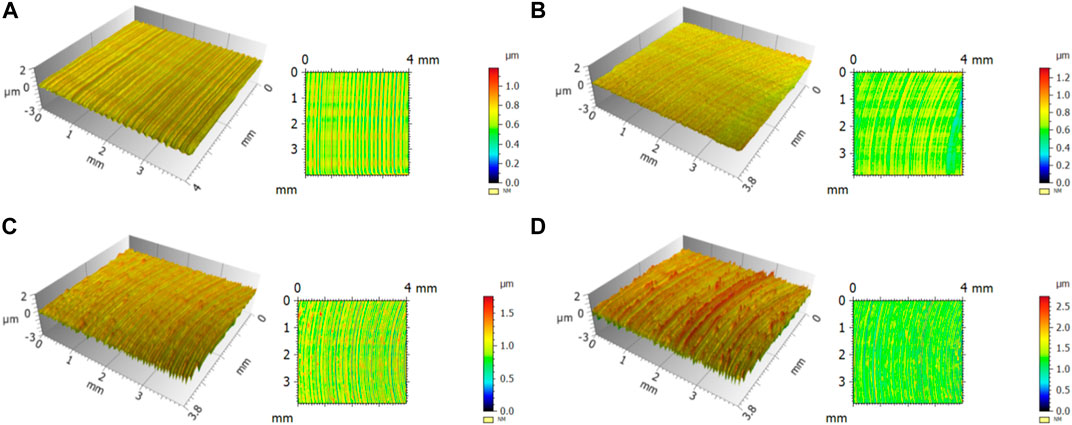
FIGURE 6. Results of 3D topography measurements for Vancron 40 steel after: (A) G, (B) T, (C) T + B150, (D) T + B180.
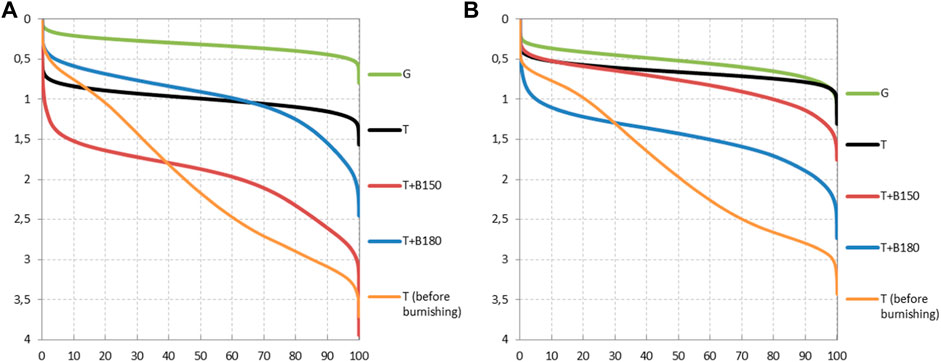
FIGURE 7. Material ratio curves after mechanical processes of surface layer modifications for: (A) Vanadis 8, (B) Vancron 40 steels.
Figure 7 clearly shows the influence of slide burnishing after turning on the distribution of material ratio. The curves become shorter and symmetrical–which means that amplitude of the surface decreased and the height the peaks after turning was significantly reduced.
Dynamic Friction and Wear Resistance
Figures 8, 9 present wear rates and dynamic friction values for tests against Al2O3 after surface layer modifications. The differences of wear rates between Vancron 40 and Vanadis 8 were: 2.7 (G), 11.6 (T), 3.3 (T + B150) and 2.3 (T + B180) times. Presence of the much harder (up to 3000 HV 0.02) MC type carbides in only, Vanadis 8 may explain these results. In Vancron 40, besides MC type carbides, there are also M6C type carbides with twice lower hardness (Nurthen et al., 2008). The lowest wear rates and dynamic frictions were achieved after the sequential process of hard turning and slide burnishing, with a force of 180 N. Increase of wear resistance (against Al2O3) achieved after T + B180 in comparison to G exceeds 50 and 60%, respectively for Vanadis 8 and Vancron 40 steels.
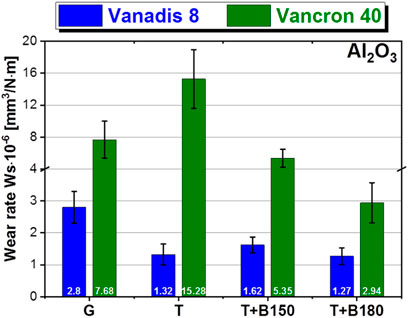
FIGURE 8. Wear rates for Vanadis 8 and Vancron 40 samples, following the mechanical processes of SL modifications: (A) G, (B) T, (C) T + B150,(D) T + B180. Ball-on-disc tests carried out against Al2O3 pins.
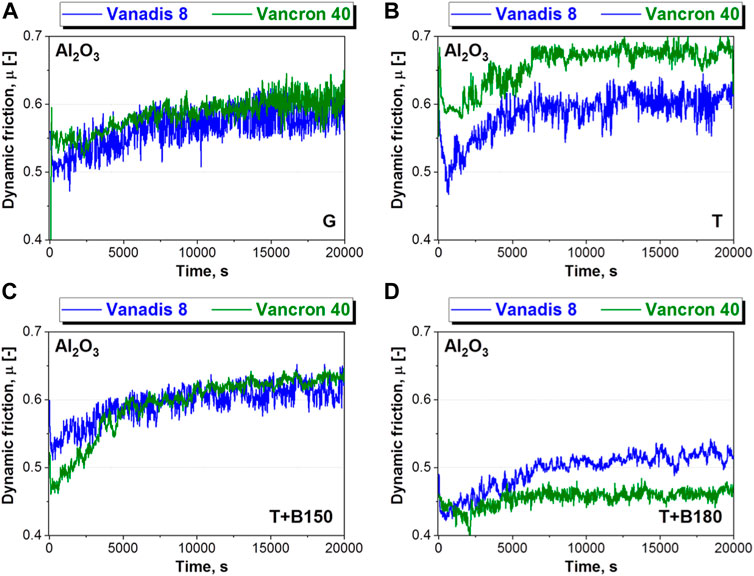
FIGURE 9. Dynamic friction coefficients for Vanadis 8 and Vancron 40 samples, following the mechanical processes of SL modifications: (A) G, (B) T, (C) T + B150, (D) T + B180. Ball-on-disc tests carried out against Al2O3 pins.
After all tribological tests against 100Cr6, sufficient wear, that would allow the determination of wear rates, was not observed and only dynamic friction coefficients are presented in Figure 10. For Vanadis 8, the lowest values of about 0.5 were found for the turning variant, whereas for Vancron 40 two variants, machined by sequential processes, with almost the same trend, were observeds.
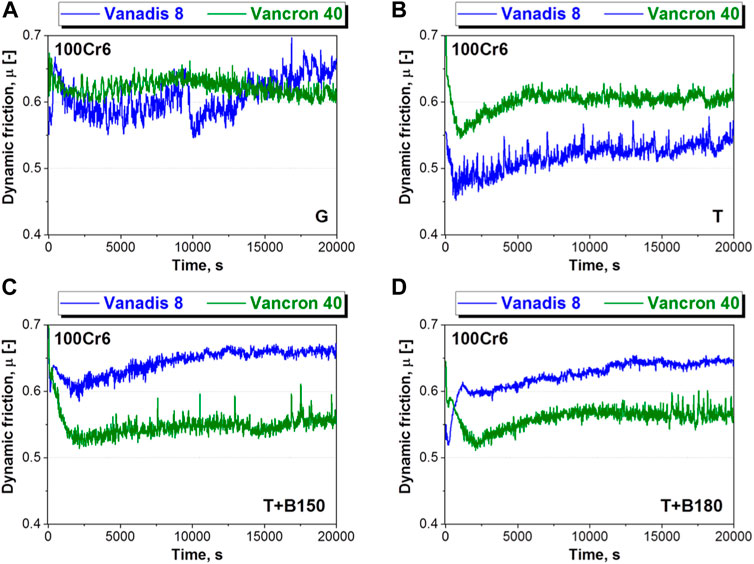
FIGURE 10. Dynamic friction coefficients for Vanadis 8 and Vancron 40 samples, following the mechanical processes of SL modifications: (A) G, (B) T, (C) T + B150, (D) T + B180. Ball-on-disc tests carried out against 100Cr6 pins.
Examples of the profilograph runnings across the track following the wear as well as SEM images of wear (after ball-on-disc test) for the tool steels after different surface treatments are presented in Figures 11, 12. Always adhesion wear was the main wear mechanism against 100Cr6, whereas for tests against Al2O3, abrasive wear was dominant. This mechanism is consistent with previous results for Vanadis 6 (Toboła, 2022), where adhesion wear running parallel to the sliding direction along edge of the trace was the failure mechanism.
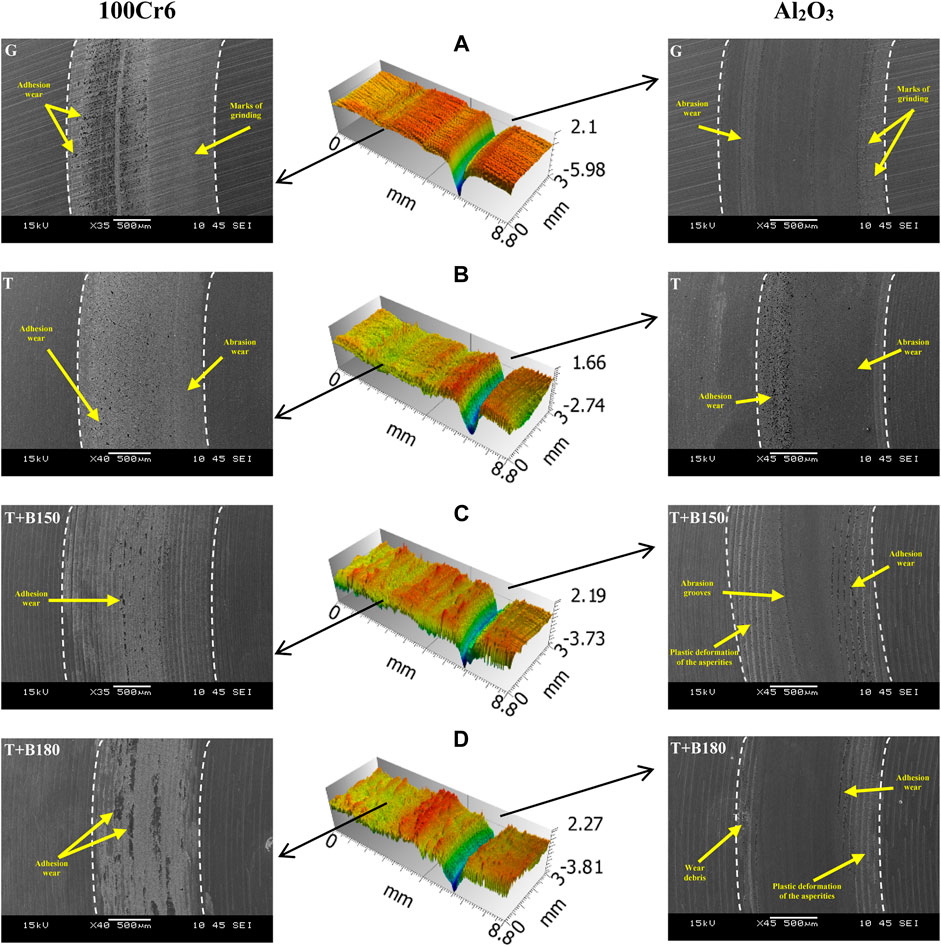
FIGURE 11. Examples of the profilograph running s across the track following the wear as well as images of wear (after ball-on-disc test) for Vanadis 8 tool steel after different surface treatments: (A) G, (B) T, (C) T + B150, (D) T + B180.
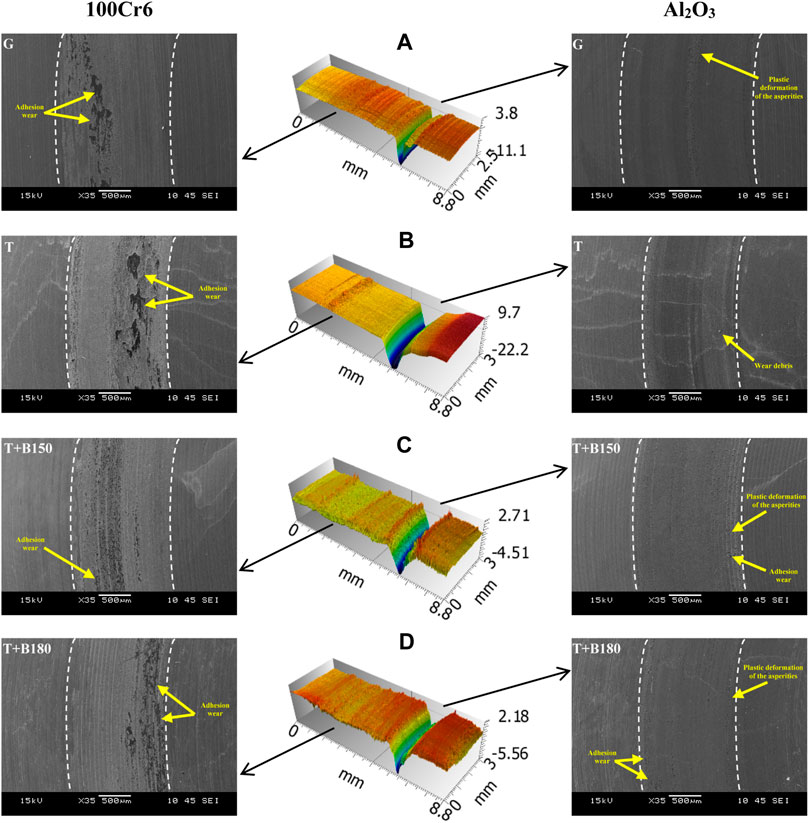
FIGURE 12. Examples of the profilograph running s across the track following the wear as well as images of wear (after ball-on-disc test) for Vancron 40 tool steel after different surface treatments: (A) G, (B) T, (C) T + B150, (D) T + B180.
Conclusion
The following findings were made based on the results of the experiments:
1) Sequential process of Turning + Burnishing could be an alternative to grinding for hardened P/M Vanadis 8 and Vancron 40 tool steels.
2) Increase of wear resistance achieved for Vanadis 8 and Vancron 40 tool steels after T + B180 process in comparison to G exceeds 50 and 60% respectively.
3) Differences in wear resistance between investigated tool steels are related to carbides contains. MC type carbides because of their high hardness behave better in abrasive environment (only such ones occur in Vanadis 8 steel), then much softer M6C type carbides–which are in Vancron 40 steel.
4) The relationship between the Vmc parameter and the dynamic friction coefficients (against Al2O3 pins) were observed. When it reached a higher value the lover friction was noticed and thus better wear resistance, for both P/M tool steels.
5) Adhesion wear was the dominant wear mechanisms after tests against 100Cr6 pins, for all applied variants of mechanical processes.
6) After tests against Al2O3 pins, besides adhesion wear two other wear mechanisms were stated: abrasion wear and plastic deformation.
7) Small amounts of wear debris have been shown after T + B180 process.
Data Availability Statement
The raw data supporting the conclusion of this article will be made available by the authors, without undue reservation.
Author Contributions
DT: Funding acquisition, Conceptualization, Project administration, Investigation, Visualization, Writing–original draft. AŁ: Investigation, Writing–review and editing.
Funding
This work was financially supported by the National Centre for Research and Development of Poland (project no. LIDER/13/0075/L7/15/NCBR/2016) and partially by the Łukasiewicz Research Network–Krakow Institute of Technology under development fund (project no. 2605/00).
Conflict of Interest
The authors declare that the research was conducted in the absence of any commercial or financial relationships that could be construed as a potential conflict of interest.
Publisher’s Note
All claims expressed in this article are solely those of the authors and do not necessarily represent those of their affiliated organizations, or those of the publisher, the editors and the reviewers. Any product that may be evaluated in this article, or claim that may be made by its manufacturer, is not guaranteed or endorsed by the publisher.
Acknowledgments
The authors would like to thank the whole team involved in the Lider project: Dr. Sylwester Pawęta, Dr. Piotr Wyżga, Dr. Jolanta Cyboroń, Dr. Jolanta Laszkiewicz-Łukasik.
References
Arantes, L. J., Fernandes, K. A., Schramm, C. R., Leal, J. E. S., Piratelli-Filho, A., Franco, S. D., et al. (2017). The Roughness Characterization in Cylinders Obtained by Conventional and Flexible Honing Processes. Int. J. Adv. Manuf Technol. 93, 635–649. doi:10.1007/s00170-017-0544-2
Burakowski, T., and Wierzchoń, T. (1999). Surface Engineering of Metals Principles, Equipment, Technologies. Boca Raton - London - New York -Washington D.C: CRC Press.
Byrne, G., Dornfeld, D., and Denkena, B. (2003). Advancing Cutting Technology. CIRP Ann. 52 (2), 483–507. doi:10.1016/s0007-8506(07)60200-5
Czechowski, K., Polowski, W., Wronska, I., Wszołek, J., and Toboła, D. (2012). Finishing Treatment with Roller and Slide Burnishing (In Polish). Obróbka metalu 1, 34–41.
Hutchings, I., and Shipway, P. (2017). Tribology: Friction and Wear of Engineering Materials. Oxford - Cambridge MA: Butterworth – Heinemann.
Jaworska, L., Stobierski, L., Twardowska, A., and Królicka, D. (2005). Preparation of Materials Based on Ti-Si-C System Using High Temperature-High Pressure Method. J. Mater. Process. Technology 162-163, 184–189. doi:10.1016/j.jmatprotec.2005.02.172
Jaworska, L., Szutkowska, M., Morgiel, J., Stobierski, L., and Lis, J. (2001). Ti3SiC2 as a Bonding Phase in diamond Composites. J. Mater. Sci. Lett. 20, 1783–1786. doi:10.1023/A:1012535100330
Kleiner, M., Geiger, M., and Klaus, A. (2003). Manufacturing of Lightweight Components by Metal Forming. CIRP Ann. 52 (2), 521–542. doi:10.1016/S0007-8506(07)60202-9
Klocke, F. (2013). Manufacturing Processes 4. Forming. Berlin/Heidelberg, Germany: Springer-Verlag Berlin Heidelberg.
Korzynski, M., Lubas, J., Swirad, S., and Dudek, K. (2011). Surface Layer Characteristics Due to Slide diamond Burnishing with a Cylindrical-Ended Tool. J. Mater. Process. Technology 211, 84–94. doi:10.1016/j.jmatprotec.2010.08.029
Korzynski, M., Pacana, A., and Cwanek, J. (2009). Fatigue Strength of Chromium Coated Elements and Possibility of its Improvement with Slide diamond Burnishing. Surf. Coat. Technology 203 (12), 1670–1676. doi:10.1016/j.surfcoat.2008.12.022
Krolczyk, G., Legutko, S., Nieslony, P., and Gajek, M. (2014). Study of the Surface Integrity Microhardness of Austenitic Stainless Steel after Turning. Tehnički vjesnik 21 (6), 1307–1311. doi:10.2478/mms-2014-0060
Liang, X., Liu, Z., Yao, G., Wang, B., and Ren, X. (2019). Investigation of Surface Topography and its Deterioration Resulting from Tool Wear Evolution when Dry Turning of Titanium alloy Ti-6Al-4V. Tribology Int. 135, 130–142. doi:10.1016/j.triboint.2019.02.049
Mahajan, D., and Tajane, R. (2013). A Review on Ball Burnishing Process. Int. J. Scientific Res. Publications 3 (4), 1–8.
Maruda, R. W., Feldshtein, E. E., Legutko, S., and Królczyk, G. M. (2015). Improving the Efficiency of Running in for a Bronze–Stainless Steel Friction Pair. J. Friction Wear 36 (6), 548–553. doi:10.3103/s1068366615060082
Maximov, J. T., Duncheva, G. V., Anchev, A. P., Dunchev, V. P., and Capek, J. (2021). A Cost-Effective Optimization Approach for Improving the Fatigue Strength of diamond-burnished Steel Components. J. Braz. Soc. Mech. Sci. Eng. 43 (33), 1–13. doi:10.1007/s40430-020-02723-6
Maximov, J. T., Duncheva, G. V., Anchev, A. P., and Ichkova, M. D. (2019). Slide Burnishing—Review and Prospects. Int. J. Adv. Manufacturing Technology 104, 785–801. doi:10.1007/s00170-019-03881-1
Nieslony, P., Cichosz, P., Krolczyk, G. M., Legutko, S., Smyczek, D., and Kolodziej, M. (2016). Experimental Studies of the Cutting Force and Surface Morphology of Explosively Clad Ti–Steel Plates. Measurement 78, 129–137. doi:10.1016/j.measurement.2015.10.005
Nurthen, P., Bergman, O., and Hauer, I. (2008). Carbide Design in Wear Resistant Powder Materials. PM 2008 World Congress, 10. Washington, USA: June, 1–16.
Pawlus, P., Reizer, R., and Wieczorowski, M. (2021). Functional Importance of Surface Texture Parameters. Materials 14, 5326. doi:10.3390/ma14185326
Prevéy, P. S., and Jayaraman, N. (2005). Overview of Low Plasticity Burnishing for Mitigation of Fatigue Damage Mechanisms. Proc. ICSP, 9. 6–9.
Sedlaček, M., Podgornik, B., and Vižintin, J. (2009). Influence of Surface Preparation on Roughness Parameters, Friction and Wear. Wear 266 (3-4), 482–487. doi:10.1016/j.wear.2008.04.017
Toboła, D., Brostow, W., Czechowski, K., and Rusek, P. (2017). Improvement of Wear Resistance of Some Cold Working Tool Steels. Wear 382-383, 29–39. doi:10.1016/j.wear.2017.03.023
Toboła, D., Brostow, W., Czechowski, K., Rusek, P., and Wronska, I. (2015). Structure and Properties of Burnished and Nitride AISI D2 Tool Steel. Mater. Sci. Medžiagotyra 21, 511–516. doi:10.5755/j01.ms.21.4.7224
Toboła, D. (2022). Influence of Sequential Surface Treatment Processes on Tribological Performance of Vanadis 6 Cold Work Tool Steel. Wear 488-489, 204106. doi:10.1016/j.wear.2021.204106
Keywords: P/M tool steel, wear resistance, grinding, turning, burnishing
Citation: Toboła D and Łętocha A (2021) Influence of Combined Mechanical Processes on Tribological Properties of Tool Steels Vanadis 8 and Vancron 40 With a Similar Hardness. Front. Mech. Eng 7:775059. doi: 10.3389/fmech.2021.775059
Received: 13 September 2021; Accepted: 19 October 2021;
Published: 17 December 2021.
Edited by:
Mourad Keddam, University of Science and Technology Houari Boumediene, AlgeriaReviewed by:
Stanisław Legutko, Poznań University of Technology, PolandJeng Haur Horng, National Formosa University, Taiwan
Copyright © 2021 Toboła and Łętocha. This is an open-access article distributed under the terms of the Creative Commons Attribution License (CC BY). The use, distribution or reproduction in other forums is permitted, provided the original author(s) and the copyright owner(s) are credited and that the original publication in this journal is cited, in accordance with accepted academic practice. No use, distribution or reproduction is permitted which does not comply with these terms.
*Correspondence: Daniel Toboła, ZGFuaWVsLnRvYm9sYUBraXQubHVrYXNpZXdpY3ouZ292LnBs
 Daniel Toboła
 Aneta Łętocha