- 1Dipartimento di Ingegneria Civile e Industriale, University of Pisa, Pisa, Italy
- 2Parker Hannifin–FCCE, Gessate (MI), Italy
- 3Direzione Edilizia e Telecomunicazione, University of Pisa, Pisa, Italy
Cam-follower contacts are characterized by continuous changes of operating parameters such as speed, load and geometry, so that both numerical simulations and experimental measurements are very complex. An experimental apparatus has been specifically designed and realized to perform tests with cam–follower pairs. The apparatus allows measurements of contact forces with a custom-made dynamometer and of lubricant film thickness and shape with optical interferometry. After an introductory review of experimental works on cam-follower pairs mainly related to force measurements, the test rig used for the experimental work reported in the paper is briefly described. Some trends of all components of the contact forces measured during the rotation of a circular eccentric cam and an engine spline cam are presented. Tests have been performed at different rotational speeds and preloads. The friction trends can be associated to mixed and boundary lubrication regimes. Some unattended friction peaks are found in tests with the spline cam and possible explanations are given.
Introduction
Cam and follower pairs are mechanisms present in several mechanical systems such as internal combustion engines. They usually operate under severe working conditions with continuous variations of load, speed and geometry. They often work under mixed or even boundary lubrication regimes, which are connected to significant energy losses and wear. The continuous changes of the working conditions, the influence of surface roughness, thermal effects and dynamic behavior of the whole system make extremely complex both theoretical/numerical studies and experimental investigations.
This paper is focused on experimental studies related to one of the most important and investigated aspects of the cam-follower contacts, namely the contact forces. Due to the rapid variation of the operating conditions, it is difficult to perform measurements of the most remarkable parameters of the contact, particularly the friction force, and in literature not many experimental studies on actual cam-follower contacts can be found. Friction force can be directly measured or can be evaluated from the measured torque. A cylindrical eccentric cam in contact with the plane surface of a tappet actuated by a rectilinear alternating motion was investigated in Vichard (1971). Ring type strain gauge dynamometers were used for measuring the normal and the tangential (friction) components of the contact force. Lubricant film thickness was measured by dynamic capacitive measurements. Film thickness and pressure were investigated in a cam-follower contact by Hamilton (1980). Two follower types of similar design were used: one with a small isolated capacitance gauge for measuring the film thickness and one fitted with a pressure gauge. An experimental apparatus was used for estimation of the power losses using a four-power polynomial cam in contact with a flat faced follower in Dowson et al. (1986) and Dowson et al. (1989). The total torque was measured by a strain gauge torque transducer. The power involved in the contact between the cam and the follower was evaluated by subtracting the parasitic losses associated with the rolling element support bearings. The total instantaneous camshaft torque included the component due to the eccentricity of the cam-follower contact point and the one due to friction. The same apparatus was also used for measuring the film thickness by using an electrical resistivity technique in Dowson et al. (1990). Film thickness and temperature measurements with thin film micro transducers were also reported in van Leeuwen et al. (1987). Willermet et al. (1991) used an experimental apparatus with a cam-tappet module driven by a variable speed DC motor for testing the frictional behavior of different oils. The cam-tappet module was a temperature controlled aluminum box which could accommodate different valve train designs. The torque required to rotate the cam was measured by a torque meter and the frictional torque for the cam-tappet contact was obtained by subtracting the geometric torque due to the normal load. The same apparatus was used in Gangopadhyay et al. (2004) to investigate the effect of different surface finish, surface texture and coatings. Friction torque was measured with a torque sensor in the apparatus used by Kano (2006) for testing the effects of different surface roughness and coatings in combination with some lubricants and additives. Particularly advanced diamond-like carbon coatings combined with suitable lubricants and additives produced very low friction coefficient values. The influence of materials, lubricants and additives on friction and scuffing characteristics was also investigated using a test rig able to measure directly the friction between cam and follower in Soejima et al. (1999a). The friction force acting on the follower was measured with a strain gauge sensor located on a follower holder-rod connected to a spherical joint, while the normal force was measured by a piezoelectric load sensor. The same apparatus, improved with the use of a piezoelectric force sensor installed at the base of the spherical joint connected to the follower holder-rod, was used in Soejima and Hamatake (2013). A system that allows the rotation of the follower was also installed in the rig. The effects of different materials, surface finish and coatings were investigated. A different test rig was used in Soejima et al. (1999b) for investigations on cam and roller tappet. Two different configurations for measuring the contact force were employed, with one and with two three-component piezoelectric force sensors. Another experimental apparatus for testing a cam-follower contact with direct evaluation of the friction force is described in Baş et al. (2003). The follower was laterally connected to a flexible beam instrumented with strain gauges from where the friction force was evaluated including the inertia effects. The normal force was evaluated considering the deformation of the spring connected to the follower and the inertia force. Acceleration sensors were used for measuring the accelerations of the different bodies.
The classical configuration, with the moving follower connected to a spring, was used in all previously mentioned test rigs. Different experimental apparatuses with fixed follower and the cam rotating around a moving axis were furthermore developed. Bair et al. (1986) utilized an apparatus with the support of the follower connected to three load cells for measuring all components of the contact force. Being the follower fixed, the shaft of the cam was connected to a flexible frame so that its axis could move. Contact temperature was also measured with an infrared camera when a transparent sapphire follower was used. A test rig for contemporary measurements of contact force and lubricant film thickness in cam-follower contacts has been designed and built by the authors’ research group, (Vela et al., 2011; Fazzolari et al., 2012). All components of the contact force can be measured by a six axes dynamometer, and the lubricant film thickness and shape by optical interferometry that gives more detailed information about film thickness and shape than the electrical techniques.
Some tests on real engines have been also performed. A six-cylinder internal combustion engine under motored conditions driven by an electric motor was used in Mufti (2009). Friction, oil film thickness, and tappet rotation were measured simultaneously synchronized with the engine crank angle. Friction torque was measured by replacing a camshaft with a torque tube equipped with strain gauges. The oil film thickness was measured at the cam-tappet interface using the capacitance technique. The follower rotation was measured using a miniature Eddy current sensor. A new method for directly measuring camshaft friction that uses a specially designed camshaft pulley transducer with strain gauges and slip rings to measure the torque was described in Mufti and Priest (2012). Experiments were carried out for both motored and fired conditions on a single-cylinder gasoline engine.
Numerical studies have improved during the years thanks to the increased computational power and better simulations can be performed today. Just to give an idea of the most recent developments, some numerical studies related to the cam-follower contacts carried out during the last three years are mentioned in the following. Elastohydrodynamic lubrication (EHL) models are generally used by adding some other particular aspects. Qin and Zhang (2017) used a quasi-steady solution of the line contact EHL problem including mixed lubrication conditions and wear classical formulas to evaluate the wear of a cam and follower contact. A nonlinear relationship between the wear coefficient and the lubricant oil film thickness was introduced in relation to the probability of the surface asperities to be greater than the lubricant film thickness. The mixed EHL problem was also solved by Torabi et al. (2017) that in addition considered the squeeze term and the energy equation and compared the behavior of flat and roller followers. The friction coefficient was also evaluated. This line contact thermo-elasto-hydrodynamic analysis was also performed in combination with an elasto-plastic model for the evaluation of the asperities deformation during running-in in Torabi et al. (2018). Yu et al. (2017) used transient thermal EHL equations to investigate the influence of coatings with different characteristics placed on the cam and/or on the tappet. They found out that the reduction of friction losses is greater when both the cam and the tappet are coated. A study was presented in Jamali et al. (2019) for the cam and follower lubrication including the effect of the introduction of an axial modification of the cam depth. Furthermore the contact point EHL problem was solved. Umar et al. (2018) developed a different numerical approach based on friction and lubrication analysis to predict the flash temperature at cam/follower interface. They used some classical formulas for film thickness evaluation instead of solving the Reynolds equation.
For the sake of completeness, it is worth mentioning some studies on the cam–roller follower mechanisms reported in Alakhramsing et al. (2018a, 2018b, 2019). A full numerical solution of line contact isothermal-EHL model for the cam–roller contact combined with a semi-analytical lubrication model for the roller–pin bearing were used in Alakhramsing et al. (2018b). Frictional forces were also evaluated. A transient finite line contact EHL model for the cam–roller was coupled with a transient EHL model for the roller–pin contact in Alakhramsing et al. (2018a). Mixed lubrication and thermal and non-Newtonian effects were finally included in Alakhramsing et al. (2019).
Some first experimental tests were carried out with the apparatus developed by the authors’ research group using a circular eccentric cam (Ciulli et al., 2014) and a spline cam (Ciulli et al., 2019). The study reported in Ciulli et al. (2019) and Pugliese et al. (2019) were carried out using transparent glass followers and were focused on film thickness and shape evaluation with optical interferometry. In this work the apparatus has been used for detailed investigations on contact force measurements by using steel followers.
The Experimental Apparatus
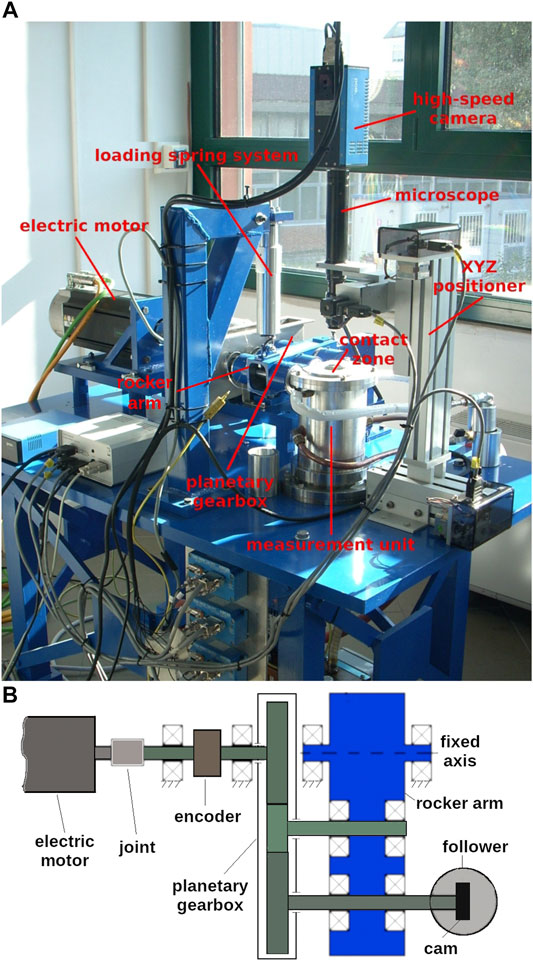
The apparatus used for the experimental tests is able to perform contemporary measurements of contact force and lubricant film thickness. It is also very modular because it has been designed in order to be able to work with the axis of the cam moving and the follower fixed or with fixed cam axis and moving follower. In the configuration used in the present work, the follower is fixed while the cam rotates around a moving axis, Figure 1. In order to maintain the parallelism between the cam axis and the flat surface of the follower during the cam’s motion, the shaft of the cam is installed on a rocker arm and is driven by a planetary gearbox moved by a 5.65 kW electric motor with 3,000 rpm maximum speed. An elastic joint and an absolute encoder are mounted between the motor and the gearbox.
A loading spring system is used to apply the normal load. Springs of different stiffness can be installed. A screw is used to apply the desired preload. The follower is mounted in the measurement unit, basically a six axes dynamometer, Figure 2, that allows direct measurement of all contact force components along three different orthogonal directions (normal to the follower, parallel to the cam axis and parallel to the movement). The measurement unit includes a system of nine Kistler piezoelectric annular load cells mounted in three groups, each one composed of two tangential cells and one for normal load. The complex calibration methodology of the system is described in detail in Fazzolari et al. (2012). A calibration matrix relates the output voltages of the nine load cells to a generalized contact force vector composed by the three force components and the three moment components. The maximum measurable normal and friction forces are 6,000 and 900 N respectively. The lubricant is directly supplied to the contact zone by an oil system. A thermostatic bath is used to regulate the temperature.
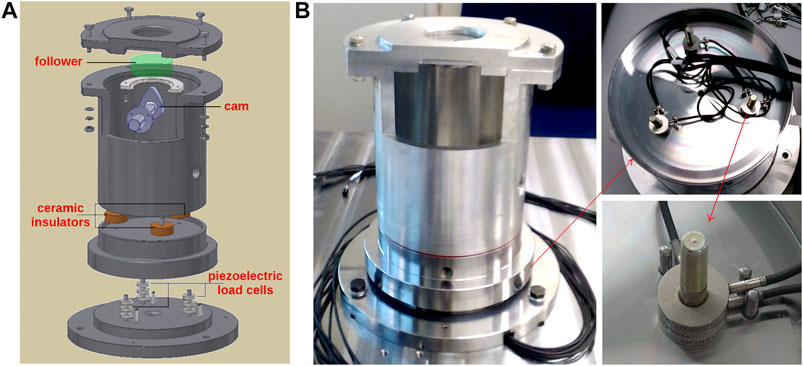
FIGURE 2. Measurement unit. (A) Schematic drawing. (B) Photographs with details of the annular load cells. The lubricant is directly supplied to the contact zone by an oil system. A thermostatic bath is used to regulate the temperature.
Film thickness and shape are estimated using optical interferometry. For this purpose, transparent glass discs are used as follower. These discs are coated with a thin semi-reflective layer of chromium and a layer of silicon dioxide to protect the surface from abrasion and to increase the range of thicknesses measurable. Interference images are recorded by means of a microscope connected to a high-speed camera (Figure 1A) with a frame rate of up to 1,000 images per second. The interference images are analyzed by programs developed ad hoc. Further details on system and methodology used for the image analysis can be found in Ciulli et al. (2019). Microscope and camera are connected to a computer controlled XYZ positioner that includes an independent step motor for moving each axis. This system allows an easy positioning of the microscope over the desired contact zone and also to follow the cam/follower contact zone, that moves on a segment during the cam’s rotation cycle. Depending on the cam geometry, the contact area can be followed point to point usually for low rotational speeds and only using low optical magnification as reported in Pugliese et al. (2019).
A real-time controller and a data acquisition system National Instruments cRIO and LabVIEW® software are used for managing the operating conditions and for data recording.
DETAILS OF THE CAM-FOLLOWER CONTACT
Two different cams, described in the next section, have been tested. As the behavior of the cam and follower contact is strongly influenced by the cam geometry, a kinematic analysis of this contact is also reported for a better comprehension of the experimental results.
Tested Cams
Two kinds of steel cams, a circular eccentric one and an engine cam with a spline profile, have been tested in contact with a flat faced steel follower. The circular eccentric cam has been used as a reference cam. A similar cam was already tested in Ciulli et al. (2014) at different speeds greater than the ones used in this study. The spline cam was also tested against a glass follower in order to investigate the film thickness evolution during the cam rotation in Ciulli et al. (2019) and Pugliese et al. (2019).
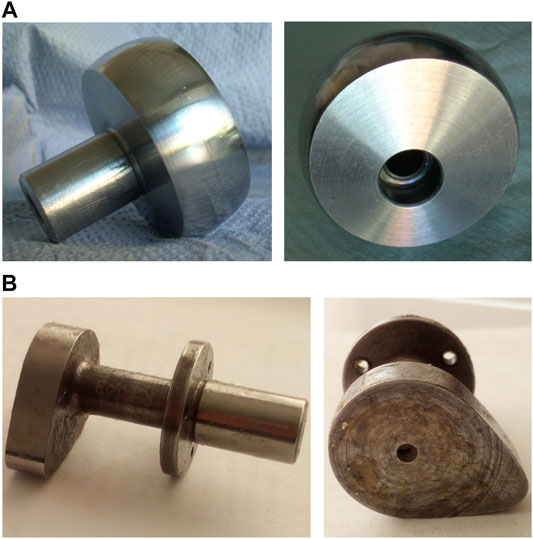
The cams are connected to the shaft of the test rig through a very precise cylindrical coupling. Some pictures of the cam specimens used are shown in Figure 3.
The circular eccentric cam has a spherical surface with a radius of 20 mm and an eccentricity of 2 mm. The radius of the base circle is 18 mm. The mean surface roughness before tests was 0.8 μm.
The engine cam has a radius of the base circle of 14 mm. The cam’s axial width is 10 mm. The mean surface roughness before tests was 0.2 μm.
The steel discs used as followers had a mean surface roughness of 1.6 μm before tests.
Kinematics Aspects
A suitable reference system has been chosen for this work starting from the force reference system used for the calibration of the measurement system (Ciulli et al., 2014), Figures 4A. The reference coordinate system used for the cam kinematics has the opposite direction of the one used for the forces on the follower so that the same signs can be used for the forces acting on the follower, Figures 4B. The origin of the system is on the follower, the coordinate x gives the position of the contact point P and the coordinate z indicates the vertical distance of the base circle of radius Rb from the fixed follower (z corresponds to the follower’s lift in the common configuration with the cam with fixed axis, when the origin is on the base circle and the direction of z is opposite to the one used here).
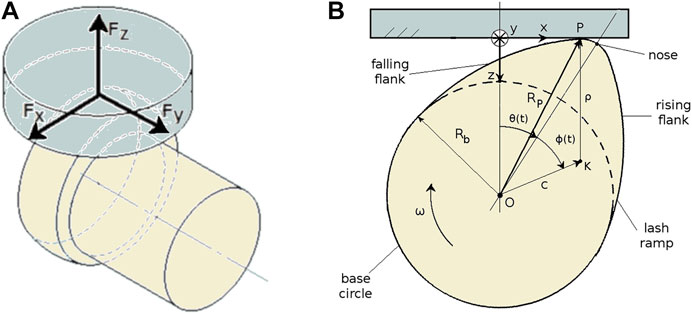
FIGURE 4. Reference systems used for the forces exerted on the follower (A) and for the kinematics of the cam (B).
Being K the cam’s center of curvature at the generic contact point P, with reference to the other quantities shown in Figure 4B, the position of the point P can be expressed as:
where
where θ is the angular position of the cam (its origin is chosen at the position corresponding to the cam nose). As reported in Norton (2002), the center of curvature K is stationary, which means that c, ρ and ϕ can be considered constant for small changes of the cam angle. Therefore, the derivation of Eq. 3 with respect to the variable θ gives:
Eq. 4 indicates that the displacement of the contact point along the x direction has the same behavior (apart the sign due to the used reference system) of the vertical velocity of the axis of the cam (corresponding to the velocity of the follower in the configuration with the cam with fixed axis) being
By further derivation of Eq. 4 we obtain
It is worth mentioning that the second derivative of the vertical displacement z is related to the vertical acceleration. Particularly when the angular velocity ω is constant, the vertical acceleration, related to the vertical inertia force, can be evaluated as
Once Rb and the law z(θ) are known, all the above quantities can be calculated for every angular velocity ω.
For the circular eccentric cam with radius r and eccentricity e, the point K is fixed, c = e, ρ = r, ϕ = 0, Rb = r-e so that
These relationships and their derivatives can easily be found also starting from the circular geometry of the cam. All further derivatives have a sinusoidal form too.
The vertical displacement z and its derivatives for the tested cams are shown in Figure 5.
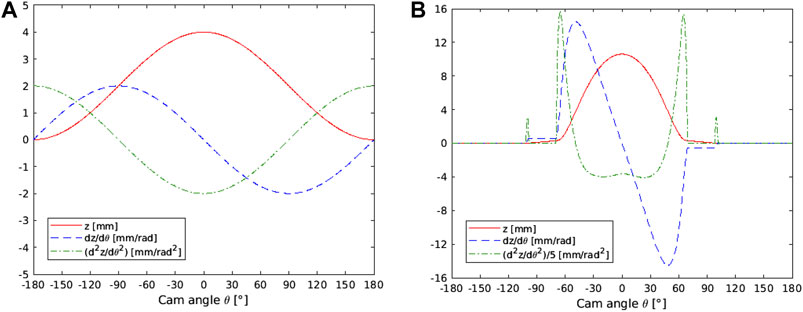
FIGURE 5. Vertical displacement z and its first and second derivatives, z' = -x and
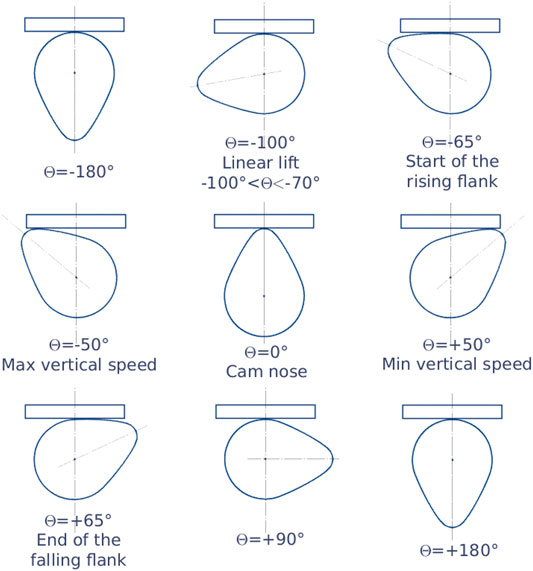
While the circular eccentric cam shows regular sinusoidal trends for all quantities, greater fluctuations are present for the spline cam by increasing the order of the derivatives. This reveals very fast movements of the contact point for certain angular positions, as clarified in Figure 6 where some significant positions during the clockwise rotation of the cam are shown.
Starting from the angular position of the cam when the contact point is opposed to the cam nose (θ = −180°), there is no vertical movement until a zone with a linear trend is reached starting at about θ = −100° (the lash ramp zone, normally introduced at the beginning of the lift law to reduce dynamic effects). Then the vertical movement becomes quick as soon as the contact zone reaches the rising flank (around θ = −65°). The flank zone correspond to the lift. Around the middle of the flank there is the zone with the maximum radius of curvature. The movement of the contact point has very fast variations along the x direction reaching a maximum negative displacement in correspondence to the maximum vertical speed (θ = −50°). Then the contact point comes back, passing in the central position in correspondence to the cam nose (θ = 0°) where the maximum lift occurs, and reaches the maximum positive displacement at θ = 65°. Then the falling flank comes and finally the base circle zone again when the follower is in contact with the back of the cam where the displacements, the velocity and the acceleration along the direction z are constantly equal to zero. Note that the ramps with linear displacements (connecting the base circle and the flanks) are characterized by a constant value of the velocity and acceleration equal to zero. The maximum and the minimum values of the acceleration are in correspondence to the start of the rising flank and at the end of the falling flank (θ = −65° and θ = 65° respectively). Other two lower peaks of accelerations occur in correspondence to about θ = −100° and θ = 100° that are just at the beginning of the linear ramp of the rising flank and after the one at the end of the falling ramp.
The friction coefficient is greatly influenced by the type of lubrication regimes (fluid film, mixed or boundary) that are strictly related to the minimum film thickness and the surfaces roughness. The trend of the friction coefficient is well depicted by the Stribeck and the Lambda curves, as reported in Bassani and Ciulli (2003). The lubricant film thickness depends on geometry, lubricant and material characteristics, load and, particularly, on the entraining velocity. The entraining velocity can be evaluated as the mean surface velocity referred to the contact point and is related to the rotational speed and the geometrical characteristics of the cam. The physical contact points P (Figure 4B) of cam and follower have the same velocities along the z direction but generally they differ in the x direction. In particular, the velocity component along the x direction is zero for the point of the follower, while for the point of the cam is:
Thus the entraining velocity u can be evaluated, using the velocity of the geometrical contact point
Another important parameter affecting friction is the slide-to-roll ratio S, the ratio between the sliding and the entraining velocities, related to thermal effects (Ciulli et al., 2009). Being the follower fixed, the sliding velocity Δu corresponds to vx, and S can be evaluated by the formula:
For the circular eccentric cam it is easy to find:
Trends of sliding velocity Δu = vx, entraining velocity u and slide-to-roll ratio S are shown in Figure 7 for both cams. Bigger variations of the entraining velocity are evident for the spline cam as well as a central region with negative value of S delimited by two points with theoretically infinite values where the entraining velocity is zero.
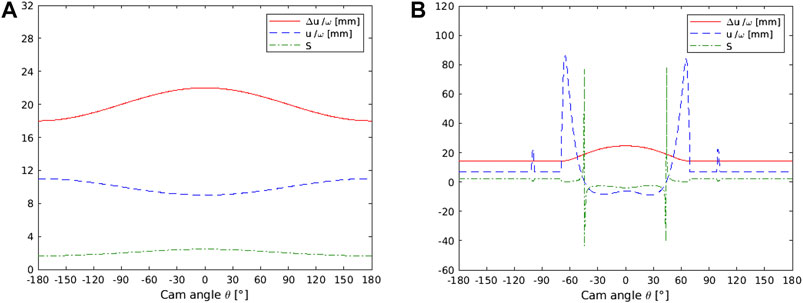
FIGURE 7. Sliding velocity Δu = vx and entraining velocity u devided by the rotational speed of the cam, and slide-to-roll ratio S. (A) Circular eccentric cam. (B) Spline engine cam.
Experimental Results
Several tests have been performed with the two cams described above. Different preloads, spring stiffness and rotational speeds were used also for testing the capabilities of the apparatus. Some sample results of tests at 6 and 60 rpm are reported in the following. Engine oil SAE 5W-40 was used as a lubricant.
The voltage signals of the nine annular load cells were recorded during the test normally at a sampling frequency of 1 or 10 kHz. A couple of examples of data recorded at 1 kHz during tests with the circular eccentric cam and the spline one are shown in Figure 8.
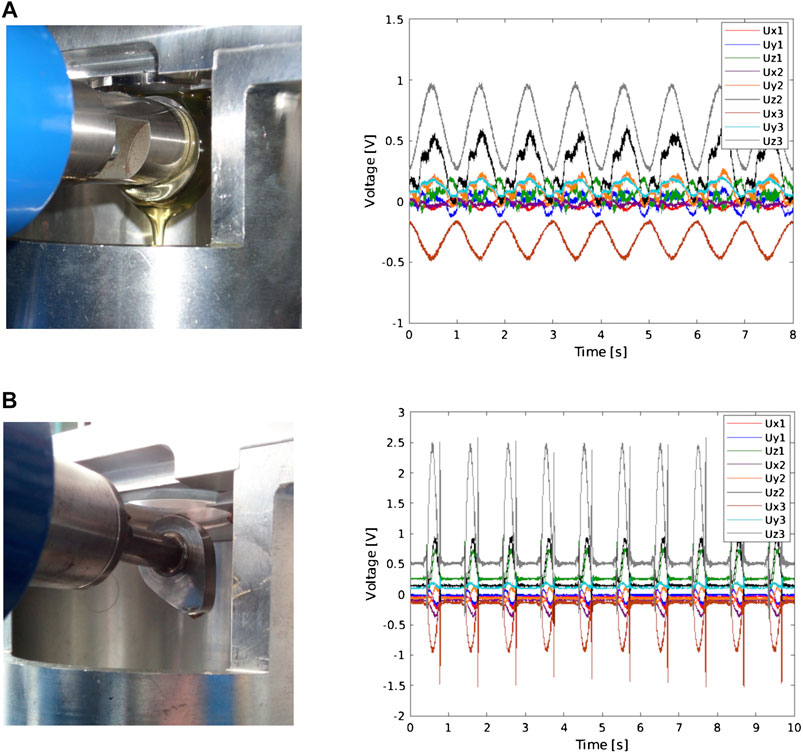
FIGURE 8. Cams specimens connected to the shaft in contact with the follower (left) and sample data recorded during tests at 60 rpm (right). (A) Circular eccentric cam. (B) Spline cam.
From the recorded voltages, the three force and moment components were evaluated by using the calibration matrix previously mentioned when describing The Experimental Apparatus. Several cycles are usually recorded in order to make possible some averaging and some filtering of the results. Filtering is particularly useful for interpretation of noisy data. Fast Fourier Transform of the data have been applied and, among the other, the mating frequencies of the gears have been found in the recorded signals. However, these aspects are beyond the aim of this paper and only unfiltered results are presented.
Sample forces and moments trends obtained by the elaboration of the data reported in Figure 8 are shown in Figure 9. The results refer to tests with the cams rotating clockwise at 60 rpm. Preloads of 35 and 70 N have been applied for the circular eccentric and the spline cam respectively, with the contact on the base circle (points with z = 0). A spring with a stiffness of 20.22 N/mm was used.
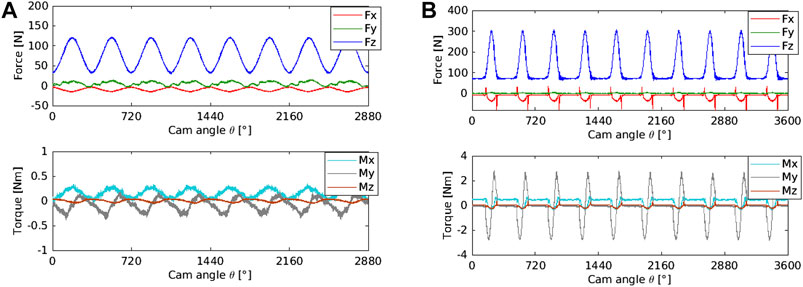
FIGURE 9. Force and moment components in a tests at 60 rpm. (A) Circular eccentric cam. (B) Spline cam.
Single cycles, extracted from the recorded data, have been deeply analyzed. Sample results related to single cycles are reported and discussed in the following section for each one of the two cams tested at 6 and 60 rpm.
Single Cycle Results and Discussion
Contact forces measured in single cycles for the reference circular eccentric cam and the spline one are presented below. It is worth to note preliminarily that some dynamic simulations of the whole system made through a purposely developed program (Vela et al., 2011) have shown that dynamic aspects are not significant for the low speed tested. The normal force Fz is essentially related to the lift and due to the spring force for both cams.
For a better interpretation of the friction results, the minimum film thickness has been also evaluated by using some classical formulas as reported in Hamrock (1994). These formulas do not include squeeze effect, but this is not a problem because it can be considered negligible at the tested velocities. Together with the geometrical and kinematics data, a viscosity value at ambient pressure of 0.145 Pa s and a Barus pressure viscosity coefficient of 2.2 10–8 Pa−1 have been used for the lubricant, and an equivalent elastic modulus of 2.2 1011 N/m2 for the materials.
Circular Eccentric Cam Results
Contact forces detected at 6 and 60 rpm for the circular eccentric cam in a single cycle are shown in the diagrams of Figures 10A, B. A 35 N preload was applied and the spring stiffness was 20.22 N/mm. By comparing the normal loads Fz measured at the two different rotational speeds, the inertia effects result negligible. The maximum normal load is applied in correspondence to the maximum lift and is almost equal for both cases. The trend of Fz follows the one of the vertical displacement shown in Figure 5A and the force values are in good agreement with the ones calculated by considering the preload and the spring stiffness. Also the friction forces Fx have similar trends for both speeds, with maximum (negative) values at the cam nose position and lower values for the higher rotational speed. A not null force component Fy is also detected likely due to a non perfect alignment between the cam axis and the surface of the follower and/or to some imperfections of the cam surface. The friction coefficient has been evaluated as the absolute value of the ratio of Fx and Fz. Its trends for both rotational speeds are shown in Figure 10C. The high values of the friction coefficient are typical of mixed and boundary lubrication regimes. This is also confirmed by the calculated minimum film thickness evaluated with the elastohydrodynamic formulas for point contacts (Hamrock, 1994). Incidentally, the regime of lubrication is piezoviscous-elastic at every contact point during the whole rotation of the cam. The results obtained at 6 and 60 rpm are shown in Figure 10D. The measured normal load has been used for the calculation. Values of the film thickness follow the trend of the entraining velocity (Figure 7A) and are always very low compared to the surface roughness of the spherical specimen and above all of the follower. Accordingly, wear marks have been found on the surface of the specimen after tests, particularly around the zone of the cam nose.
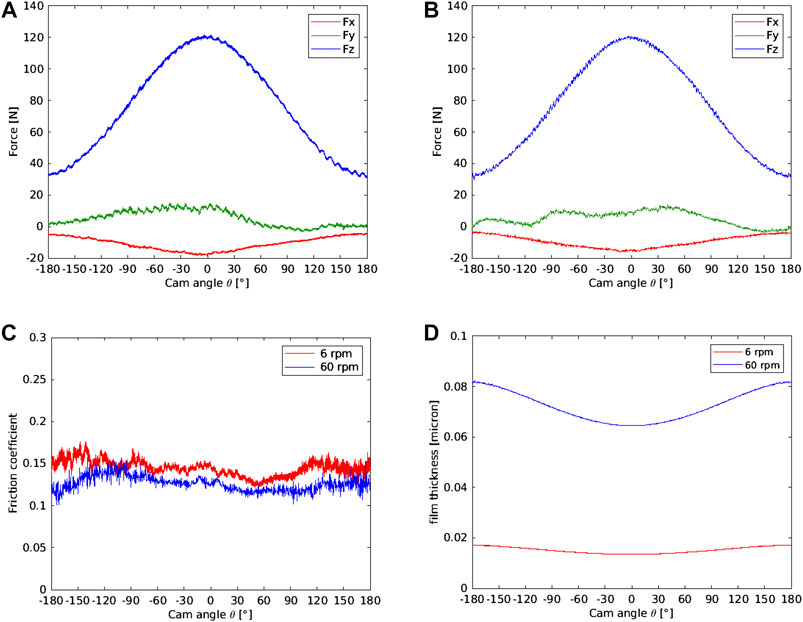
FIGURE 10. Circular eccentric cam. Force components measured during a cycle at 6 rpm (A) and 60 rpm (B). Friction coefficient trends (C) and calculated minimum film thickness (D) at 6 and 60 rpm.
Spline Cam Results
Contact forces detected at 6 and 60 rpm for the engine spline cam in a single cycle are shown in the diagrams of Figures 11A, B. A 75 N preload was applied and the spring stiffness was 20.22 N/mm. As for the circular cam, the trend of Fz follows the one of the vertical displacement (Figure 5B) and the maximum load at the low rotational regimes tested occurs in the nose region, with very similar results for both velocities, indicating negligible dynamic effects. The force values are in agreement with the ones calculated by considering the preload and the spring stiffness apart some fluctuations that can be put in relation to some vibrations connected to the gear teeth contacts more evident for the higher speed case. The zones with constant load corresponds to the base circle. Two peaks of the friction force Fx are present that will be discussed below in more detail. As shown in Figure 11C, the friction peaks are associated to high values of the friction coefficient for both rotational speeds. High values of the friction coefficient are typical of mixed and boundary lubrication regimes. Values greater than about 0.1 could be related to some direct steel-steel contacts while values greater than about 0.4–0.6 could indicate the presence of significant wear. Apart from the two zones with the peaks, the values of the friction coefficient decrease from about 0.14 to about 0.1 by increasing the rotational speed. These values are quite similar to the ones obtained in tests with the circular cam.
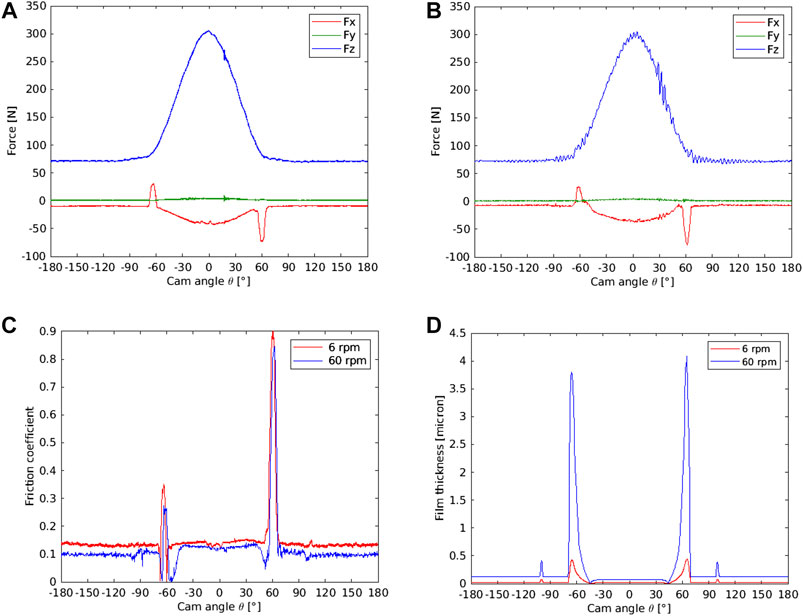
FIGURE 11. Spline cam. Force components measured during a cycle at 6 rpm (A) and 60 rpm (B). Friction coefficient (C) and calculated minimum film thickness (D) at 6 and 60 rpm.
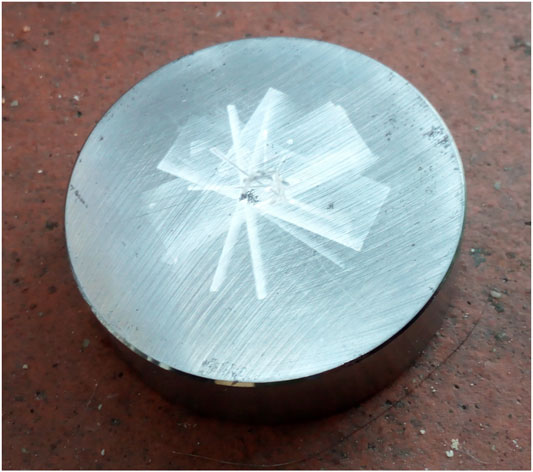
The diagram of Figure 11D shows the calculated minimum film thickness. The lubrication type has been also investigated by using some classical formulas for line contacts, as reported for instance in Hamrock (1994). The lubrication has been identified as isoviscous-rigid for most of the angular position of the cam. Particularly in the zone of the flank with the maximum radius of curvature and the maximum lubricant entraining velocity, around positive and negative 60°, the lubrication is surely isoviscous-rigid and the maximum film thickness is reached. In any case the film thickness is comparable with the composite roughness of the contacting bodies, thus mixed lubrication should occur also for the highest rotational speed. Boundary lubrication regime probably occurs in the other angular positions of the cam. In particular in the nose region, with the minimum radius of curvature, the film thickness reaches its minimum values. Two points with theoretically zero film thickness are present where the entraining velocity is zero (squeeze effects have been neglected). As evident in Figure 12, some wear has been found on the follower, made by a steel with lower hardness than the cam, confirming the presence of mixed and boundary lubrication. It is worth noting that the follower shown in Figure 12 was used for more than one test. For all the tests, wear tracks are present along the whole displacement of the contact zone. More significant wear marks are present close to the central zone where the friction peaks occur. It has to be highlighted also that some preliminary tests were also carried out with the axis of the cam not perfectly parallel to the follower. In these cases the contact was concentrated on one of the edge of the cam.
Peaks of friction force have been found in several testing series. These peaks occur when the contact is close to the beginning of the rising flank and the end of the falling flank. Some tests with different spring stiffness and with opposite rotational speeds have been also performed. Some results are reported in Figure 13. Normal and friction forces measured in tests using two different springs with stiffness K = 20.22 N/mm and K = 11.25 N/mm are compared in Figure 13A. The preload and the rotational speed are 75 N and 60 rpm respectively. It is interesting to note that the peaks are greater when the spring with the lower stiffness is used, while, as expected, the friction force around the cam nose is lower.
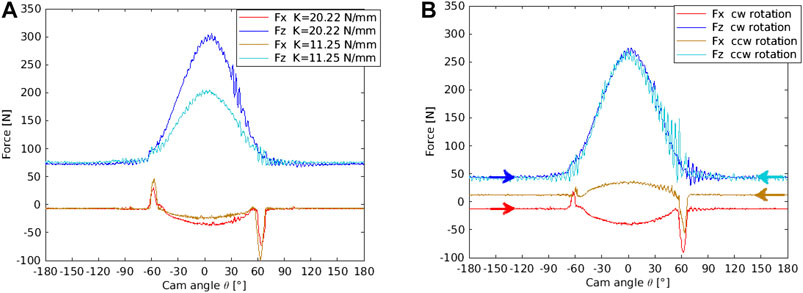
FIGURE 13. Normal (Fz ) and friction (Fx) forces measured during a cycle for the spline cam. (A) Results obtained with two different spring stiffness K (clockwise rotation at 60 rpm with 75 N preload). (B) Results obtained with two different directions of rotation, clockwise (cw) and counterclockwise (ccw) (spring stiffness 20.22 N/mm, 60 rpm, 45 N preload).
The forces measured in tests with 45 N preload and 60 rpm of rotational speed with clockwise and counterclockwise rotations are compared in the diagram of Figure 13B. The results have been arranged in order to have correspondence of the angular positions on the cam. The directions of rotation are indicated by the arrows. As expected the friction forces have opposite signs, while the peaks remain on the same parts.
A first hypothesis for explaining this particular trends was made by putting in relation the friction peaks to possible variations of lubrication regimes. However, the mixed and boundary conditions were proved to be present during the whole cam rotation and in addition, the peaks were close (but not in correspondence) to the zones with maximum film thickness. Also the inversion of sign of one of the peaks could not be explained by some lubrication effects. The results shown in Figure 13 seem to link the peaks to geometrical aspects and dynamics effects. Fluctuations of the normal force occur close to the peaks of the friction force. The greatest fluctuations close to 60° with respect to the zone at −60° could indicate some geometrical differences between the two zones.
It is not easy to find similar results in literature also because detailed measurements of friction in all regions of the cam rotation can rarely be found. Two peaks of friction torque values at about 60° cam angle before and after the nose were reported in Dowson et al. (1989) for a polynomial cam in contact with a flat faced follower. It was stated that they “relate to the ramp regions where the cam contacts and leaves the follower.” Similar peaks were also shown in Soejima et al. (1999a) and Soejima and Hamatake (2013). These peaks are greatly influenced by the running time (Soejima and Hamatake, 2013). These regions are clearly indicated as zone where scuffing occurs in Soejima et al. (1995). Even if the different configuration of cam-roller contact was used in Soejima et al. (1999b), it’s worth noting that a reverse friction force is detected due to the traction related to the inertia force of the roller. It is also interesting to note that similar force fluctuations with also some negative peaks of the friction force were found in Baş et al. (2003) using an apparatus with moving follower. More recently Qin and Zhang (2017) found that calculated wear depths for a cam-follower contact show their greatest values at the starting point of the lift. Results were also consistent with the values measured in an industrial test with a real engine.
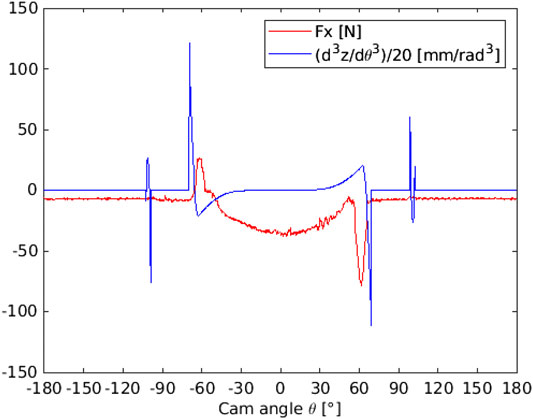
In the cases discussed in the present work, detachments do not seem to be present looking at the normal force values. Anyway the amplitude of the friction peaks reduces with the higher stiffness spring and this gives indication about a possible relation with some vibrations. A quantity surely related to vibrations is the jerk, the changing rate of acceleration, linked to physical mutations and destruction process. In Figure 14z′′′, the jerk divided by ω3, is plotted together with the friction force. Interestingly, the peaks of Fx are close to the ones of the jerk.
A sudden vibration associated with the presence of wear marks could create localized effects. Close to the beginning of the rising flank, when the contact occurs on the right side of a surface elevation produced by the wear, the slope could produce a positive force along the x direction that could be greater than the friction contribution, possibly also due to some impact effects, leading to a local positive force. In the same way, close to the end of the falling flank, when the contact occurs on the left side of a surface elevation, the slope could produce a negative force along the x direction that is added to the real friction force.
Conclusions and Future Developments
All components of the contact forces of cam-follower contacts have been measured with a test rig also able to evaluate the lubricant film thickness. Some experimental results obtained with a circular eccentric cam, used as reference, and with an engine spline cam have been presented. The results are greatly influenced by the shape of the cam. Small variations of the geometry can produce big variations of the dynamic effects and therefore of the contact forces. Due to the relatively low rotational speeds tested, the influence of the dynamic effects on the normal contact force is negligible in the cases reported in this work. However, the results obtained with the spline cam present a particular trend of the friction force with a localized inversion of its sign that could be explained by vibrations related to high values of jerk. The presence of high wear with peaks of material could furnish another possible explanations for this uncommon behavior. It is worth also mentioning that in general test rigs themselves influence the results. The more the experimental apparatus is able to simulate the real machine the more the results are realistic; the quantities of interest are, nevertheless, more difficult to be measured. The system containing the tribological pair influences its behavior, for instance trough its deformations and vibrations. Being a global phenomenon of transformation and dissipation of energy, friction depends a lot on the dynamic and the thermodynamic states of the whole system and the related parameters. The interaction of the studied tribo-couple with the other parts of the entire operating system and with the environment will be subject of further developments. The influence of several parameters can be investigated in the future also thanks to the modularity of the apparatus that can be arranged in a different configuration with fixed cam axis and moving follower.
The experimental system can be used for verification of existing cams and for design of new ones. Local problems can be detected and analyzed in detail. Further developments could be mainly related to investigation on the dynamic behavior of the full system. Some improvements of the experimental apparatus could be made, such as the use of some accelerometers located on the measurement unit. Some tests could be performed using flexible joints with different stiffness to investigate the effect of possible torsional vibrations of the camshaft. The contemporary measurements of the contact force and of the film thickness and shape with the optical interferometry, possible when using transparent followers, can provide more detailed information about what is happening locally at the different cam positions.
Cams with different shape, dimension and surface roughness can be investigated using this rig. Detailed investigations on the surface topography of cam and follower before and after the tests could also be very useful for the interpretation of the results.
Data Availability Statement
The datasets presented in this article are not readily available. Data of the circular eccentric cam are available but some industrial limitations apply to data of the engine spline cam. Requests to access the datasets should be directed toY2l1bGxpQGluZy51bmlwaS5pdA==.
Author Contributions
GP and FF performed the experimental tests. EC and FF analyzed the results. EC wrote the manuscript. All authors revised the manuscript and approve it for publication.
Conflict of Interest
The authors declare that the research was conducted in the absence of any commercial or financial relationships that could be construed as a potential conflict of interest.
Acknowledgments
The authors would like to thank Eng. Alessandro Paglini for his contribution to the experimental work and the elaboration of some results.
References
Alakhramsing, S. S., de Rooij, M., Akchurin, A., Schipper, D. J., and van Drogen, M. (2019). A mixed-TEHL analysis of cam-roller contacts considering roller slip: on the influence of roller-pin contact friction. J. Trib. 141 (1), 011503. doi:10.1115/1.4040979
Alakhramsing, S. S., de Rooij, M. B., Schipper, D. J., and van Drogen, M. (2018a). A full numerical solution to the coupled cam–roller and roller–pin contact in heavily loaded cam–roller follower mechanisms. Proc. Instn. Mech. Engrs., J.Eng. Trib. 232 (10), 1273–1284. doi:10.1177/1350650117746899
Alakhramsing, S. S., de Rooij, M. B., Schipper, D. J., and van Drogen, M. (2018b). Lubrication and frictional analysis of cam–roller follower mechanisms. Proc. Instn. Mech. Engrs., J.Eng. Tri. 232 (3), 347–363. doi:10.1177/1350650117718083
Bair, S., Griffioen, J. A., and Winer, W. O. (1986). The tribological behavior of an automotive cam and flat lifter system. J. Tribol. 108 (3), 478–486. doi:10.1115/1.3261246
Baş, H., Bιyιklιoğlu, A., and Cuvalci, H. (2003). A new test apparatus for the tribological behavior of cam mechanisms. Exp. Tech. 27 (5), 28–32. doi:10.1111/j.1747-1567.2003.tb00126.x
Bassani, R., and Ciulli, E. (2003). “Friction from fluid-film to boundary lubricated conditions,” in Tribological research and design for engineering systems. Editor D. Dowson, M. Priest, G. Dalmaz, and A. A. Lubrecht, (Amsterdam, Netherlands: Elsevier), 821–834.
Ciulli, E., Fazzolari, F., and Piccigallo, B. (2014). Experimental study on circular eccentric cam–follower pairs. Proc. Instn. Mech. Engrs., J.Eng. Tri. 228 (10), 1088–1098. doi:10.1177/1350650114529943
Ciulli, E., Pugliese, G., and Fazzolari, F. (2019). Film thickness and shape evaluation in a cam-follower line contact with digital image processing. Lubricants, 7 (4), 29–17. doi:10.3390/lubricants7040029
Ciulli, E., Stadler, K., and Draexl, T. (2009). The influence of the slide to roll ratio on the friction coefficient and film thickness of EHD point contacts under steady state and transient conditions. Tribol. Int. 42 (4), 526–534. doi:10.1016/j.triboint.2008.04.005
Dowson, D., Harrison, P., and Taylor, C.M. (1986). “The lubrication of automotive cams and followers,” in Proceedings of the 12th leeds-lyon symposium on tribology. Editors D. Dowson, P. Harrison, and C. M. Taylor, (Oxford, UK: Butterworths), 305–322.
Dowson, D., Harrison, P., Taylor, C. M., and Zhu, G. (1990). “Experimental observation of lubricant film state between a cam and bucket follower using the electrical resistivity technique,” in Proc. Japan international tribology conference, Nagoya, Japan, October 29 – November 1, 1990, 119–124.
Dowson, D., Taylor, C. M., and Zhu, G. (1989). “An experimental study of the tribology of a cam and flat-faced follower,” in Proceedings of the Institution of Mechanical Engineers 2nd International Conference Of combustion engines - reduction in friction and wear, London, UK, September 19–20, 1989, 97–108.
Fazzolari, F., Ciulli, E., and Vela, D. (2012). “A novel instrumentation for contact force measurement in cam-follower pairs,” in Proceedings 18th international colloquium tribology, industrial and automotive lubrication, Esslingen, Germany, January 10–12, 2012, 1–10.
Gangopadhyay, A., Soltis, E., and Johnson, M. D. (2004). Valvetrain friction and wear: influence of surface engineering and lubricants. Proc. Instn. Mech. Engrs., J. Eng. Tri. 218, 147–156. doi:10.1177/135065010421800302
Hamilton, G. M. (1980). The hydrodynamic of a cam follower. Tribol. Int. 13, 113–119. doi:10.1016/0301-679x(80)90054-7
Jamali, H. U., Al-Hamood, A., Abdullah, O. I., Senatore, A., and Schlattmann, J. (2019). Lubrication analyses of cam and flat-faced follower. Lubricants 7 (31), 31–19. doi:10.3390/lubricants7040031
Kano, M. (2006). Super low friction of DLC applied to engine cam follower lubricated with ester-containing oil. Tribol. Int. 39, 1682–1685. doi:10.1016/j.triboint.2006.02.068
Mufti, R. A. (2009). Experimental technique for evaluating valve train performance of a heavy duty diesel engine. Proc. Instn. Mech. Engrs., J.Eng.Tri. 223, 425–436. doi:10.1243/13506501jet537
Mufti, R. A., and Priest, M. (2012). Effect of cylinder pressure on engine valve-train friction under motored and fired conditions. Proc. IMechE Part J: J. Eng. Tri. 226 (4), 306–314. doi:10.1177/1350650111432666
Pugliese, G., Ciulli, E., and Fazzolari, F. (2019). "Experimental aspects of a cam-follower contact," in Advances in mechanism and machine science, mechanisms and machine science 73. Editors T. Uhl, (Switzerland: Springer Nature Switzerland AG), 3815–3824
Qin, W., and Zhang, Z. (2017). Simulation of the mild wear of cams in valve trains under mixed lubrication. Proc. Instn. Mech. Engrs., J.Eng.Tri. 231 (5), 552–560. doi:10.1177/1350650116661071
Soejima, M., Ejima, Y., Wakuri, Y., and Kitahara, T. (1999a). Improvement of lubrication for cam and follower. Tribol. Trans. 42 (4), 755–762. doi:10.1080/10402009908982279
Soejima, M., and Hamatake, T. (2013). “Tribology of cam and follower for direct-type valve train,” in Proceedings of the 5th world tribology congress WTC2013, Torino, Italy, September 8–13, 2013, 1–4.
Soejima, M., Wakuri, Y., Ejima, Y., Katsuki, H., and Murase, T. (1999b). "Studies on friction characteristics of cam and roller tappet for engine valve train: investigation of friction measurement method," in Proceedings 15th internal combustion engine symposium. Seoul, Korea, July 13–16, 1999, 185–190.
Soejima, M., Wakuri, Y., Ejima, Y., Kobayashi, M., Miyauchi, K., and Mamiya, H. (1995). “Experimental evaluation of scuffing resistance of cam and follower,” in Proceedings International tribology conference. Yokohama, Japan, October 29–November 2, 1995, 1483–1488.
Torabi, A., Akbarzadeh, S., and Salimpour, M. (2017). Comparison of tribological performance of roller follower and flat follower under mixed elastohydrodynamic lubrication regime. Proc. Instn. Mech. Engrs., J.Eng.Tri. 231 (8), 986–996. doi:10.1177/1350650116684403
Torabi, A., Akbarzadeh, S., Salimpour, M., and Khonsari, M. M. (2018). On the running-in behavior of cam-follower mechanism. Tribol. Int. 118, 301–313. doi:10.1016/j.triboint.2017.09.034
Umar, M., Mufti, R. A., and Khurram, M. (2018). Effect of flash temperature on engine valve train friction. Tribol. Int. 118, 170–179. doi:10.1016/j.triboint.2017.09.030
van Leeuwen, H., Meijer, H., and Schouten, M. (1987). “Elastohydrodynamic film thickness and temperature measurements in dynamically loaded concentrated contacts: eccentric cam-flat follower,” in Proceedings of the 13th leeds-lyon symposium on tribology. Editors D. Dowson, C. M. Taylor, M. Godet, and D. Berthe, (Amsterdam, Netherlands: Elsevier), 611–625.
Vela, D., Fazzolari, F., and Ciulli, E. (2011). “Dynamic aspects of a new experimental apparatus for tribological investigations on cam-follower pairs,” in Proceedings 13th world congress in mechanism and machine science, Guanajuato, México, June 19–23, 2011, 1–9.
Vichard, J. P. (1971). Transient effects in the lubrication of Hertzian contacts. J. Mech. Eng. Sci. 13 (3), 173–189. doi:10.1243/jmes_jour_1971_013_030_02
Willermet, P. A., Pieprzak, J. M., Dailey, D. P., Carter, R. O., Lindsay, N. E., Haack, L. P., et al. (1991). The composition of surface layers formed in a lubricated cam/tappet contact. J. Tribol. 113, 38–47. doi:10.1115/1.2920601
Keywords: cam-follower, experimental tests, contact forces, friction, elastohydrodynamic lubrication
Citation: Ciulli E, Fazzolari F and Pugliese G (2020) Contact Force Measurements in Cam and Follower Lubricated Contacts. Front. Mech. Eng. 6:601410. doi: 10.3389/fmech.2020.601410
Received: 31 August 2020; Accepted: 20 October 2020;
Published: 13 November 2020.
Edited by:
Alessandro Ruggiero, University of Salerno, ItalyReviewed by:
Jeng Haur Horng, National Formosa University, TaiwanEmilia Grigorova Assenova, Society of Bulgarian Tribologists, Bulgaria
Copyright © 2020 Ciulli, Fazzolari and Pugliese. This is an open-access article distributed under the terms of the Creative Commons Attribution License (CC BY). The use, distribution or reproduction in other forums is permitted, provided the original author(s) and the copyright owner(s) are credited and that the original publication in this journal is cited, in accordance with accepted academic practice. No use, distribution or reproduction is permitted which does not comply with these terms.
*Correspondence: Enrico Ciulli, Y2l1bGxpQGluZy51bmlwaS5pdA==
 Enrico Ciulli
 Francesco Fazzolari
 Giovanni Pugliese3