
95% of researchers rate our articles as excellent or good
Learn more about the work of our research integrity team to safeguard the quality of each article we publish.
Find out more
ORIGINAL RESEARCH article
Front. Mater. , 07 March 2023
Sec. Structural Materials
Volume 10 - 2023 | https://doi.org/10.3389/fmats.2023.1135407
This article is part of the Research Topic Joining and Welding of New and Dissimilar Materials - Volume II View all 6 articles
 Ling Shao1,2,3
 Xinyu Zhang1
 Yingwei Chen2
 Liu Zhu1,3*
 Sujun Wu4*
 Qijie Liu2
 Weiwei Li1,3
 Na Xue1,3
 Zhibiao Tu1,3
 Tianle Wang1
 Jitang Zhang1,3
 Sheng Dai1,3
 Xinxing Shi1
 Mengliang Chen5
Ultrasonic pulse frequency tungsten inert gas welding technology was adopted to join Ti-22Al-25Nb alloy. There were some cracks in the Ti-22Al-25Nb alloy weld joint after post-weld heat treatment. The hardness and Young’s modulus of α2, O, and β/B2 phases in Ti-22Al-25Nb alloy were examined with an in situ nanoindentation technique. The phase transition stresses of three different phases in the weld joint of Ti-22Al-25Nb alloy were analyzed to explain why cracks occur in the weld joint of Ti-22Al-25Nb alloy during post-weld heat treatment. The results show that mean hardness is highest for the α2 phase, second-highest for the O phase, and lowest for the β/B2 phase; the mean Young’s modulus has the same trend in Ti-22Al-25Nb alloy. Phase transition stress results in cracks in the weld joint of Ti-22Al-25Nb alloy during post-weld heat treatment. By improving post-weld heat treatment, the ultimate strength of the Ti-22Al-25Nb alloy weld joints reaches 750 MPa, which is 72.5% that of the base material.
Ti2AlNb-based alloys, known as orthorhombic alloys, have drawn much attention for having great potential in advanced automotive and aerospace applications due to their high specific strength and stiffness, excellent oxidation and creep resistance at elevated temperatures, good room temperature toughness and workability, as well as low density (Zhang et al., 2021a; Han et al., 2022; Li et al., 2022; Zhang et al., 2022). As a second generation of Ti2AlNb-based alloys, Ti-22Al-25Nb (at%) alloy exhibits high strength and large elongation to failure at both room and elevated temperatures and thus attracts interest in scientific circles (Yang et al., 2019; Zhou et al., 2019). In some cases, Ti-22Al-25Nb alloy, like any structural material, must be welded to fabricate components with complex geometries. The joining of Ti-22Al-25Nb alloy has been conducted using various welding technologies, such as diffusion bonding welding (Zou et al., 2009; Chu et al., 2017), electron beam welding (Chen et al., 2016; Li et al., 2017), laser beam welding (Zhang et al., 2021b; Zhang et al., 2021c), and friction welding (Chen et al., 2018; Zhao et al., 2020). The main shortcomings of these Ti-22Al-25Nb alloy welding methods are their high cost and limited versatility.
In a previous study (Shao et al., 2018a), we adopted ultrasonic pulse frequency tungsten inert gas (TIG) welding technology to join Ti-22Al-25Nb alloy, due to its advantages of versatile workpiece shape requirements, low cost, and simplicity. Post-weld heat treatment (PWHT) is widely used to relieve the residual stresses caused by welding (Somashekara et al., 2016) and can stabilize the structure and properties of the joints (Panov et al., 2022). Ti-22Al-25Nb alloy, which primarily consists of a two-phase β/B2 + O microstructure, has the optimum combination of strength, creep, and fracture toughness properties (Zhang et al., 2021d). In order to completely remove the residual stress and to have a similar strength as the base material, PWHT was carried out on the weld joint Ti-22Al-25Nb alloy at the temperature range of the β/B2 + O two-phase region. However, cracks were found in the weld joint of Ti-22Al-25Nb alloy after PWHT.
Nanoindentation has become an increasingly popular technique for determining the properties of various materials (metals, composites, polymers, coatings, films, etc.) (Ma et al., 2020; Rominiyi and Mashinini, 2023). The technique has been used for extracting residual stress field (Zhou et al., 2015), investigating the phase transformation process (Wang et al., 2017), and examining the hardness and Young’s modulus (Jin et al., 2023). In particular, the in situ nanoindentation technique is conducted using a scanning electron microscope (SEM), which can visualize the behavior of the material in real-time (Juri et al., 2021). In this study, an in situ nanoindentation technique was used to examine the hardness and Young’s modulus of three different phases in the Ti-22Al-25Nb alloy. Load–displacement (P-h) curves were converted to indentation stress–strain (σ-ε) curves in order to analyze the phase transition stresses of the three different phases in the weld joints of Ti-22Al-25Nb alloy and to better explain why cracks occur in the weld joint of Ti-22Al-25Nb alloy during PWHT.
A Ti-22Al-25Nb alloy butt joint with a high ultimate strength was obtained by ultrasonic pulse frequency TIG welding technology under welding parameters of 50 KHz pulse frequency, 125 mm min-1 welding speed, 80 A peak current, 35 A base current, 13 L min-1 argon gas flow, a welding wire of 1.5 mm diameter, and a welding torch polarity of electrode-positive direct current. A schematic illustration of the experimental setup is shown in Figure 1A and the weld seam appearance of the butt joint is presented in Figure 1B. At the location indicated by the rectangular box in Figure 1B, the specimen was cut along the cross-section by wire cutting used for PWHT. Microstructural features of the cross-section of the weld joint observed using an optical microscope (OM) are given in Figure 1C and exhibit three different zones: fusion zone (FZ), heat-affected zone (HAZ), and base material (BM). The weld joints of Ti-22Al-25Nb alloy after welding were heat treated in an STF1200 tube furnace under argon atmosphere, followed by heating (10°C s-1 heating rate) to 800°C, 850°C, and 900°C, in that order, including a 2-h hold at each temperature, and then cooling to room temperature by decreasing the furnace temperature (Liu, 2013). Table 1 shows that the ultimate strength of weld joints is higher before PWHT than after PWHT.
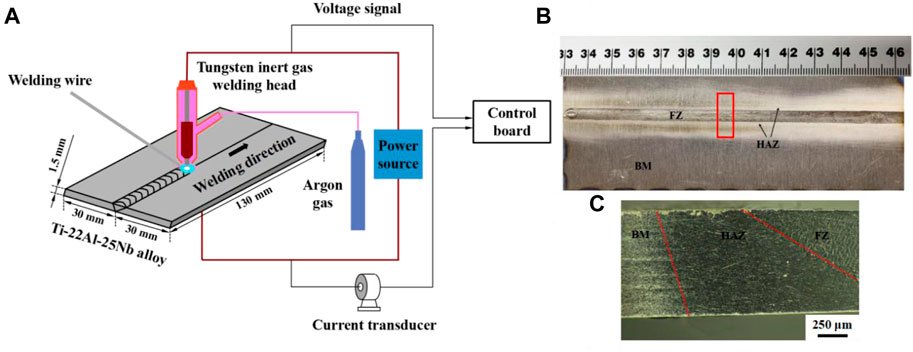
FIGURE 1. Welding of Ti-22Al-25Nb alloy: (A) schematic illustration of the experimental setup; (B) weld seam appearance of the weld joint of Ti-22Al-25Nb alloy; (C) weld joint includes three different zones: fusion zone (FZ), heat-affected zone (HAZ), and base material (BM).
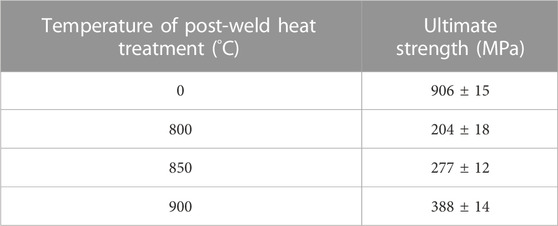
TABLE 1. Ultimate strength of the weld joints of Ti-22Al-25Nb alloy before and after post-weld heat treatment.
Optical microscopy for metallurgical examination of the weld joints was performed on a Keyence VHX-500F digital optical microscope, after the specimens were cut perpendicular to the welding direction of the joint using electro-discharge machining (EDM). The cross-sections of the specimens were polished for microstructural characterization. The samples were ground with wet abrasive paper and mechanically polished using a velvet cloth to obtain mirror-polished sections and then etched in a solution containing 2 mL HF, 2 mL HNO3, and 80 mL ultrapure water to reveal the microstructure. The cross-sections of the weld joints before and after PWHT are shown in Figure 2. Cracks in the weld joint can be clearly seen after PWHT. We seek to answer the question: why do these cracks occur in the weld joint of Ti-22Al-25Nb alloy during PWHT?
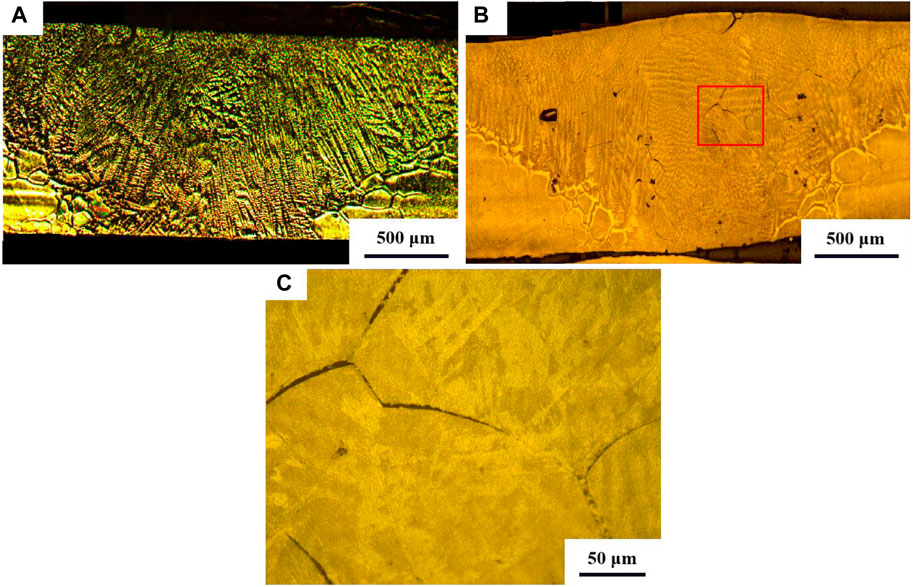
FIGURE 2. Macromorphology of the weld joints of Ti-22Al-25Nb alloy: (A) before post-weld heat treatment and (B) after post-weld heat treatment. (C) Magnification of the area indicated by the rectangular box in (B).
The phase constituents of the Ti-22Al-25Nb alloy plate were investigated by X-ray diffraction (XRD, Bruker D8 Avance) using Cu–Kα radiation at a diffraction angle of 2θ from 10 to 90° with a step width of 0.02° and a scan speed of 3° min-1. The microstructure of the Ti-22Al-25Nb alloy plate was characterized by scanning electron microscopy using a Hitachi SU8230 cold-field emission (CFE) microscope. An extremely smooth surface of the observed sample was obtained by grinding with 2,500-grit paper and polishing to a 0.05-μm surface. In situ nanoindentation tests were performed to determine the elastic and plastic properties of phases at room temperature using a Hysitron Triboindenter with a Berkovich tip. Load-controlled indentations were made using a constant loading rate of 100 μN s-1 up to maximum load of 500 μN and then equilibrated at 500 μN for 2 s before unloading.
To answer the question “why do cracks occur in the weld joint of Ti-22Al-25Nb alloy during PWHT?”, a Ti-22Al-25Nb alloy plate consisting of β/B2 matrix, equiaxed α2 particle, and lath-shaped O phase (Figure 3) was adopted. The phase constituents of the Ti-22Al-25Nb alloy plate were examined by XRD (Figure 3A). The microstructure of the Ti-22Al-25Nb alloy plate (Figures 3B,C) was observed with an SEM. The dark phase corresponds to the α2 phase, the gray phase corresponds to the O phase, and the lightest phase is the β/B2 phase. The phases in the weld joint of Ti-22Al-25Nb alloy before PWHT contained α2 (D019 structure based on Ti3Al), O (Cmcm system based on Ti2AlNb), and either β (disordered structure, the allotrope of titanium) or B2 (ordered structure) (Shao et al., 2018b; Zavodov et al., 2021), as shown in Figure 4.
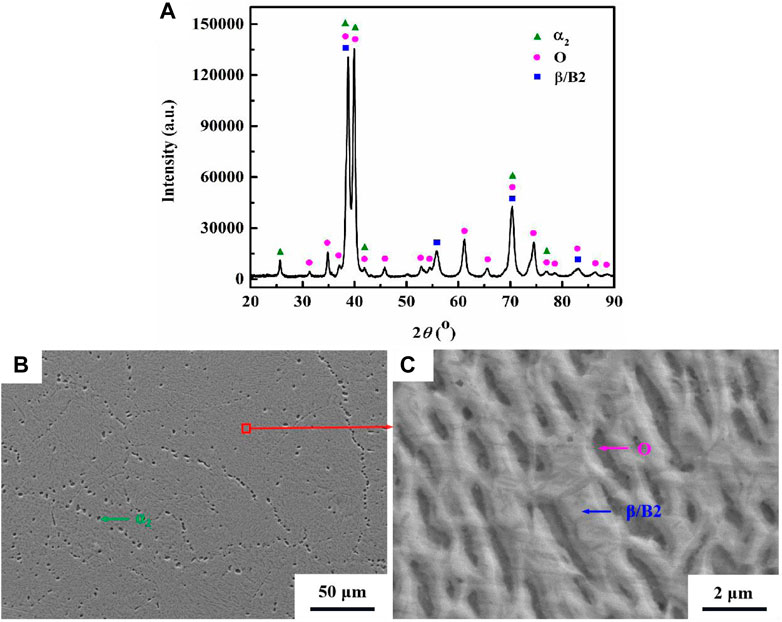
FIGURE 3. X-ray diffraction pattern (A) and microstructure (B) and (C) of Ti-22Al-25Nb alloy. Dark phase corresponds to α2 phase, gray phase corresponds to O phase, and lightest phase is β/B2 phase.
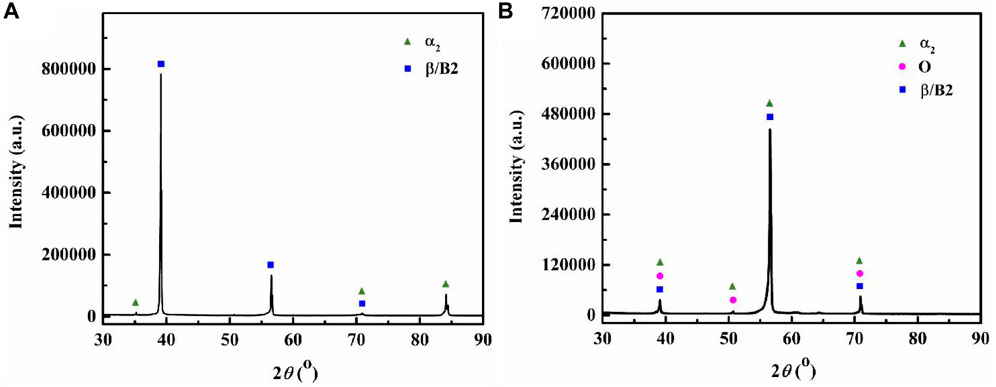
FIGURE 4. X-ray diffraction patterns of different zones in the weld joint of Ti-22Al-25Nb alloy before post-weld heat treatment: (A) fusion zone (FZ), (B) heat-affected zone (HAZ).
The lattice parameters of the body-centered cubic β/B2 phase were a = b = c = 0.328 nm, α = β = γ = 90°, and V = 0.03516 nm3 (from PDF Card No. 01–077–3482). The lattice parameters of the hexagonal close-packed α2 phase were a = b = 0.576 nm, c = 0.466 nm, α = β = 90°, γ = 120°, and V = 0.13420 nm3 (from PDF Card No. 01–074–4579 (Novoselova et al., 2004)). The lattice parameters of the orthorhombic O phase were a = 0.609 nm, b = 0.957 nm, c = 0.467 nm, α = β = γ = 90°, and V = 0.27193 nm3 (from PDF Card No. 01–072–8492 (Mozer et al., 1990; Wei et al., 2017)). The densities of β/B2, α2, and O phases were calculated as density = (mass of atoms in the unit cell)/(volume of unit cell) (Kasap, 2001), as shown in Table 2. The densities of the three different phases in the weld joint of Ti-22Al-25Nb alloy follow the order O phase > β/B2 phase > α2 phase. Therefore, it can be concluded that the volumes of the three different phases follow the order α2 phase > β/B2 phase > O phase. The B/G ratio of the bulk modulus to the shear modulus is an index of ductility; the larger the ratio, the higher the ductility (Tanaka et al., 1996). The B/G ratio of the three different phases in the weld joint of Ti-22Al-25Nb alloy (Table 2) shows that the ductility of the β/B2 phase is the highest, α2 phase second, and O phase lowest.

TABLE 2. Density (ρ) and elastic constants such as bulk modulus (B), shear modulus (G), B/G ratio, and Poisson’s ratio (υ) for β/B2, α2, and O phases (Pathak and Singh, 2015).
Cai et al. (2016) reported that the hardness of the β/B2 phase (6.11 GPa) was higher than that of the O phase (3.85 GPa) in Ti2AlNb alloy. However, Yang et al. (2012) proposed that the hardness of the O phase (6.6 GPa) was higher than that of the β/B2 phase (4.75 GPa) in Ti2AlNb alloy. In this study, in situ nanoindentation technology was adopted to examine the hardness of the three different phases in Ti-22Al-25Nb alloy. Figure 5A shows the loading contact between the Berkovich tip and α2 phase. The continuous stiffness measurement (CSM) method was used for all the nanoindentation experiments (Datye et al., 2016; Shao et al., 2017). Es (E is the Young’s modulus and the subscript s refers to the different phases) can be given by the following equation (Oliver and Pharr, 1992; Choudhury and Ladani, 2014):
where υ is the Poisson’s ratio and the subscript s refers to the different phases. The υ of the three different phases in Ti-22Al-25Nb alloy is presented in Table 2. Er is the reduced modulus estimated from the unloading part of the P-h curve as (Oliver and Pharr, 1992)
where S is the unloading stiffness, taken as the slope of the curve at the beginning of unloading and A is the projected contact area. Phase hardness (H) is given using the expression for an indentation,
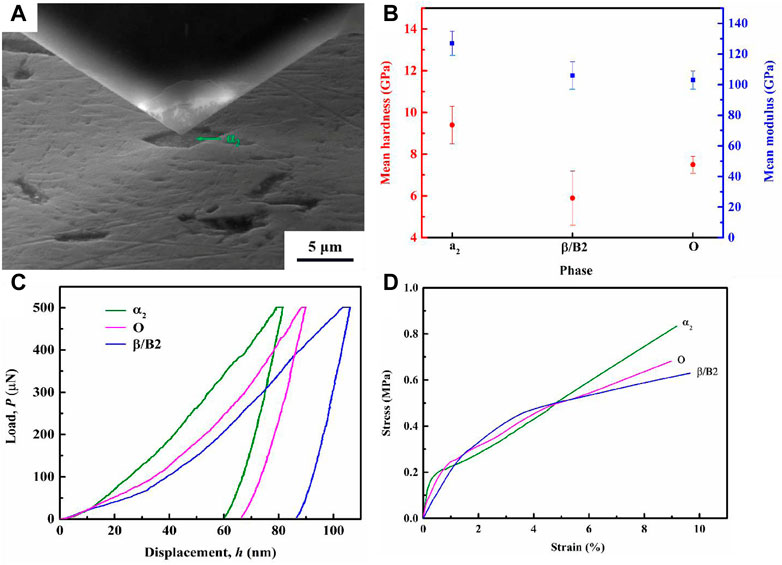
FIGURE 5. In situ nanoindentation test of the three different phases in Ti-22Al-25Nb alloy. (A) Image was extracted from an SEM video recorded during the indentation test; (B) mean hardness and mean Young’s modulus of the three different phases; (C) their typical load–displacement (P-h) curves; and (D) their indentation stress–strain (σ-ε) curves.
where P is the applied load. The mean hardness and mean Young’s modulus of the three different phases in Ti-22Al-25Nb alloy measured by the in situ nanoindentation method are shown in Figure 5B, which shows that the mean hardness is highest in the α2 phase, second-highest in the O phase, and lowest in the β/B2 phase, and that the mean Young’s modulus has the same trend. In general, phases with lower hardness and Young’s modulus present a higher capability of plastic deformation (Cai et al., 2016). The typical P-h curves for the α2, O, and β/B2 phases are presented in Figure 5C and show elastic–plastic material responses. The differences in hardness of the materials are evident from the large differences in peak depth (Chen et al., 2009). As can be seen in Figure 5C, the α2 phase recovers 60.12 nm of the 81.76 nm indentation depth, corresponding to an elastic recovery of 21.64 nm; the elastic recovery is 23.70 nm for the O phase and 19.67 nm for the β/B2 phase. The P-h curves were converted to indentation σ-ε curves, as shown in Figure 5D. The indentation stress is determined by the equation σ = P/A. The indentation strain is obtained by formulas established by Hochstetter et al. (2003):
where hr is the plastic depth, h1 (= 5 nm) is the tip defect for a well-manufactured Berkovich diamond (Hochstetter et al., 1999), X is the plasticity index, ht is the total depth, and θ (= 70.3°) is the half tip of a perfect cone.
Strain resulting from phase transition can be obtained from the corresponding stress resulting from phase transition by σ-ε curves in Figure 5D. During PWHT (at 800°C, 850°C, and 900°C) in the β/B2 + O two-phase region, the β/B2 phase with a body-centered cubic structure transformed to O phase with an orthorhombic structure, and the volume decreased because the density of the O phase is larger than that of the β/B2 phase (Table 2). This results in the O phase suffering tensile stress, while the β/B2 phase suffers compressive stress. Supposing that one-quarter of the β/B2 phase transforms to O phase, it will produce 7.9% phase transition strain, a corresponding compressive stress of 0.59 MPa for the β/B2 phase, and a corresponding tensile stress of 0.63 MPa for the O phase. Therefore, it can be concluded that the cracks result from phase transition stresses in the weld joint of Ti-22Al-25Nb alloy during PWHT.
The PWHT conditions of the weld joint of Ti-22Al-25Nb alloy must be improved to avoid cracks resulting from phase transition stresses. The cleaned weld joint of Ti-22Al-25Nb alloy after welding was heated to 980°C (5°C s-1 heating rate) for 2 h in a tube furnace under argon atmosphere and then cooled to 850°C for 3 h, followed by cooling to room temperature by decreasing the furnace temperature. Tensile tests were performed for weld joints of Ti-22Al-25Nb alloy subjected to improved PWHT. The ultimate strength of the weld joints of Ti-22Al-25Nb alloy after improved PWHT can be up to 750 MPa, which is close to that of the weld joints of Ti-22Al-25Nb alloy before PWHT and is 72.5% that of the base material (1,035 MPa). This improved PWHT procedure is simple, convenient, and highly efficient. It can effectively avoid reducing the ultimate strength of weld joints subjected to a traditional ordinary annealing process.
To explain why cracks occurred in the weld joint of Ti-22Al-25Nb alloy during the PWHT process, the phase transition stresses of three different phases in Ti-22Al-25Nb alloy were analyzed with in situ nanoindentation technology and several formulas. The main conclusions that can be drawn are as follows.
(1) The densities of the three different phases in the weld joint of Ti-22Al-25Nb alloy follow the order O phase > β/B2 phase > α2 phase, while the volumes of the three different phases follow the opposite order.
(2) In the weld joint of Ti-22Al-25Nb alloy, the mean hardness is highest in the α2 phase, second highest in the O phase, and lowest in the β/B2 phase, and the mean Young’s modulus has the same trend.
(3) The cracks resulted from phase transition stresses in the weld joint of Ti-22Al-25Nb alloy during PWHT.
(4) The ultimate strength of the weld joints of Ti-22Al-25Nb alloy after improved PWHT can be up to 750 MPa, which is close to that of the weld joints of Ti-22Al-25Nb alloy before PWHT and is 72.5% that of the base material (1,035 MPa).
The original contributions presented in the study are included in the article/supplementary material; further inquiries can be directed to the corresponding authors.
LS analyzed the experimental data and wrote the manuscript. LZ and SW provided the idea of the manuscript and gave the main suggestions. Other people helped with the experiments.
The authors would like to acknowledge the National Natural Science Foundation of China (No. 52201187), the General Scientific Research Project of Zhejiang Provincial Education Department (No. Y202249336), the Zhejiang Public Welfare Technology Application Research Project (No. LGC20E010003), and the Science and Technology Plan Project of Taizhou (Nos. 22gya18, 21gya23, 2002gy06).
Authors LS, LZ, WL, NX, ZT, JZ, and SD are employed by Taizhou Clean Carbon Technology Company Limited.
The remaining authors declare that the research was conducted in the absence of any commercial or financial relationships that could be construed as a potential conflict of interest.
All claims expressed in this article are solely those of the authors and do not necessarily represent those of their affiliated organizations, or those of the publisher, the editors, and the reviewers. Any product that may be evaluated in this article, or claim that may be made by its manufacturer, is not guaranteed or endorsed by the publisher.
Cai, X. Q., Wang, Y., Yang, Z. W., Wang, D. P., and Liu, Y. C. (2016). Transient liquid phase (TLP) bonding of Ti2AlNb alloy using Ti/Ni interlayer: Microstructure characterization and mechanical properties. J. Alloys Compd. 679, 9–17. doi:10.1016/j.jallcom.2016.03.286
Chen, C. L., Richter, A., and Thomson, R. C. (2009). Mechanical properties of intermetallic phases in multi-component Al–Si alloys using nanoindentation. Intermetallics 17, 634–641. doi:10.1016/j.intermet.2009.02.003
Chen, W., Chen, Z. Y., Wu, C. C., Li, J. W., Tang, Z. Y., and Wang, Q. J. (2016). The effect of annealing on microstructure and tensile properties of Ti–22Al–25Nb electron beam weld joint,. Intermetallics 75, 8–14. doi:10.1016/j.intermet.2016.02.006
Chen, X., Xie, F., Ma, T., Li, W., and Wu, X. (2018). Hot corrosion behavior of three different zones of linear friction welded Ti-22Al-25Nb alloy. Mater. Corros. 70, 612–622. doi:10.1002/maco.201810356
Choudhury, S. F., and Ladani, L. (2014). Grain growth orientation and anisotropy in Cu6Sn5 intermetallic: Nanoindentation and electron backscatter diffraction analysis. J. Electron. Mater. 43, 996–1004. doi:10.1007/s11664-014-2977-9
Chu, Y., Li, J., Zhu, L., Tang, B., and Kou, H. (2017). Characterization of the interfacial-microstructure evolution and void shrinkage of Ti-22Al-25Nb orthorhombic alloy with different surface roughness during diffusion bonding. Intermetallics 90, 119–127. doi:10.1016/j.intermet.2017.07.009
Datye, A., Li, L., Zhang, W., Wei, Y., Gao, Y., and Pharr, G. M. (2016). Extraction of anisotropic mechanical properties from nanoindentation of SiC-6H single crystals. J. Appl. Mech. 83, 091003. doi:10.1115/1.4033790
Hochstetter, G., Jimenez, A., and Loubet, J. L. Strain-rate effects on hardness of glassy polymers in the nanoscale range. Comparison between quasi-static and continuous stiffness measurements, Journal of Macromolecular Science Part B 38 (1999) 681–692. doi:10.1080/00222349908248131
Han, J., Ren, N., Zhou, Y., Zhang, R., Li, J., Huang, X., et al. (2022). Melt convection and macrosegregation in the vacuum arc remelted Ti2AlNb ingot: Numerical methods and experimental verification. J. Mater. Process. Technol. 308, 117729. doi:10.1016/j.jmatprotec.2022.117729
Hochstetter, G., Jimenez, A., Cano, J. P., and Felder, E. (2003). An attempt to determine the true stress-strain curves of amorphous polymers by nanoindentation. Tribol. Int. 36, 973–985. doi:10.1016/s0301-679x(03)00107-5
Jin, Z., Jia, L., Ye, C., Wang, W., and Zhang, H. (2023). Orientation dependence of microcosmic plasticity and toughness in Nb-Si alloys. J. Alloys Compd. 934, 167549. doi:10.1016/j.jallcom.2022.167549
Juri, A. Z., Basak, A. K., and Yin, L. (2021). Microstructural responses of zirconia materials to in-situ SEM nanoindentation. J. Mech. Behav. Biomed. Mater 118, 104450. doi:10.1016/j.jmbbm.2021.104450
Kasap, S. O. (2001). Principles of electronic materials and devices. New York: McGraw-Hill Higher Education.
Li, Y., Zhao, Y., Li, Q., Wu, A., Zhu, R., and Wang, G. (2017). Effects of welding condition on weld shape and distortion in electron beam welded Ti2AlNb alloy joints. Mater. Des. 114, 226–233. doi:10.1016/j.matdes.2016.11.083
Li, Z., Cui, Y., Wang, L., Zhang, H., Liang, Z., Liu, C., et al. (2022). An investigation into Ti-22Al-25Nb in-situ fabricated by electron beam freeform fabrication with an innovative twin-wire parallel feeding method. Addit. Manuf. 50, 102552. doi:10.1016/j.addma.2021.102552
Ma, Z., Pathegama Gamage, R., and Zhang, C. (2020). Application of nanoindentation technology in rocks: A review. Geomechanics Geophys. Geo-Energy Geo-Resources 6, 60. doi:10.1007/s40948-020-00178-6
Mozer, B., Bendersky, L. A., Boettinger, W. J., and Rowe, R. G. (1990). Neutron powder diffraction study orthorhombic Ti2AlNb phase. Scr. Metall. 24, 2363–2368. doi:10.1016/0956-716x(90)90094-w
Novoselova, T., Malinov, S., Sha, W., and Zhecheva, A. (2004). High-temperature synchrotron X-ray diffraction study of phases in a gamma TiAl alloy. Mater. Sci. Eng. A 371, 103–112. doi:10.1016/j.msea.2003.12.015
Oliver, W. C., and Pharr, G. M. (1992). An improved technique for determining hardness and elastic modulus using load and displacement sensing indentation experiments. J. Mater. Res. 7, 1564–1583. doi:10.1557/jmr.1992.1564
Panov, D., Naumov, S., Stepanov, N., Sokolovsky, V., Volokitina, E., Kashaev, N., et al. (2022). Effect of pre-heating and post-weld heat treatment on structure and mechanical properties of laser beam-welded Ti2AlNb-based joints. Intermetallics 143, 107466. doi:10.1016/j.intermet.2022.107466
Pathak, A., and Singh, A. K. (2015). A first principles study of Ti2AlNb intermetallic,. Solid State Commun. 204, 9–15. doi:10.1016/j.ssc.2014.12.002
Rominiyi, A. L., and Mashinini, P. M. (2023). Nanoindentation study of mechanical and wear properties of spark plasma sintered Ti-6Ni-xTiCN composites. Ceram. Int. 49, 2194–2203. doi:10.1016/j.ceramint.2022.09.186
Shao, L., Datye, A., Huang, J., Ketkaew, J., Woo Sohn, S., Zhao, S., et al. (2017). Pulsed laser beam welding of Pd43Cu27Ni10P20 bulk metallic glass. Sci. Rep. 7, 7989. doi:10.1038/s41598-017-08460-6
Shao, L., Wu, S., Datye, A., Zhao, H., Petterson, M., and Peng, W. (2018). Microstructure and mechanical properties of ultrasonic pulse frequency tungsten inert gas welded Ti-22Al-25Nb (at.%) alloy butt joint. J. Mater. Process. Technol. 259, 416–423. doi:10.1016/j.jmatprotec.2018.03.018
Shao, L., Wu, S., Zhao, S., Ketkaew, J., Zhao, H., Ye, F., et al. (2018). Evolution of microstructure and microhardness of the weld simulated heat-affected zone of Ti-22Al-25Nb (at.%) alloy with continuous cooling rate. J. Alloys Compd. 744, 487–492. doi:10.1016/j.jallcom.2018.01.347
Somashekara, M. A., Naveenkumar, M., Kumar, A., Viswanath, C., and Simhambhatla, S. (2016). Investigations into effect of weld-deposition pattern on residual stress evolution for metallic additive manufacturing. Int. J. Adv. Manuf. Technol. 90, 2009–2025. doi:10.1007/s00170-016-9510-7
Tanaka, K., Okamoto, K., Inui, H., Minonishi, Y., Yamaguchi, M., and Koiwa, M. (1996). Elastic constants and their temperature dependence for the intermetallic compound Ti3Al. Philos. Mag. A 73, 1475–1488. doi:10.1080/01418619608245145
Wang, S., Liu, H., Xu, L., Du, X., Zhao, D., Zhu, B., et al. (2017). Investigations of phase transformation in monocrystalline silicon at low temperatures via nanoindentation. Sci. Rep. 7, 8682. doi:10.1038/s41598-017-09411-x
Wei, Z.-Y., Hu, K.-M., Sa, B.-S., and Wu, B. (2017). Pressure-induced structure, electronic, thermodynamic and mechanical properties of Ti2AlNb orthorhombic phase by first-principles calculations. Rare Met. 40, 1–11. doi:10.1007/s12598-017-0915-8
Yang, J., Wang, G., Park, J. M., and Kim, H. S. (2019). Microstructural behavior and mechanical properties of nanocrystalline Ti-22Al-25Nb alloy processed by high-pressure torsion. Mater. Charact. 151, 129–136. doi:10.1016/j.matchar.2019.02.029
Yang, X., Xi, Z. p., Tang, H. p., and Jia, W. p. (2012). Microstructure and fracture toughness of a TiAl-Nb composite consolidated by spark plasma sintering. Trans. Nonferrous Metals Soc. China 22, 2628–2632. doi:10.1016/s1003-6326(11)61509-4
Zavodov, A. V., Nochovnaya, N. A., Lyakhov, A. A., and Filonova, E. V. (2021). Effect of deformation band on the strength of a rolled plate of intermetallic titanium alloy based on Ti–22Al–25Nb system. Mater. Charact. 180, 111438. doi:10.1016/j.matchar.2021.111438
Zhang, K., Lei, Z., Chen, Y., Yan, C., Fu, Q., and Bao, Y. (2021). High-temperature tensile behavior of laser welded Ti-22Al-25Nb joints at different temperatures. J. Wuhan Univ. Technology-Mater. Sci. Ed. 35, 1116–1121.
Zhang, K., Lei, Z., Chen, Y., Yang, K., and Bao, Y. (2021). Microstructural evolution and numerical simulation of laser-welded Ti2AlNb joints under different heat inputs. Rare Met. 40, 2143–2153. doi:10.1007/s12598-020-01508-z
Zhang, K., Lei, Z., Ni, L., Zhou, H., and Chen, Y. (2021). Improvement in microstructure and high-temperature brittleness of laser-welded Ti-22Al-25Nb joints with the addition of TiB2 powder. J. Mater. Process. Technol. 288, 116848. doi:10.1016/j.jmatprotec.2020.116848
Zhang, P., Zeng, W., Jia, R., Kou, Y., Xu, J., Liang, X., et al. (2021). Tensile behavior and deformation mechanism for Ti–22Al–25Nb alloy with lamellar O microstructures. Mater. Sci. Eng. A 803, 140492. doi:10.1016/j.msea.2020.140492
Zhang, S., Xi, M., Liu, R., Li, M., Guo, X., Gui, Y., et al. (2022). Fabricating Ti–22Al–25Nb intermetallic with ductility higher than 25% by advanced printing technique: Point-forging and laser-deposition. Mater. Sci. Eng. A 850, 143520. doi:10.1016/j.msea.2022.143520
Zhao, Q., Zhu, W., Shao, T., Shuai, Y., Liu, J., Wang, R., et al. (2020). Microstructure and mechanical properties of inertia friction welded joint of Ti-22Al-25Nb alloy. J. Mater. Eng. 48, 140–147.
Zhou, W., Zhou, H., Zhang, R., Pei, Y., and Fang, D. (2015). Measuring residual stress and its influence on properties of porous ZrO2/(ZrO2+Ni) ceramics. Mater. Sci. Eng. A 622, 82–90. doi:10.1016/j.msea.2014.11.018
Zhou, Y. H., Li, W. P., Wang, D. W., Zhang, L., Ohara, K., Shen, J., et al. (2019). Selective laser melting enabled additive manufacturing of Ti–22Al–25Nb intermetallic: Excellent combination of strength and ductility, and unique microstructural features associated. Acta Mater. 173, 117–129. doi:10.1016/j.actamat.2019.05.008
Keywords: Ti-22Al-25Nb alloy, weld joint, post-weld heat treatment, in situ nanoindentation, phase transition stress
Citation: Shao L, Zhang X, Chen Y, Zhu L, Wu S, Liu Q, Li W, Xue N, Tu Z, Wang T, Zhang J, Dai S, Shi X and Chen M (2023) Why do cracks occur in the weld joint of Ti-22Al-25Nb alloy during post-weld heat treatment?. Front. Mater. 10:1135407. doi: 10.3389/fmats.2023.1135407
Received: 31 December 2022; Accepted: 20 February 2023;
Published: 07 March 2023.
Edited by:
Xiangchen Meng, Harbin Institute of Technology, ChinaReviewed by:
Wenbin Zhou, University of Dundee, United KingdomCopyright © 2023 Shao, Zhang, Chen, Zhu, Wu, Liu, Li, Xue, Tu, Wang, Zhang, Dai, Shi and Chen. This is an open-access article distributed under the terms of the Creative Commons Attribution License (CC BY). The use, distribution or reproduction in other forums is permitted, provided the original author(s) and the copyright owner(s) are credited and that the original publication in this journal is cited, in accordance with accepted academic practice. No use, distribution or reproduction is permitted which does not comply with these terms.
*Correspondence: Liu Zhu, emh1bGl1QHR6Yy5lZHUuY24=; Sujun Wu, d3VzakBidWFhLmVkdS5jbg==
Disclaimer: All claims expressed in this article are solely those of the authors and do not necessarily represent those of their affiliated organizations, or those of the publisher, the editors and the reviewers. Any product that may be evaluated in this article or claim that may be made by its manufacturer is not guaranteed or endorsed by the publisher.
Research integrity at Frontiers

Learn more about the work of our research integrity team to safeguard the quality of each article we publish.