- 1State Key Laboratory of Vanadium and Titanium Resources Comprehensive Utilization, Pangang Group Research Institute Co., Ltd., Panzhihua, China
- 2Sichuan Advanced Metal Material Additive Manufacturing Engineering Technology Research Center, Chengdu Advanced Metal Materials Industry Technology Research Institute Co., Ltd., Chengdu, China
- 3School of Mechanical and Automotive Engineering, South China University of Technology, Guangzhou, China
Ti6Al4V is widely used in aerospace and medical applications, where high demands on dimensional accuracy and surface quality require the application of post-processing to achieve optimal performance. However, the surface quality of parts fabricated by LPBF is inferior due to the inherent defects of LPBF. Therefore, it is important to investigate the effect of post-processing on the surface quality of Ti6A14V parts fabricated by LPBF. In this work, the effect of post-processing methods (i.e., sandblasting, electrolytic polishing, chemical polishing, and abrasive flow polishing) on the surface quality of Ti6Al4V fabricated by laser powder bed fusion (LPBF) additive manufacturing was investigated. The changes in surface roughness and morphology of the 45° inclined square and curved pipe Ti6Al4V samples processed with post-processing were observed, and the weight and elemental changes of the parts were also analyzed. The result reveals that sandblasting, electrolytic polishing, chemical polishing, and abrasive flow polishing are all effective in improving the surface quality of Ti6Al4V parts fabricated by LPBF. The effect of sandblasting is mainly caused by sharp-edged grit driven by high-speed airflow, resulting in the lowest surface roughness and the least influence on the weight, but may contaminate the surface with residual brown corundum. Electrolytic polishing and chemical polishing achieve surface quality improvement through different corrosion patterns without changing the surface composition. The surface smoothness of parts processed with chemical polishing is the best, while the weight loss rate of the sample processed with electrolytic polishing is the most at about 7.47%. Abrasive flow polishing presents a remarkable effect on polishing the internal surface of the Ti6Al4V sample by the extrusion scratching, extrusion deformation, and micro-cutting effects of abrasive on the surface. The findings can provide important engineering references for the post-processing of precision Ti6Al4V parts fabricated by LPBF and further promote the engineering applications of Ti6Al4V parts.
1 Introduction
Laser powder bed fusion (LPBF) is an additive manufacturing (AM) technology with great potential for fabricating 3D models into solid parts by stacking layer by layer (Wang et al., 2017). Metal parts with complex geometrical features and good mechanical properties could be fabricated by LPBF, but not by traditional methods such as turning or milling (Wang et al., 2022a). However, the LPBF-fabricated metal parts are generally characterized by discontinuous surfaces and incomplete fusion powders, resulting in poor surface quality with roughness ranging from Ra 10 μm–15 μm (Lober et al., 2013; Yamaguchi et al., 2017; Eyzat et al., 2019), mainly due to the inherent defects of LPBF such as step effect, spherification effect and powder adhesion (Huai-yang et al., 2020).
Ti6Al4V features high specific strength, low density, good corrosion resistance, and a wide temperature adaptation range, exhibiting excellent overall mechanical properties, thus widely available in aerospace and medical applications (e.g., turbine blades and artificial implants) (Wang et al., 2022b; Ke et al., 2022; Obeidi et al., 2022). However, such parts usually demand high dimensional accuracy and surface quality, requiring the application of post-processing for optimal performance, since the surface quality significantly impacts the performance and service life (Teng et al., 2019). Therefore, it is essential to investigate the effect of post-processing on the surface quality of LPBF-fabricated Ti6A14V parts (Lee et al., 2021).
Currently, post-processing methods, such as high-energy beam (e.g., laser and electron beam) polishing (Obeidi et al., 2022; Wang et al., 2023), mechanical polishing (Eyzat et al., 2019; Ke et al., 2022), abrasive flow polishing (Peng et al., 2018; Finazzi et al., 2020; François et al., 2021), sandblasting (Lober et al., 2013), chemical polishing (Balyakin et al., 2018; Bezuidenhout et al., 2020), and electrolytic polishing (Mingear et al., 2019), are used to improve the surface quality of Ti6A14V parts. Wang et al. (2023) reduced the surface roughness of column-faced Ti6Al4V by 16 times via electron beam rotary polishing. Ke et al. (2022) polished the Ti6Al4V with flexible tools, which decreased the surface roughness from the Sa 172.1 nm–6.1 nm. François et al. (2021) significantly reduced the surface roughness of LPBF-fabricated waveguide intel surfaces from Ra 9.7 μm–1 μm by abrasive flow polishing. Martin (Bezuidenhout et al., 2020) investigated the effect of chemical polishing with HF-HNO3 chemical solution on LPBF-fabricated Ti6Al4V, exhibiting a decrease in surface roughness from Ra 10.69 μm–0.99 μm and better fatigue properties compared to unpolished samples. Zhang et al. (2020) utilized the electrolytic polishing on LPBF-fabricated Ti6Al4V in different concentrations of chloride-containing ethylene glycol electrolyte, obtaining the best surface quality by 0.4 mol/L chloride electrolyte with a 75.4% reduction in surface roughness and a 4.93% weight loss rate.
Mechanical, (electro) chemical, and high-energy beam polishing methods all present positive results, but each post-processing method has different pros and cons as well as the applicable situations. Traditional mechanical polishing, such as CNC, can usually achieve good surface quality, but it is costly and technically demanding, difficult to handle complex structures such as holes and curved tubes, and can cause deformation. Sand blasting, electrolytic polishing and chemical polishing are less difficult to handle, do not easily lead to deformation and can be applied to complex structures; flow polishing also has a good effect on complex structures such as holes, but the effect of these processing methods is relatively difficult to control. And due to the characteristics of LPBF and the widespread use of Ti6Al4V in aerospace and medical implants, it is common for parts with complex structures to be fabricated and post-processed. Therefore, it is significant to study the parameters of sandblasting, electrolytic polishing, chemical polishing, and abrasive flow polishing and evaluate the effects on the surface quality of LPBF-fabricated Ti6Al4V samples.
In this way, the work focused on evaluating and comparing the effect of four post-processing methods (i.e., sandblasting, electrolytic polishing, chemical polishing, and abrasive flow polishing) on the surface quality of LPBF-fabricated 45° inclined square and curved pipe Ti6Al4V samples. Since the lower side of LPBF-fabricated parts usually has the worst surface quality, the changes in surface roughness and morphology of the lower side of the Ti6Al4V samples were observed, and the effect of post-processing on the surface quality was investigated. The weight of the 45° inclined square samples and the aperture of the curved pipe samples were measured to analyze the effect on the shape and quality of the polished samples. The element changes on the surface were also examined to investigate the effect on the surface composition. The findings may provide significant engineering references for the post-processing of LPBF-fabricated precision Ti6Al4V parts, help the industry to better control and enhance the surface quality of the lower and inner surfaces of LPBF parts, and further facilitate the engineering applications of Ti6Al4V parts.
2 Methods and experiments
2.1 Materials and equipment
A plasma atomized Ti6Al4V alloy powder (AP&C, Canada) was used, and the material composition is shown in Table 1; Figures 1A, B show the morphology and particle diameter distribution of the Ti6Al4V powder. The powder ranged from 8 μm to 62 µm with a quantile value of D50 corresponding to 23.37 µm and was nearly spherical with a loose density of 2.49 g/cm3 and a flow rate of 7 s/50 g. A Dimetal-100 LPBF equipment (Laseradd, China) was utilized to fabricate the Ti6Al4V (Figures 1C, D) with the preliminarily investigated process parameters listed in Table 2, using 99.999% (v/v) argon as the protective gas.
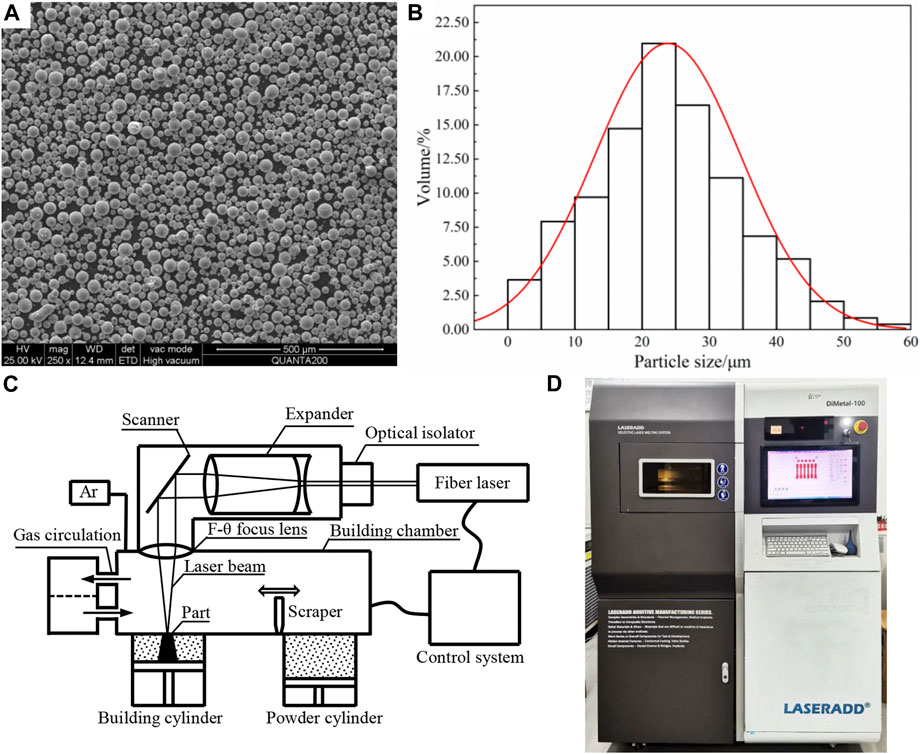
FIGURE 1. Ti6Al4V powder and LPBF equipment: (A) powder morphology of Ti6Al4V; (B) particle size distribution of Ti6Al4V; (C) LPBF schematic; (D) the DiMetal-100 equipment.
2.2 Experimental model
As shown in Figure 2A, 45° inclined square samples with dimensions of 8 mm × 8 mm on the bottom side and 10 mm in height were fabricated. The surface morphology and roughness variations of the lower side of the inclined square sample adopted with post-processing were investigated in this paper. The influence of abrasive flow polishing on the internal surface was also evaluated using curved pipe samples, with the curved pipe model and LPBF-fabricated curved pipe samples shown in Figures 2B, C.
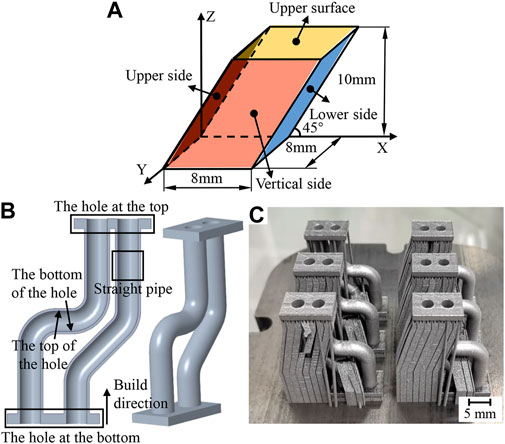
FIGURE 2. Experimental model: (A) 45° inclined square; (B) curved pipe model; (C) LPBF-fabricated curved pipe samples.
2.3 Post-processing methods
Sandblasting was performed with a PEENMATIC PM 620S microblasting equipment (IEPCO, Switzerland) using sharp-edged 320 mesh brown corundum as the blasting material. During the sandblasting process, samples were kept perpendicular to the nozzle of the microblasting equipment with a distance of 5 mm between the nozzle and the sandblasted surface, and the nozzle was oscillated at a uniform speed ensuring 150% or more sandblasting coverage. The first group of experiments was sandblasting at 0, 1, 2, 3, 4, and 5 MPa pressure for 5 s, respectively; the second group of experiments was sandblasting at 3 MPa pressure for 0, 2, 5, 7, 10 and 15 s, respectively.
Electrolytic polishing was performed by the P-016 electrolytic polishing machine (Pudeng, Taiwan) with the Ti6Al4V sample connected to the anode and the titanium sheet as the cathode. The electrolytic polishing solution was mixed in the ratio of H2SO4 (40% concentration): HF (40% concentration): glycerol: water = 3:1:1:3 (v/v), the electrolytic voltage was 7 V, and the electrolysis time was set to 2, 5, 10, and 15 min, respectively.
The chemical polishing solution was mixed in the ratio of HNO3 (65%–68% concentration): HF (40% concentration) = 4:3 (v/v). The chemical polishing solution was diluted by water at a concentration ratio of 0.25 (i.e., chemical polishing solution: water = 1: 4) when investigating the effect of chemical polishing time on surface polishing since the high concentration of HNO3 and HF in the solution would lead to an overly violent reaction. The solution was also diluted with water and polished for 10 min at a concentration ratio of 0.50, 0.33, and 0.25, respectively when exploring the effect of polishing solution concentration on surface polishing.
The abrasive flow polishing was performed using an SMKS-3329 abrasive flow polishing machine (SMKS, China) with 100 mesh silicon carbide abrasive. The curved pipe samples were polished for 5, 10, 15, 20, and 25 min under 120 kg pressure, and then the straight, bottom, and top of the hole of the sample were selected to observe the polished inner surface by wire-cutting.
2.4 Surface characterizations
In this study, the two-dimensional roughness Ra is used to characterize the sample surface quality, while the surface roughness measurement method refers to GB/T 1031“Product Geometry Technical Specification (GPS) surface structure, contour method, surface roughness parameters, and their values.” The one-dimensional definition of the contour arithmetic mean deviation Ra (National Institute of Metrology, 2009) for a contoured surface of length L is illustrated as follows:
where f(x) represents the deviation of the surface height at x from the median contour value calculated using the least squares median. If the measured height fn at N locations along the contour length L is adopted, the numerical calculation of the surface roughness Ra can be simplified as follows:
The surface roughness was calculated by intercepting the surface contour of the central axis in the 3D morphological photograph of the sample surface taken by the Ultra-Depth Three-Dimensional Microscope with the following parameters: sampling interval of 0.002 mm, sampling segment number of 3, data points of 8,244, and the sampling lengths of 5 and 8 mm.
The weight of the 45° inclined square samples with and without post-processing was measured by electronic balance, and the results were averaged over three measurements for each sample. The weight loss rate of the sample was calculated as the reduced weight divided by the original weight. The surface elements of the post-processed Ti6Al4V samples were analyzed by Nova Nano SEM 430 scanning electron microscope (FEI, US).
3 Results and discussion
3.1 Effect of post-processing on the surface roughness of inclined square samples
Figure 3A illustrates the effect of sandblasting on the surface roughness of Ti6Al4V inclined square samples. The surface roughness of the lower side roughly showed a decreasing trend with the increase of sandblasting pressure to a lowest of Ra 7.27 μm. The surface roughness of the lower side surface roughness showed a trend of first decreasing and then increasing under the 3 MPa sandblasting pressure, attaining the lowest of Ra 7.81 μm at 7 min.
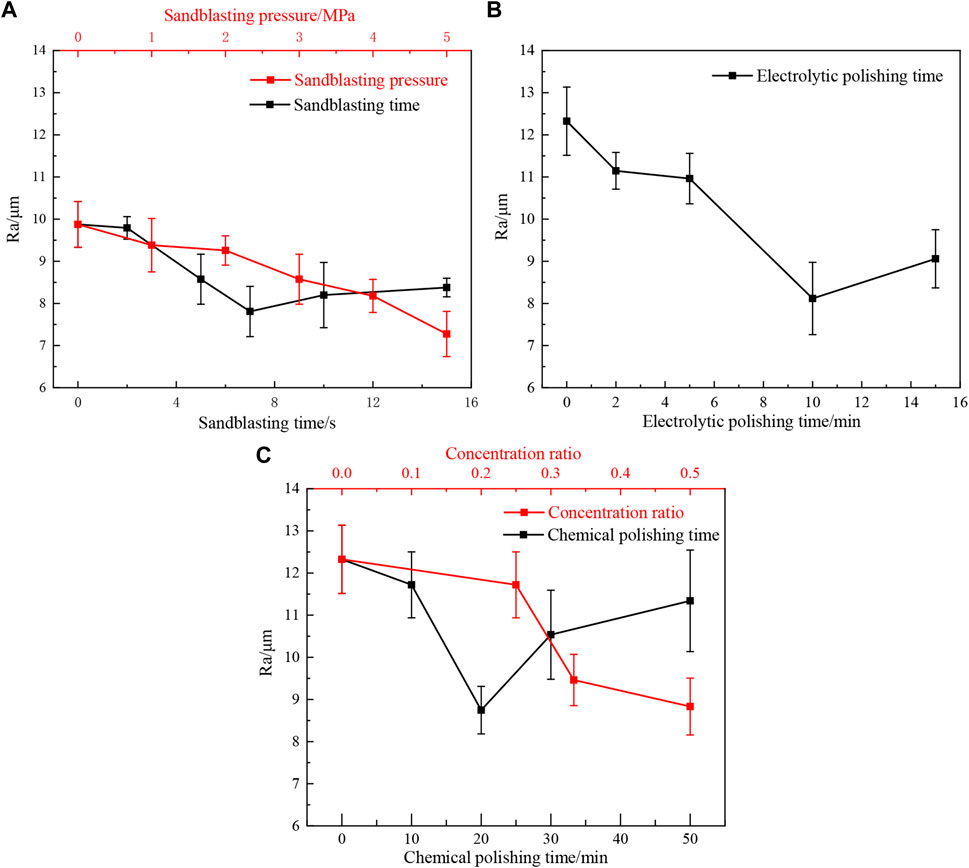
FIGURE 3. Surface roughness changes of Ti6Al4V samples processed with different post-processing: (A) sandblasting; (B) electrolytic polishing; (C) chemical polishing.
Figure 3B shows the surface roughness changes of Ti6Al4V samples processed with electrolytic polishing times. The surface roughness of the lower side showed a trend of slowly decreasing and then rapidly increasing with the increase of electrolytic polishing time, reaching the lowest at 10 min with Ra 8.12 μm. Therefore, proper electrolytic polishing could effectively reduce the surface roughness of the Ti6Al4V inclined square sample surface.
Figure 3C presents the surface roughness changes of Ti6Al4V samples processed with different chemical polishing times and different chemical polishing solution concentration ratios. The surface roughness of the inclined square Ti6Al4V samples showed a trend of first decreasing and then increasing with the increasing polishing time, which achieved the lowest at 20 min with Ra 8.75 μm. Meanwhile, the surface roughness was decreased with increasing solution concentration, with the lowest of Ra 8.83 μm.
3.2 Effect of post-processing on the morphology and weight of inclined square samples
Figure 4 presents the surface macro-morphology of Ti6Al4V samples processed with different post-processing. The lower side of inclined square Ti6Ai4V samples was covered with spherical powder particles and numerous solid bumps. All the powders, splash particles and solid bumps adhering to the inclined square Ti6Al4V samples were removed with sandblasting at 3 MPa pressure for 5 s, while some depressions and bumps still existed on the lower side. Similarly, all the powders and some bumps adhering to each surface of the samples were removed with 10 min electrolytic polishing, and the surfaces became more metallic with smoother edges. In addition, most of the powders and bumps on each surface of Ti6Al4V samples were dissolved by chemical polishing at a solution concentration ratio of 0.25 for 10 min.
Figure 5 shows the macro-morphology of the lower side surface processed with different sandblasting pressure. The spherical powder particles adhering to the surface were easily removed with 5 s sandblasting at 1 MPa pressure. However, the bumps of the Ti6Al4V sample became more visible after removing the adhered powder at a blasting pressure of 5 MPa since the solid bumps on the surface were relatively difficult to remove. The reduction of surface roughness and change of surface morphology was mainly due to the sharp-edged grit driven by the high-speed airflow continuously impacting the surface of the sample. Thus, the amount of adhered powder and the bump in the surface had a great influence on the effect of sandblasting. As the surface of the sample is relatively flat with few bumps, the morphology hardly changed processed with the sandblasting, so the surface roughness decreased slowly.
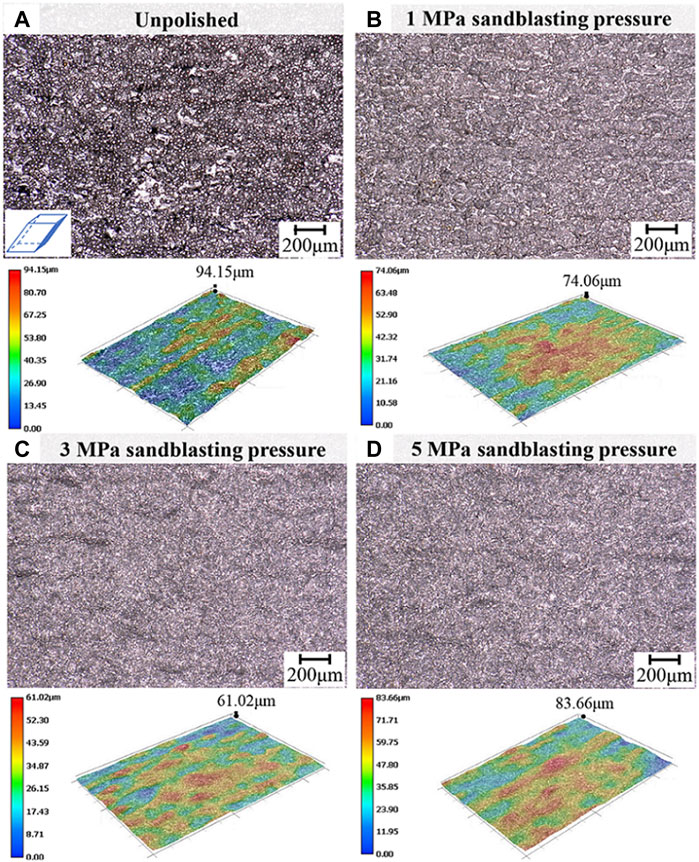
FIGURE 5. Macro-morphology of the lower side surface processed with different sandblasting pressures: (A) unpolished; (B) 1 MPa; (C) 3 MPa; (D) 5 MPa.
Figure 6 presents the macro-morphology of the lower side processed with different electrolytic polishing times. The powder adhered to the surface was eliminated with the bumps retained processed with 2 min electrolytic polishing, and the bumps were reduced in 10 min polishing. But when the electrolytic polishing time reached 15 min, many round pits were observed on the surface due to excessive corrosion. A passivation film was formed at the anode during the electrolytic polishing, which could inhibit corrosion. The adhered powder on the sample surface was removed, due to the bonding structure resembling the neck structure with a relatively small size and low bonding strength between the powder particles and the surface, while the adhered powder contributed to the formation of a highly activated and porous passivation film resulting in rapid dissolution and corrosion of the passivation film [20]. However, smooth surfaces with a few bumps were difficult to level, since they tended to form a dense passivation film slowing down the electrolytic polishing.
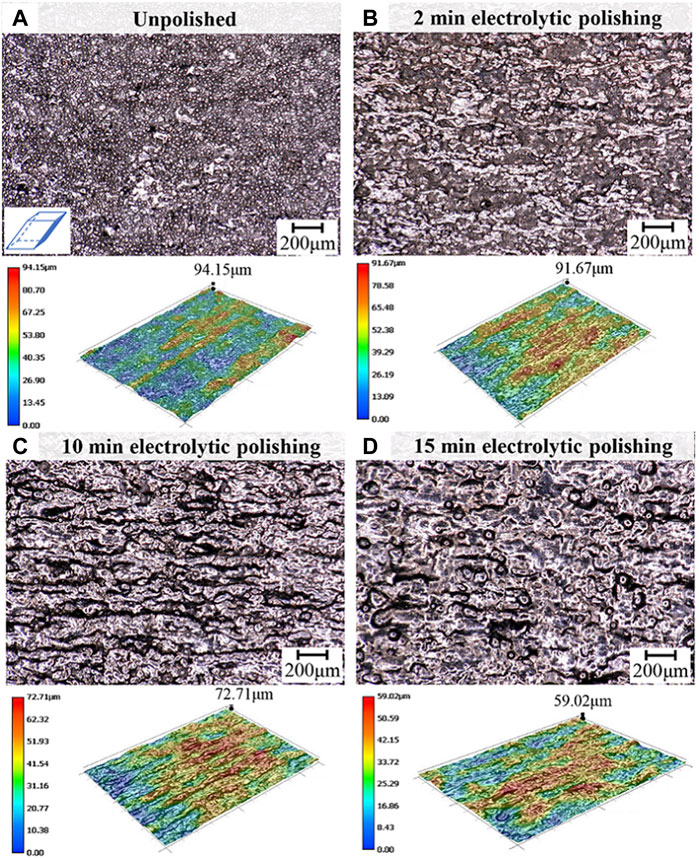
FIGURE 6. Macro-morphology of the lower side processed with different electrolytic polishing times: (A) unpolished; (B) 2 min; (C) 10 min; (D) 15 min.
Figure 7 shows the macro-morphology of the lower side processed with different chemical polishing times. The adhered powder particles were easily removed and the bumps were gradually dissolved with the increasing polishing time, while the surface became shinier without much change in the flatness. The chemical polishing rate was determined by the thickness of the invisible mucous film layer formed on the sample surface by the chemical polishing solution, where the dynamic balance of “erosion-dissolution-passivation” between Ti, HNO3, and HF controlled the reaction (Zhang et al., 2017). The thickness of the mucous film depended on the reaction temperature and reaction efficiency. Therefore, the surface morphology changed little with the increasing chemical polishing time at the solution concentration ratio of 0.25, due to the thin mucous film caused by low reaction efficiency and the reaction temperature maintained at room temperature. As the solution concentration ratio increased, the thickness of the mucus film would increase, resulting in a smoother surface and lower surface roughness.
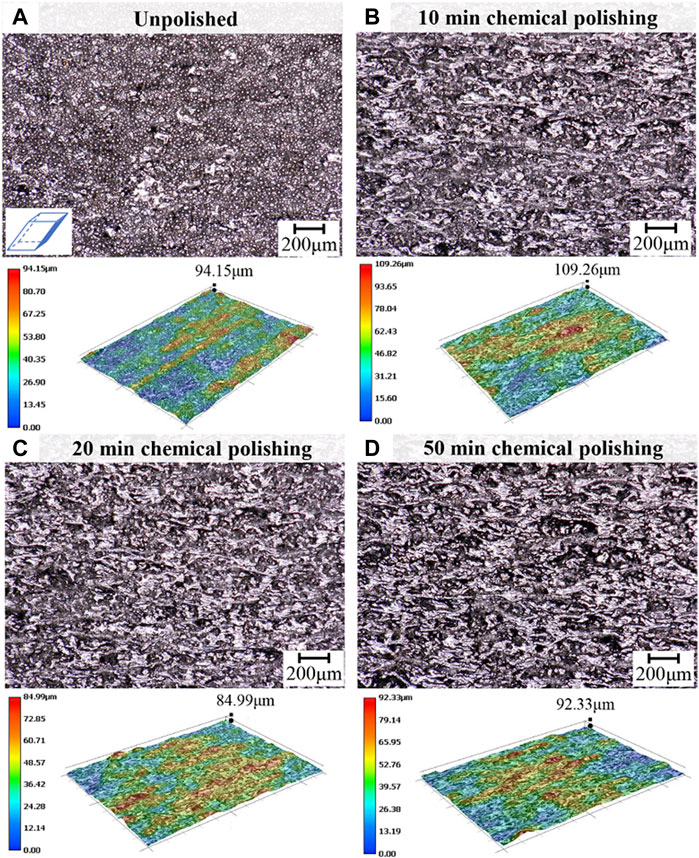
FIGURE 7. Macro-morphology of the lower side processed with different chemical polishing times: (A) unpolished; (B) 10 min; (C) 20 min; (D) 50 min.
Figure 8 presents the weight loss rate of Ti6Al4V samples processed with different post-processing. Figures 8A, B show that the weight loss rate of the inclined square Ti6Al4V sample increased with the increase of sandblasting pressure and time, and was relatively constant with certain sandblasting pressure and time, with a maximum of 0.55% and 1.04%, respectively. As shown in Figures 8C, D, the weight loss rate tended to increase with increasing electrolytic and chemical polishing time. However, the electrolytic polishing presented a stronger corrosion effect on Ti6Al4V, as the weight loss rate was 7.47% processed with 15 min electrolytic polishing, compared to 2.56% processed with 50 min of chemical polishing.
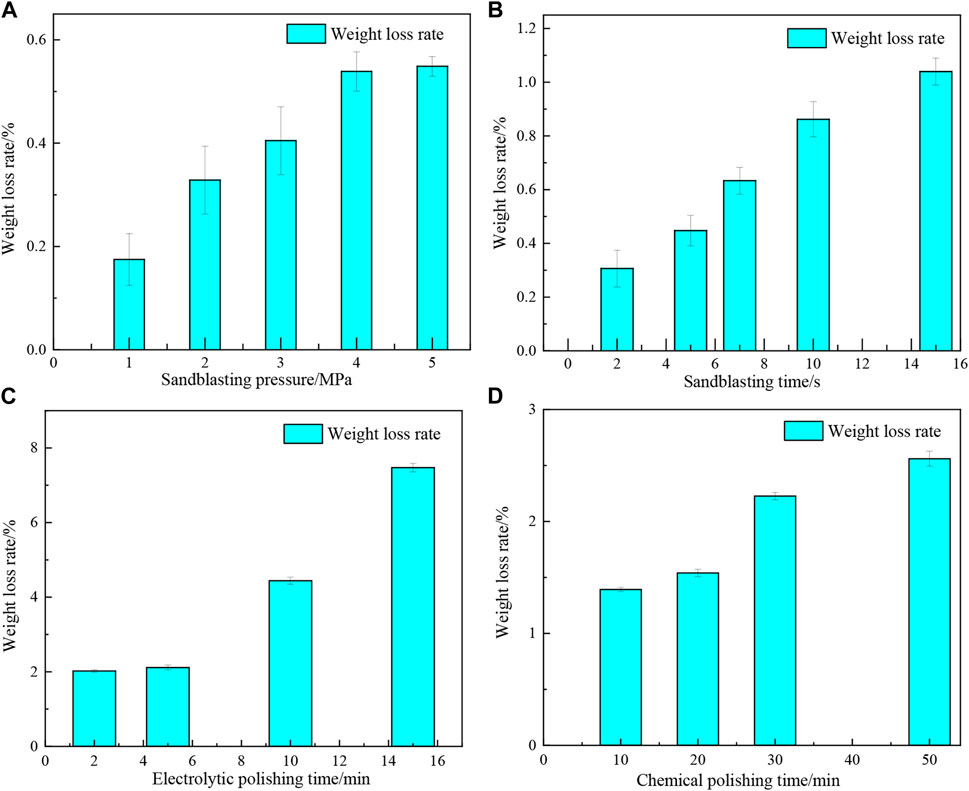
FIGURE 8. The weight loss rate of Ti6Al4V samples processed with different post-processing: (A,B) sandblasting; (C) electrolytic polishing; (D) chemical polishing.
3.3 Effect of post-processing on the surface elements of inclined square samples
Figure 9 shows the surface element of Ti6Al4V samples processed with different post-processing based on EDS mapping. The surface elements of unpolished samples were mainly composed of Ti, Al, and V, which was consistent with the materials used. Meanwhile, C and O were also detected, which was due to the contamination caused by organic matter such as grease in the air that was easily adsorbed onto the sample surface. As shown in Figures 9A, B large amount of Si elements and a small amount of Fe elements were detected on the Ti6Al4V sample surface processed with sandblasting, except for Ti, Al, V, C, and O elements, which was due to the residue of brown corundum during sandblasting, with the main composition of Al2O3 and another small amount of Fe2O3, SiO2, and TiO2 (Pan et al., 2019; Li et al., 2022). Figures 9C, D show that the surface elements of electrolytic polished and chemical polished Ti6Al4V samples resembled the unpolished ones since both the electrolytic polishing and chemical polishing dissolve and erode the material through a chemical reaction to flatten the surface, and the chemicals dissolve into the solution after reacting, so the elemental composition of the sample surface does not change.
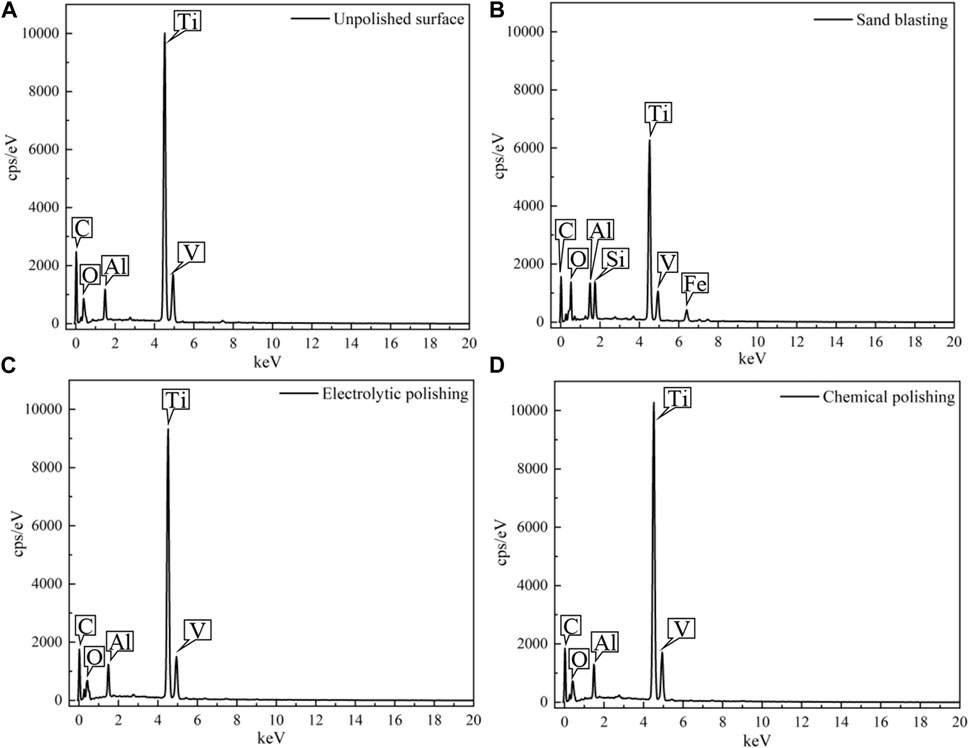
FIGURE 9. Surface element of Ti6Al4V samples processed with different post-processing: (A) unpolished surface; (B) sandblasting; (C) electrolytic polishing; (D) chemical polishing.
3.4 Effect of abrasive flow polishing on the internal surface of curved pipe samples
Figure 10 presents the changes of surface roughness, aperture, and morphology of curved pipe samples processed with abrasive flow polishing. The straight pipe internal surface roughness of the curved pipe sample decreased rapidly by 50.21% from Ra 7.17 μm–3.57 μm, while the aperture of the hole at the top and bottom enlarged fluctuating processed with 25 min abrasive flow polishing. As shown in Figure 10C, small bumps and spherical powder particles were observed on the unpolished straight pipe internal surface, which was due to the heat diffusion to the surrounding area when the laser scanned the edge of the profile. The adhered powder was removed at 5 min abrasive flow polishing, but the internal surface maintained a rough morphology similar to the step effect, while Figure 10E shows that the internal face was largely smooth without obvious grooves and bumps processed with 25 min polishing.
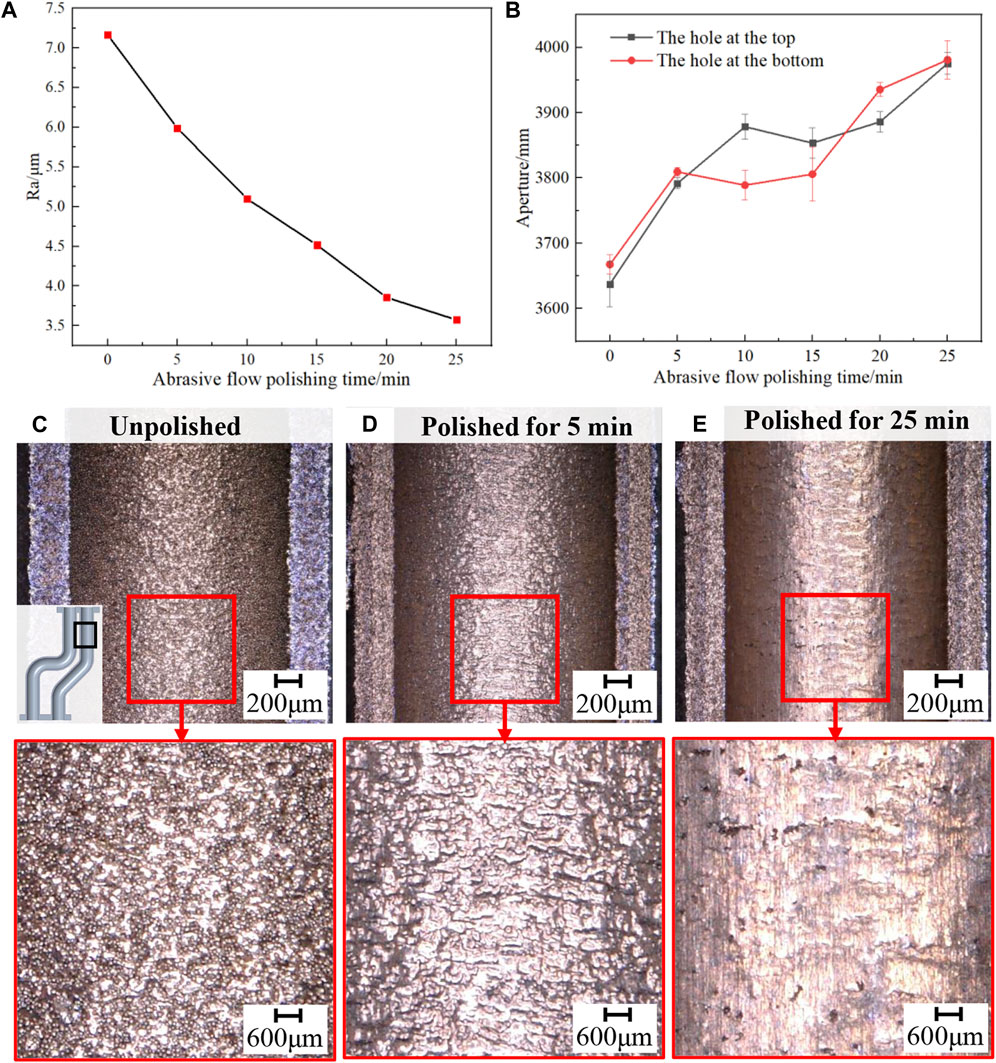
FIGURE 10. Changes of surface roughness, aperture, and morphology of curved pipe samples processed with abrasive flow polishing: (A) surface roughness; (B) aperture; (C–E) the internal morphology of straight pipe without polishing and with polishing at 5 and 25 min, respectively.
Figures 11A–D exhibit the morphology changes of round holes at the bottom of curved pipe samples processed with abrasive flow polishing. Obvious striped steps with a small amount of adhered powder were observed in the round hole at the bottom of the unpolished curved pipe sample due to the step effect. The adhered powder was easily removed, while the steps were gradually sanded smooth with the increasing polishing time, and completely vanished processed with more than 25 min polishing.
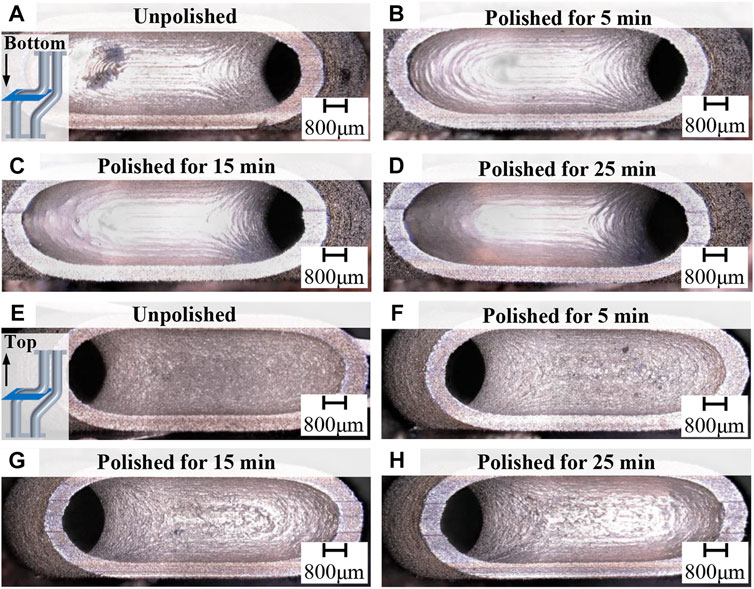
FIGURE 11. Morphology changes of round holes processed with abrasive flow polishing: (A–D) bottom morphologies without polishing and with polishing at 5, 15, and 25 min, respectively; (E–H) top morphologies without polishing and with polishing at 5, 15, and 25 min, respectively.
The morphology changes of round holes at the top processed with abrasive flow polishing are shown in Figures 11E–H. The surface quality of the round hole at the top of the curved pipe sample was poor with not only step bumps but also collapses, aggregated powder particles, and hanging slag due to the lack of solid support in the overhanging structure. Only aggregated powder particles were removed with 5 min polishing, while step bumps and hanging slag were also smoothed out at 25 min polishing.
4 Discussion
The1 effect of sandblasting on the surface of Ti6Al4V samples is mainly due to the sharp-edged grit driven by the high-speed airflow impacting the surface, which is positively related to the sandblasting pressure and time. However, the excessive sandblasting pressure or time tended to cause the sandblasting material (brown corundum) residual on the surface, and the large residual material would adversely affect the surface roughness and resulted in surface contamination. As shown in Table 3, the minimum surface roughness of the lower side of the inclined square Ti6Al4V sample processed with sandblasting was Ra 7.27 μm with maximum weight loss rates of 1.04%, while the surface processed with sandblasting was less shiny without metallic luster. Therefore, the Ti6Al4V sample processed with sandblasting could achieve the minimum surface roughness with the least effect on the weight, compared to electrolytic polishing, and chemical polishing.
Electrolytic polishing forms a passivation film that can inhibit corrosion on the surface of Ti6Al4V samples, while adhered powders and bumps can lead to the destruction of the passivation film and cause the surface to be corroded, thus achieving the improvement of surface quality. The samples processed with electrolytic polishing achieved a minimum surface roughness of Ra 8.12 μm for the lower side of the inclined square sample, which could effectively reduce the adhered powder and bump, but the long-time processing might lead to excessive corrosion. However, the electrolytic polishing had the maximum impact on the weight, since the maximum weight loss rate was 7.47%, which required extra attention in post-treatment selection during the actual production.
The essence of the chemical polishing of Ti6Al4V in the chemical solution of HNO3 and HF was the reaction process of Ti with HNO3 and HF, and the chemical equation of the reaction process is shown in Eqs 3, 4 (Bezuidenhout et al., 2020):
where HNO3 played an oxidizing role (Zhang et al., 2019) and HF served as a corrosive agent. Since chemical polishing removes material through the chemical reaction of corrosion, there is no significant change in the major elements on the surface of the sample. The samples processed with chemical polishing achieved minimum surface roughness of Ra 8.75 μm for the lower side of the inclined square sample with maximum weight loss rates of 2.56%. In addition, the surface flatness after chemical polishing was the best with a metallic luster, but there might also be round pits due to excessive corrosion.
The abrasive flow polishing enabled the abrasive to rapidly scour the internal surface by pressure, which produced extrusion scratching, extrusion deformation, and micro-cutting effects on the surface (Han et al., 2020). The interaction between surface and abrasive was dominated by elastic deformation with extrusion scratching, which did not affect the surface roughness and morphology. Elastic and plastic deformation of the surface material occurred due to the extrusion deformation, and the material would break away from the surface and perform the micro-cutting effect when exceeding its ultimate strength. Therefore, abrasive flow polishing could effectively eliminate the collapses, aggregated powder particles, striped steps, and hanging slag, and smooth the internal surface without obvious grooves and bumps, with the minimum surface roughness of Ra 3.57 μm.
5 Conclusion
In this paper, LPBF-fabricated Ti6Al4V samples were processed by sandblasting, electrolytic polishing, chemical polishing, and abrasive flow polishing with different parameters. The effects of post-processing methods on the surface roughness and morphology of LBPF-fabricated Ti6Al4V samples were investigated, as well as the weight and element changes of the samples after post-processing. The main findings are presented as follows.
(1) The surface roughness after sandblasting was the minimum compared with electrolytic polishing, and chemical polishing, which indicated the best effect of sandblasting in reducing the surface roughness of the Ti6Al4V sample.
(2) Sandblasting, electrolytic polishing, chemical polishing, and abrasive flow polishing were all effective in removing the adhered powder particles, and the surface flatness of the sample after chemical polishing was the best, while abrasive flow polishing had a significant effect on polishing the internal surface of the sample.
(3) Sandblasting had the least effect on the weight of the Ti6Al4V samples compared to electrolytic polishing and chemical polishing, especially the maximum weight loss rate processed with electrolytic polishing exceeded 5%.
(4) Sandblasting caused contamination by the brown corundum residue on the surface of the Ti6Al4V sample, while electrolytic polishing and chemical polishing both achieved surface polishing by corrosion, which had less effect on the surface elements.
Data availability statement
The raw data supporting the conclusion of this article will be made available by the authors, without undue reservation.
Author contributions
XW, DL, and DW designed the experiments. ZL and XW carried out the experiments. ZL, XW, and CC analyzed the experimental results. ZL and XW wrote the manuscript. DL and DW conducted research guidance and reviewed the manuscript. DL and ZL are both the Equal & First Authors of the manuscript. All authors contributed to manuscript revision, read, and approved the submitted version.
Funding
This research is supported by the State Key Laboratory of Vanadium and Titanium Resources Comprehensive Utilization (Grant No. 2021P4FZG11A), the Basic and Applied Basic Research Foundation of Guangdong Province (Grant No. 2022B1515020064), and the Central University Basic Research Fund of China (Grant No. 2022ZYGXZR009).
Acknowledgments
The authors would like to thank all of the people who participated in the studies.
Conflict of interest
Authors DL and CC were employed by Pangang Group Research Institute Co., Ltd. and Chengdu Advanced Metal Materials Industry Technology Research Institute Co., Ltd.
The remaining authors declare that the research was conducted in the absence of any commercial or financial relationships that could be construed as a potential conflict of interest.
The handling editor CH declared a shared affiliation (second affiliation for authors) with the authors ZL, XW, DW at the time of the review.
Publisher’s note
All claims expressed in this article are solely those of the authors and do not necessarily represent those of their affiliated organizations, or those of the publisher, the editors and the reviewers. Any product that may be evaluated in this article, or claim that may be made by its manufacturer, is not guaranteed or endorsed by the publisher.
References
Balyakin, A. V., Shvetcov, A. N., and Zhuchenko, E. I. (2018). Chemical polishing of samples obtained by selective laser melting from titanium alloy Ti6Al4V. MATEC Web Conf. EDP Sci. 224, 01031. doi:10.1051/matecconf/201822401031
Bezuidenhout, M., Ter Haar, G., Becker, T., Rudolph, S., Damm, O., and Sacks, N. (2020). The effect of HF-HNO3 chemical polishing on the surface roughness and fatigue life of laser powder bed fusion produced Ti6Al4V. Mater. Today Commun. 25, 101396. doi:10.1016/j.mtcomm.2020.101396
Eyzat, Y., Chemkhi, M., Portella, Q., Gardan, J., Remond, J., and Retraint, D. (2019). Characterization and mechanical properties of As-Built SLM Ti-6Al-4V subjected to surface mechanical post-treatment. Procedia CIRP 81, 1225–1229. doi:10.1016/j.procir.2019.03.298
Finazzi, V., Demir, A. G., Biffi, C. A., Migliavacca, F., Petrini, L., and Previtali, B. (2020). Design and functional testing of a novel balloon-expandable cardiovascular stent in CoCr alloy produced by selective laser melting. J. Manuf. Process. 55, 161–173. doi:10.1016/j.jmapro.2020.03.060
François, M., Han, S., Segonds, F., Dupuy, C., Rivette, M., Turpault, S., et al. (2021). Electromagnetic performance of Ti6Al4V and AlSi7Mg0. 6 waveguides with laser beam melting (LBM) produced and abrasive flow machining (AFM) finished internal surfaces. J. Electromagn. Waves Appl. 35 (18), 2510–2526. doi:10.1080/09205071.2021.1954554
Han, S., Salvatore, F., Rech, J., Bajolet, J., and Courbon, J. (2020). Effect of abrasive flow machining (AFM) finish of selective laser melting (SLM) internal channels on fatigue performance. J. Manuf. Process. 59, 248–257. doi:10.1016/j.jmapro.2020.09.065
Huai-yang, L., Zhen-hua, L., Rui, Y., Bao-ren, T., and Ji-biao, S. (2020). Research progress in forming quality control of selective laser melting metal surface. Surf. Technol. 49 (9), 118–124.
Ke, X., Wu, W., Wang, C., Yu, Y., Zhong, B., Wang, Z., et al. (2022). Material removal and surface integrity analysis of Ti6Al4V alloy after polishing by flexible tools with different rigidity. Mater. (Basel) 15 (5), 1642. doi:10.3390/ma15051642
Lee, J. Y., Nagalingam, A. P., and Yeo, S. H. (2021). A review on the state-of-the-art of surface finishing processes and related ISO/ASTM standards for metal additive manufactured components. Virtual Phys. Prototyp. 16 (1), 68–96. doi:10.1080/17452759.2020.1830346
Li, S., Chen, D., Gu, H., Huang, A., and Fu, L. (2022). Investigation on application prospect of refractories for hydrogen metallurgy: The enlightenment from the reaction between commercial Brown corundum and hydrogen. Materials 15 (19), 7022. doi:10.3390/ma15197022
Lober, L., Flache, C., Petters, R., Kuhn, U., and Eckert, J. (2013). Comparison of different post processing technologies for SLM generated 316l steel parts. Rapid Prototyp. J. 19 (3), 173–179. doi:10.1108/13552541311312166
Mingear, J., Zhang, B., Hartl, D., and Elwany, A. (2019). Effect of process parameters and electropolishing on the surface roughness of interior channels in additively manufactured nickel-titanium shape memory alloy actuators. Addit. Manuf. 27, 565–575. doi:10.1016/j.addma.2019.03.027
National Institute of Metrology (2009). Product Geometry Technical Specification (GPS) surface structure, contour method, surface roughness parameters, and their values. Beijing: General Administration of Quality Supervision, Inspection and Quarantine of the People's Republic of China.
Obeidi, M. A., Mussatto, A., Dogu, M. N., Sreenilayam, S. P., McCarthy, E., Ahad, I. U., et al. (2022). Laser surface polishing of Ti-6Al-4V parts manufactured by laser powder bed fusion. Surf. Coatings Technol. 434, 128179. doi:10.1016/j.surfcoat.2022.128179
Pan, D., Zhao, H., Zhang, H., Zhao, P., Li, Y., and Zou, Q. (2019). Effect of different corundum sources on microstructure and properties of Al2O3–Cr2O3 refractories. Ceram. Int. 45 (15), 18215–18221. doi:10.1016/j.ceramint.2019.05.218
Peng, C., Fu, Y., Wei, H., Li, S., Wang, X., and Gao, H. (2018). Study on improvement of surface roughness and induced residual stress for additively manufactured metal parts by abrasive flow machining. Procedia Cirp 71, 386–389. doi:10.1016/j.procir.2018.05.046
Teng, X., Zhang, G. X., Zhao, Y. G., Cul, Y. T., Li, L. G., and Jiang, L. Z. (2019). Study on magnetic abrasive finishing of AlSi10Mg alloy prepared by selective laser melting. Int. J. Adv. Manuf. Technol. 105 (5-6), 2513–2521. doi:10.1007/s00170-019-04485-5
Wang, D., Liu, L. Q., Deng, G. W., Deng, C., Bai, Y. C., Yang, Y. Q., et al. (2022a). Recent progress on additive manufacturing of multi-material structures with laser powder bed fusion. Virtual Phys. Prototyp. 17 (2), 329–365. doi:10.1080/17452759.2022.2028343
Wang, D., Wang, H., Chen, X., Liu, Y., Lu, D., Liu, X., et al. (2022b). Densification, tailored microstructure, and mechanical properties of selective laser melted Ti–6Al–4V alloy via annealing heat treatment. Micromachines 13 (2), 331. doi:10.3390/mi13020331
Wang, D., Wu, S., Fu, F., Mai, S., Yang, Y., Liu, Y., et al. (2017). Mechanisms and characteristics of spatter generation in SLM processing and its effect on the properties. Mater. Des. 117, 121–130. doi:10.1016/j.matdes.2016.12.060
Wang, R., Li, F., Wei, D., Li, X., Huang, Y., Ren, X., et al. (2023). Scanning electron beam rotary polishing of column-faced Ti6Al4V. Mater. Lett. 330, 133228. doi:10.1016/j.matlet.2022.133228
Yamaguchi, H., Fergani, O., and Wu, P. Y. (2017). Modification using magnetic field-assisted finishing of the surface roughness and residual stress of additively manufactured components. Cirp Annals-Manufacturing Technol. 66 (1), 305–308. doi:10.1016/j.cirp.2017.04.084
Zhang, B. C., Xiaohua, L., Bai, J. M., Guo, J. F., Wang, P., Sun, C. N., et al. (2017). Study of selective laser melting (SLM) Inconel 718 part surface improvement by electrochemical polishing. Mater. Des. 116, 531–537. doi:10.1016/j.matdes.2016.11.103
Zhang, Y. F., Li, J. Z., Che, S. H., and Tian, Y. W. (2020). Electrochemical polishing of additively manufactured Ti-6Al-4V alloy. Metals Mater. Int. 26 (6), 783–792. doi:10.1007/s12540-019-00556-0
Keywords: additive manufacturing, laser powder bed fusion, Ti6Al4V, post-processing, surface quality
Citation: Lu D, Liu Z, Wei X, Chen C and Wang D (2023) Effect of post-processing methods on the surface quality of Ti6Al4V fabricated by laser powder bed fusion. Front. Mater. 10:1126749. doi: 10.3389/fmats.2023.1126749
Received: 18 December 2022; Accepted: 07 February 2023;
Published: 24 February 2023.
Edited by:
Changjun Han, South China University of Technology, ChinaReviewed by:
Hao Yi, Chongqing University, ChinaBoyuan Li, Nanyang Technological University, Singapore
Copyright © 2023 Lu, Liu, Wei, Chen and Wang. This is an open-access article distributed under the terms of the Creative Commons Attribution License (CC BY). The use, distribution or reproduction in other forums is permitted, provided the original author(s) and the copyright owner(s) are credited and that the original publication in this journal is cited, in accordance with accepted academic practice. No use, distribution or reproduction is permitted which does not comply with these terms.
*Correspondence: Dong Lu, bHVkb25nXzE3ODZAMTYzLmNvbQ==; Di Wang, bWV3ZGxhc2VyQHNjdXQuZWR1LmNu
†These authors have contributed equally to this work and share first authorship
 Dong Lu
 Zhenyu Liu
 Xiongmian Wei3
 Di Wang


