- 1Key Laboratory of Precision Manufacturing for Complex Parts of Liaoning Province, Dalian Jiaotong University, Dalian, China
- 2Key Laboratory for Precision and Non-traditional Machining Technology of Ministry of Education, Dalian University of Technology, Dalian, China
- 3State Key Laboratory for Manufacturing Systems Engineering, Xi’an Jiaotong University, Xi'an, China
The deformation characteristics of GaSb are investigated by employing nano-scratch tests to understand the material removal mechanism during ultra-precision grinding. The nano-scratches are obtained by a cube-corner tip under the two linear normal load conditions (0–30 mN and 0–60 mN). The normal force/scratch distance-penetration depth curves and the characteristics of chips and cracks are analyzed to understand the transition mechanism of ductile to brittle removal. In addition, the maximum principal stress near the bottom of the scratch is calculated to analyze the deformation behavior. The results revealed that the deformation behavior of three zones of deformation is plastic deformation, the transition from plastic to brittle deformation, and brittle deformation, respectively. The change rate of stress is significant differences in the zone of brittle-ductile transition. The critical ratio between mean contact pressures and hardness in the transition region is determined as 0.39 and 0.21, respectively.
1 Introduction
Monocrystalline gallium antimonide (GaSb) is a new type of semiconductor material, that is, used in infrared photoelectric devices and optical communication systems (Li et al., 2022; Zhang et al., 2022). GaSb is a hard-to-cut material due to its brittleness. Ultra-precision grinding is commonly employed in the machining of monocrystalline GaSb components. However, large surface defects and subsurface damages occur in the deformation of material during ultra-precision grinding. Hence, the understanding of the material deformation modes of GaSb during ultra-precision grinding is a thriving field of research. In most of the studies, scratch experiments were used to investigate the mechanical properties of the hard-brittle material, chip morphology, and micro-defects (Gao et al., 2018; Gao et al., 2021; Zhou et al., 2021; Zhao et al., 2021). For instance, Lamy and Berlie (1984) applied scratch texts on ceramics to analyze the brittleness of the material and to establish the transition scratching depth from ductile to brittle. Zhang et al. (1987) studied the behavior of alumina by scratching with a single-point diamond tool. Their study evaluated the formation of surface cracks, including microscopic plastic deformation, scale-like cracking, and chipping. Xu and Jahanmir (1995) performed repeated single-point scratch tests for alumina and identified that the microcracks were because of grain boundary dislodgement. Thonggoom and Funkenbusch (2005) used three different optical glasses and repeatedly scratched them with a Berkovich diamond indenter with minimum load. The results showed that the transition point along the scratch direction corresponds to the change from ductile grooving to chip formation. Zarudi et al. (2005) revealed that the plastic deformation of silicon in scratching tests was because of the variation of the stress field. Studies have shown that phase transition and dislocation can be observed in the subsurface of silicon after scratching. Axen et al. (1997) investigated the relationship between damage mechanism and tangential force in the scratch testing of ceramics. The experiments found that the fracture characters on the scratching surface are influenced by the variation of the tangential force.
In recent years, some studies used scratching tests to evaluate the material deformation modes of a hard-brittle crystal. For instance, Gu et al. (2011), Gu and Yao (2011) employed single and double scratch tests by cracking at micron and sub-micron scales for BK7. Their research showed three types of cracking interaction. Li et al. (2019) performed nano-scratch experiments to investigate the removal mechanism of RB-SiC ceramics in abrasive machining. The results showed that the phase transition occurred in ductile chips, while no phase transition was observed in brittle chips. The transition of the deformation mechanism from ductile to brittle fracture mode occurred after increasing load. Chen et al. (2018) studied the effects of strain rate on the deformation and material removal mechanism of Lu2O3 single crystal through ductile nano-scratch tests. They found that the higher scratch velocity can reduce the subsurface damage, including dislocations, stacking faults, and nano twins when the normal force is maintained. Li et al. (2021) analyzed the micro-grinding mechanism of silicon by nano-scratch tests. They developed a model by following the phase transition-dislocation theory and studied the edge chipping damage, which was used to predict micro-grinding quality.
In the reported studies, the results of the scratch experiment were analyzed to characterize the elastic deformation, plastic flow, and brittle fracture for revealing the material removal mechanism. However, due to the difference in physical attributes of hard-brittle material, the deformation behaviors of new material are not yet known. The existing stress distribution law is not fit too. Especially for the critical value of parameters in the area of ductile-brittle transition and the material deformation processes, which is crucial to control the process of ultra-precision grinding. Meanwhile, the deformation modes and stress state of the material during the nano-scratch tests should be analyzed to study the material removal mechanism of new materials.
In this study, the nano-scratch tests were used to explore the deformation behavior of GaSb crystal. The scratch tests with two groups of varying loads were conducted on GaSb samples by employing a cube-corner tip. The scratch morphology was observed to analyze the characteristics of chips and cracks, and the normal force/scratch distance-penetration depth curves are used to explore the transition mechanism from ductile to brittle removal. Moreover, based on the stress field model, the theoretical analysis in the scratch area was conducted to study the deformation behavior of GaSb during nano-scratching.
2 Experiment details
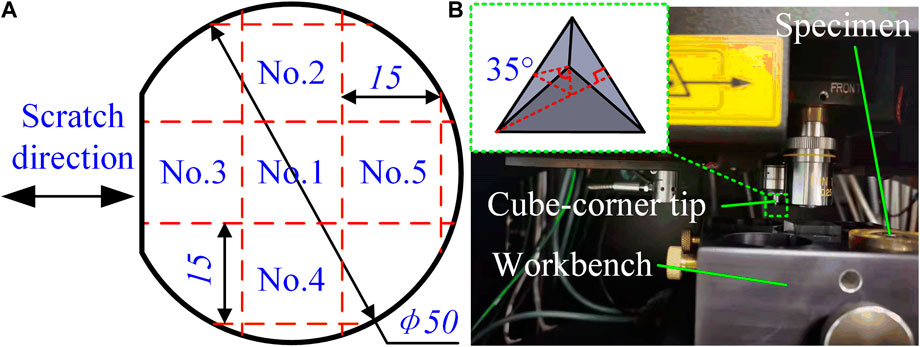
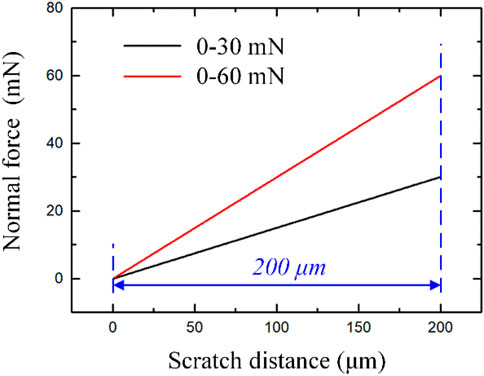
The polished GaSb wafer [φ50 mm × 0.5 mm, orientation (100)] was sliced to extract samples with the size of 15 mm × 15 mm × 0.5 mm, as shown in Figure 1A. The surface roughness of samples was less than Ra 1 nm (measured by ZYGO 9000 (Zygo Corp., Connecticut, America)). The surface morphology of the samples confirmed that there were no scratches or other defects on the surfaces. The Nano Indenter G200 (KLA Corp., California, America.) with a cube-corner tip (Figure 1B) was used to conduct the nano-scratch tests. First, a scratch length of 200 μm is used by linear load from 0 to 30 mN and 0 to 60 mN. Then repeat the above test 3 times. The experimental details are shown in Figure 2. The surface morphology of the scratched samples was observed by scanning electron microscope (SEM) (SUPRA 55, ZEISS Corp., Oberkochen, Germany) and laser scanning confocal microscopy (VKX200, KEYENCE Corp., Osaka, Japan). The data of depth displacement and load curves were obtained by a Nano Indenter G200.
3 Results
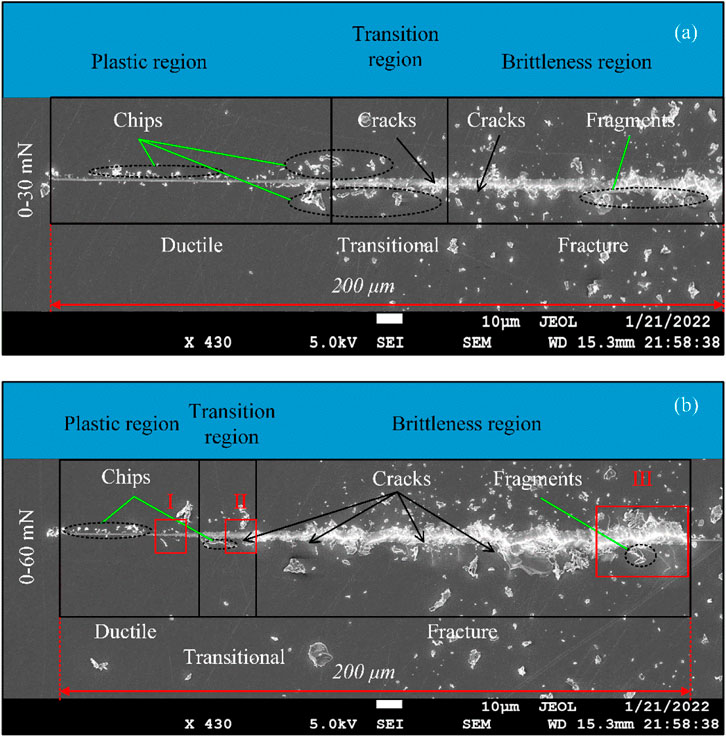
Figure 3A shows the surface morphology of the scratch under the linear loadings of 0–30 mN with a length of 200 μm. Based on the deformation characteristics, three regions can be identified plastic deformation region, transition region, and brittleness deformation region.
In the region of plastic deformation, the deformation characteristics follow a typical ductile removal mode. There are some cutting chips around both sides of the scratching and no cracks or breakages are observed. In the transition region, cracks occur gradually in the plastic deformation region by increasing the normal force. The deformation characteristics show a mixture of plastic plowing and brittle breakage which appears near the edges of the scratch. At the end of this region, the brittle fracture appears prominently, and the number of chips increases. Around the scratch, continuous chips are induced by ductile removal, and the crack chips by brittle removal. In the brittleness deformation region, when the normal force is 30 mN, the brittle fracture deformation appears more prominently. No typical characteristic of ductile removal on both sides of the scratch is observed, however, debris and fragments scattered can be observed around both sides of the scratch.
Figure 3B shows the scratch morphology under the linear loadings of 0–60 mN. Three regions corresponding to the different deformation behaviors can be observed on the scratch. The length of scratch in brittle deformation is more than the other two regions due to the slope of the increased loading.
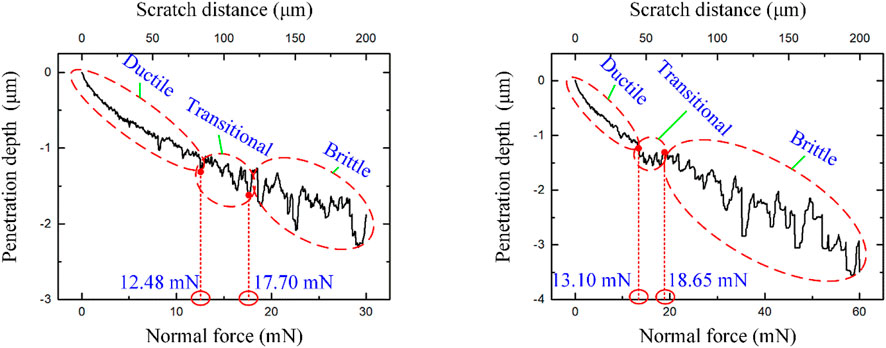
Figure 4 shows the penetration depth-scratch distance/normal force curves developed in the scratch process. It can be observed that the curve characteristics of the three stages correspond to the three regions of material deformation. The proportion of the deformation range corresponds to Figure 3. The values of normal force on the point of deformation transition are signed in Figure 3.
The three regions I, II, and III in Figure 3B are zoomed in Figure 5. Figure 5A shows the morphology of the plastic deformation region in detail. The deformation characteristics follow the typical ductile removal mode. The material deformation around the sides and bottom of the scratch is plastic plowing along the direction of the scratch. The chips on the edge of the scratch have the characteristics of stick-slip flow, however, no characteristics of cracks and crushing are observed in this region. In the transition region, as shown in Figure 5B, it can be observed that breakage and cracking occur in the plastic plowing areas. The plastic plowing coexists with a fracture on both sides of the scratch, and some cracks extend to the surface. The characteristic of brittle deformation is shown in Figure 5C. It can be found that there are numerous crack-chips scattering around the scratch. A lot of cracks propagate to the surface.
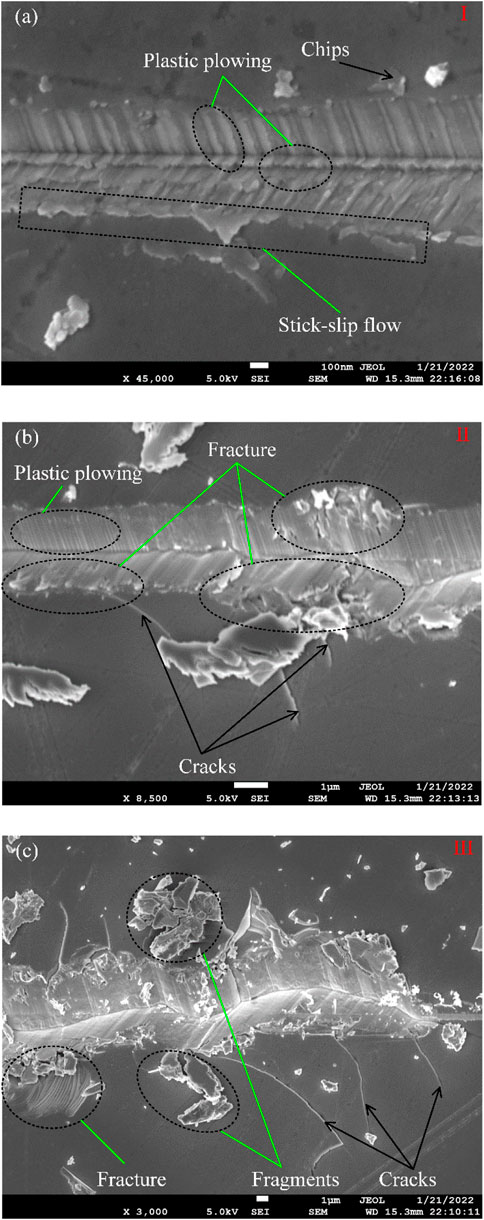
FIGURE 5. The detailed morphology of (A) ductile deformation, (B) transitional stage, and (C) brittle deformation.
4 Discussion
During the nano-scratching of GaSb crystal under linear loadings conditions, the plastic deformation of material occurs due to several factors. At the start of the scratching process, due to the minimum normal load, the indentation depth is not apparent, however, the material in the contact area of the indenter produces small hydrostatic pressure, that is, concentrated underneath the cutter edge of the indenter tip (Yan et al., 2005; Yoshino, 2016). The hydrostatic pressure causes plastic deformation of the material during scratching. In the first stage, the deformation behavior corresponds to the morphology of the plastic plowing, as shown in Figure 5A. In the second stage, the penetration depth of the indenter increases with the normal force, which increases the hydrostatic pressure as well as induces residual stress around the scratch (Gu et al., 2011; Tian, 2021). Once the residual stress is close to or considerably greater than the breaking strength, cracks gradually spread in the plastic deformation region, therefore, the deformation in this stage includes brittle-ductile transition, as shown in Figure 5B. In the third stage, the deformation behavior can be considered as the residual tensile stress exceeds the fracture toughness of the material when the normal force increases. The number of cracks rapidly increases with the load. The fracture morphology around the scratch is shown in Figure 5C, the brittle deformation is apparent when the crack intensity increases. In addition, the propagation directions of cracks are affected by the stress field and the crystal orientation (Wang et al., 2017). As shown in Figure 4, the results can be found that the values of normal force on the critical threshold of transitional deformation and brittle deformation are 13 ± 1 mN and 18 ± 1 mN, respectively. However, the brittle-ductile deformation transition depends on the tip size and the material properties (Zhang et al., 2021). The critical normal forces corresponding to the deformation transition don’t make sense. In order to evaluate the critical value of brittle-ductile transition meaningfully, the ratio between the contact stress and hardness can be calculated. The hardness H = 6.1 GPa can be measured by nano-indentation testing. The mean contact pressures under the critical normal force can be calculated by Eq. 1 (Gassilloud et al., 2005).
where Fn is the normal force, and a1 is the residual scratch width, it can be measured from Figure 3. When the Fn is 13 and 18 mN, the value of a1 is 1.49 and 2.41 μm, the critical ratio is calculated as 0.39 and 0.21, respectively.
During scratching, the complicated stress field is induced by both the normal and tangential forces acting on the material surface. The stress field will lead to the material’s deformation. The ductile deformation or brittle deformation depends on the distribution status of the stress field in zones of scratch. Hence, during scratching, the change of stress state is analyzed to reveal the deformation behavior for GaSb crystalline. Figure 4. Shows the relationship between the penetration depth and normal forces under 0–30 and 0–60 mN. Three deformation stages can be distinguished in Figure 4. In the first stage when the normal force increases, less fluctuation is noted in the displacement of penetration depth and only plastic deformation exists in this stage. In the second stage, the fluctuation of penetration depth increases gradually and shows plastic and brittle deformations. In the third stage, the fluctuation of penetration depth varies considerably, numerous chips jump off from scratches at the later stage of the loadings and the material removal mode becomes brittle. Based on this analysis, the results of Figure 4 are found consistent with Figures 3, 5.
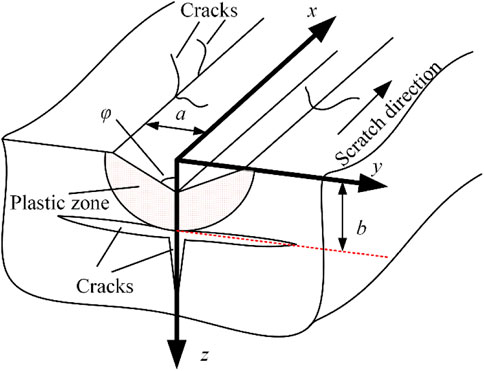
Figure 6. Shows the schematic diagram of plastic and brittle fracture deformations when the GaSb crystalline is scratched by a sharp diamond tip. The related geometric parameters are shown in Figure 6. The stress field in the scratch groove includes the Boussinesq field, Cerruti field, and sliding blister field. Therefore, the stress components in the scratching zones are expressed as Eq. 2 (Jing et al., 2007).
where the value of k0 is 0 during unloading and 1 while loading, k1 = Ft/Fn, is the friction coefficient, Fn is the normal force, and Ft is the tangential force; In k2 = B/Fn, B is the strength of the sliding blister field per unit sliding length. In Eq. 1, αij, βij, and γij represent the expression of the Boussinesq field, Cerruti field, and sliding blister field (Jing et al., 2007). Equation 2 can be used to express the stress fields during scratching, but not used for determining the value of inelastic zone size b. Thus, the value of b is solved by the model, as explained in Eq. 3 (Ahn et al., 1998; Jing et al., 2007; Yang et al., 2017). Equation 3 can be used to predict the depth of plastic deformation:
where υ = 0.3 is the Poisson ratio, E = 95 GPa is the elastic modulus, H = 6.1 GPa is the material hardness, φ = 35° is the half-apex angle of the indenter, and a is the contact size between the indenter and material. A can be expressed as Eq. 4.
where λ = 1.25 is the shape coefficient of the indenter (Jing et al., 2007).
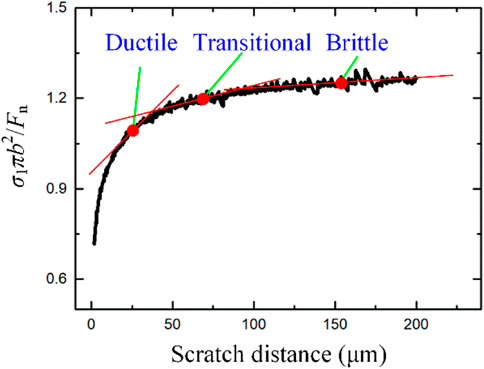
Cracks are induced during scratching when stress exceeds the fracture strength of the brittle material (Yoshin et al., 2005). The deformation behavior of the material is observed brittle as the cracks grow intensively. The depth of the plastic deformation underneath the scratch is found constant, as shown in Figure 6. This can be assumed that position b is the maximum depth of the plastic deformation during the scratching. Increasing the loadings can induce the variation of stress underneath the scratch. The generation of deformation behavior of a material can be estimated by the variation of stress. As shown in Figure 6, the maximum principal stress σ1 at point b exists in the y-z plane along the x-axis. The maximum principal stresses are nondimensionalized using σ1πb2/Fn, and the results are shown in Figure 7. Where the value of b can be calculated by Eq. 3, σ1 can be calculated by Eq. 2, and the values of αij, βij, and γij are given in Appendix A. As shown in Figure 7, the curve between σ1πb2/Fn and x may be divided into three sectors by taking the slope of the curve. The three change rates of the σ1 (shown in Figure 7) correspond to the plastic deformation region, brittle-ductile transitional deformation region, and brittle deformation region, respectively. The results shown in Figure 7 coincide with those shown in Figures 3–5.
5 Conclusion
The GaSb crystalline is scratched using a cube-corner tip under the linear normal loadings conditions of 0–30 and 0–60 mN. The relationship between the scratched depth and normal force is obtained. Then, the critical ratio between mean contact pressures and hardness in the transition region is calculated for the valuation of the brittle-ductile deformation transition. The morphology of the scratch is studied and the maximum principal stress in the region of plastic deformation is calculated by applying the stress field mode during the scratch. In a subsequent study, the results can promote optimizing the processing of ultra-precision grinding. The main conclusions of this research are summarized as:
During the nano-scratch tests, when normal force increases linearly, three regions of deformation behavior are observed: Plastic deformation, the transition from plastic to brittle deformation, and brittle deformation.
During nano-scratching, the relationship between the scratched depth and normal force shows the critical values of transitional deformation and brittle deformation are 13 ± 1 and 18 ± 1 mN, respectively. However, in order to evaluate the critical value of brittle-ductile transition meaningfully, the critical ratio between mean contact pressures and hardness in the transition region is determined as 0.39 and 0.21, respectively.
The maximum principal stress trend was obtained by the stress field mode. The change rate of stress is analyzed to validate the deformation mechanism from plastic to transitional deformations and then transform to brittle deformation.
Future research on the machining of GaSb crystalline will be built on the results of this study. The maximum-undeformed chip thickness, a critical variable that determines the manner of material removal in ultra-precision grinding, can also be determined using the results of this study.
Data availability statement
The raw data supporting the conclusions of this article will be made available by the authors, without undue reservation.
Author contributions
All authors listed have made a substantial, direct, and intellectual contribution to the work, and approved it for publication.
Funding
This research was funded by the Doctor’s Scientific Research Initiation Fund Program of Liaoning Provincial Science & Technology Department (2021BS220), Natural Science Research Project of the Educational Department of Liaoning Province (JDL2020023), National Natural Science Foundation of China (52075066,52175382,51991372), Dalian Science and Technology Innovation Fund (No. 2021JJ12GX009).
Conflict of interest
The authors declare that the research was conducted in the absence of any commercial or financial relationships that could be construed as a potential conflict of interest.
Publisher’s note
All claims expressed in this article are solely those of the authors and do not necessarily represent those of their affiliated organizations, or those of the publisher, the editors and the reviewers. Any product that may be evaluated in this article, or claim that may be made by its manufacturer, is not guaranteed or endorsed by the publisher.
References
Ahn, Y., Farris, T., and Chandrasekar, S. (1998). Sliding microindentation fracture of brittle materials: Role of elastic stress fields. J. Mech. Mater. 29 (3-4), 143–152. doi:10.1016/s0167-6636(98)00012-x
Axen, N., Kahlman, L., and Hutchings, I. (1997). Correlations between tangential force and damage mechanisms in the scratch testing of ceramics. J. Tribol. Int. 30 (7), 467–474. doi:10.1016/s0301-679x(97)00009-1
Chen, L., Zhang, F., Wu, Y., and Zhang, X. (2018). Influence of strain rate effect on material removal and deformation mechanism based on ductile nanoscratch tests of Lu2O3 single crystal. J. Ceram. Int. 44, 21486–21498. doi:10.1016/j.ceramint.2018.08.210
Gao, S., Wu, Y., Kang, R., and Huang, H. (2018). Nanogrinding induced surface and deformation mechanism of single crystal β-Ga2O3. J. Mater. Sci. Semicond. Process. 79, 165–170. doi:10.1016/j.mssp.2017.12.017
Gao, W., Zhang, Y., and Huang, P. (2021). Study on material removal mechanism of 6H-SiC single crystal wafer based on different nano-scrathc order. J. Diam. Abrasives Eng. 41 (04), 92–97.
Gassilloud, R., Ballif, C., Gasser, P., Buerki, G., and Michler, J. (2005). Deformation mechanisms of silicon during nanoscratching. J. Phys. status solidi (a) 202 (15), 2858–2869. doi:10.1002/pssa.200521259
Gu, W., and Yao, Z. (2011). Evaluation of surface cracking in micron and sub-micron scale scratch tests for optical glass BK7. J. Mech. Sci. Technol. 25 (5), 1167–1174. doi:10.1007/s12206-011-0306-2
Gu, W., Yao, Z., and Liang, X. (2011). Material removal of optical glass BK7 during single and double scratch tests. J. Wear 270 (3), 241–246. doi:10.1016/j.wear.2010.10.064
Jing, X., Maiti, S., and Subhash, G. (2007). A new analytical model for estimation of scratch-induced damage in brittle solids. J. Am. Ceram. Soc. 90 (3), 885–892. doi:10.1111/j.1551-2916.2006.01471.x
Lamy, B., and Berlie, J. (1984). Brittleness analysis of ceramic and polymeric materials by means of scratching experiments. J. Mater. Sci. Lett. 3 (12), 1069–1070. doi:10.1007/bf00719766
Li, W., Li, Z., Yang, J., Ren, Y., Jiao, Y., Hegab, H., et al. (2021). Modeling of the removal mechanism of monocrystalline silicon-based on phase change-dislocation theory and its edge chipping damage during micro-grinding. J. Precis. Eng. 71 (2), 103–118. doi:10.1016/j.precisioneng.2021.03.001
Li, Y., Cao, K., Zha, G., Zhang, X., Wan, X., Zhao, D., et al. (2022). An alternative GaSb substrate allowing close-spaced sublimation of Cd0. 9Zn0. 1Te epitaxial thick film for radiation detectors. J. Mater. Sci. Semicond. Process. 147, 106688. doi:10.1016/j.mssp.2022.106688
Li, Z., Zhang, F., Luo, X., and Cai, Y. (2019). Fundamental understanding of the deformation mechanism and corresponding behavior of RB-SiC ceramics subjected to nano-scratch in ambient temperature. J. Appl. Surf. Sci. 469 (MAR.1), 674–683. doi:10.1016/j.apsusc.2018.11.090
Thonggoom, R., and Funkenbusch, D. (2005). Transition in material removal behavior during repeated scratching of optical glasses. J. Mater. Sci. 40 (16), 4279–4286. doi:10.1007/s10853-005-2839-1
Tian, Y. (2021). Simulation study on hydrostatic stress influence of microstructure evolution in single crystal silicon nanomachining. Qinhuangdao: D. Yanshan University.
Wang, N., Jiang, F., Xu, X., and Lu, X. (2017). Effects of crystal orientation on the crack propagation of sapphire by sequential indentation testing. J. Cryst. 8 (1), 3. doi:10.3390/cryst8010003
Xu, H., and Jahanmir, S. (1995). Microfracture and material removal in scratching of alumina. J. Mater. Sci. 30 (9), 2235–2247. doi:10.1007/bf01184566
Yan, J., Takahashi, H., Tamaki, J., Gai, X., Harada, H., and Patten, J. (2005). Nanoindentation tests on diamond-machined silicon wafers. J. Appl. Phys. Lett. 86 (18), 181913. doi:10.1063/1.1924895
Yang, X., Qiu, Z., Lu, C., Li, X., and Tang, J. (2017). Modelling the strain rate sensitivity on the subsurface damages of scratched glass ceramics. J. Ceram. Int. 43, 12930–12938. doi:10.1016/j.ceramint.2017.06.191
Yoshin, M., Ogawa, Y., and Aravindan, S. (2005). Machining of hard-brittle materials by a single point tool under external hydrostatic pressure. J. Manuf. Sci. Eng. 127 (4), 837–845. doi:10.1115/1.2035695
Yoshino, M. (2016). Effects of external hydrostatic pressure on orthogonal cutting characteristics. J. Procedia Manuf. 5, 1308–1319. doi:10.1016/j.promfg.2016.08.102
Zarudi, I., Nguyen, T., and Zhang, L. (2005). Effect of temperature and stress on plastic deformation in monocrystalline silicon induced by scratching. J. Appl. Phys. Lett. 86 (1), 011922. doi:10.1063/1.1847692
Zhang, B., Tokura, H., and Yoshikawa, M. (1987). Study on surface cracking of alumina scratched by conical diamonds, J. J. Jpn. Soc. Precis. Eng. 53 (5), 826–832. doi:10.2493/jjspe.53.826
Zhang, K., Ren, Z., Cao, H., Li, L., Wang, Y., Zhang, W., et al. (2022). Near-infrared polarimetric image sensors based on ordered sulfur-passivation GaSb nanowire arrays. J. ACS Nano 16 (5), 8128–8140. doi:10.1021/acsnano.2c01455
Zhang, T., Jiang, F., Huang, H., Lu, J., Wu, Y., Jiang, Z., et al. (2021). Towards understanding the brittle-ductile transition in the extreme manufacturing. J.International J. Extreme Manuf. 3 (02), 022001–022025. doi:10.1088/2631-7990/abdfd7
Zhao, F., Lin, B., He, Y., and Sui, T. (2021). Cross-point effect of high-speed cross scratch on hard brittle materials. J. Ceram. Int. 47 (7), 9317–9324. doi:10.1016/j.ceramint.2020.12.059
Appendix A
where
Keywords: gallium antimonide, nano-scratching, material removal mechanism, brittle-ductile transition, ultra-precision grinding
Citation: Wang Z, Yan F, Zhang Y, Ma J, Zhou P, Kang C, Sha Z and Zhang S (2023) The material deformation modes of monocrystalline gallium antimonide (GaSb) under nano-scratching. Front. Mater. 10:1111717. doi: 10.3389/fmats.2023.1111717
Received: 30 November 2022; Accepted: 21 February 2023;
Published: 03 March 2023.
Edited by:
Zhen Tong, Shanghai Jiao Tong University, ChinaCopyright © 2023 Wang, Yan, Zhang, Ma, Zhou, Kang, Sha and Zhang. This is an open-access article distributed under the terms of the Creative Commons Attribution License (CC BY). The use, distribution or reproduction in other forums is permitted, provided the original author(s) and the copyright owner(s) are credited and that the original publication in this journal is cited, in accordance with accepted academic practice. No use, distribution or reproduction is permitted which does not comply with these terms.
*Correspondence: Zhihua Sha, emhzaGFfZGp0dUAxNjMuY29t
 Ziguang Wang1
 Feng Yan
 Chengwei Kang