
94% of researchers rate our articles as excellent or good
Learn more about the work of our research integrity team to safeguard the quality of each article we publish.
Find out more
ORIGINAL RESEARCH article
Front. Mater. , 19 May 2022
Sec. Environmental Degradation of Materials
Volume 9 - 2022 | https://doi.org/10.3389/fmats.2022.897718
This article is part of the Research Topic Machining Technology and Environmental Degradation Mechanism of Surface Microstructure of Special Materials View all 10 articles
Shot peening technology is usually employed to improve the ability of mechanical parts to resist failure due to fatigue and wear. It is often used to strengthen the surface of a target, but the induced residual stress and its distribution with respect to the coverage can affect the performance of the shot peening process. In this study, a comprehensive numerical and experimental study was conducted to overcome these issues. Using numerical simulation we found that both the surface and subsurface residual stress increases with the increase of the coverage before stabilizing. Quantitative analysis using the Entropy Method indicates that under the shot peening parameters considered in the simulation coverage of 200% is best for the shot peening of ZGMn13 High Manganese Steel. The following experimental study agreed with the corresponding numerical data for the residual stresses at varied depths from surface to subsurface with errors of less than 25%. Thus, the related research outcomes can guide the shot peening process to obtain the optimized surface strengthening of the target.
Advanced manufacturing technologies, including traditional and non-traditional machining technologies (Ji et al., 2022; Zhang et al., 2022), have been extensively employed to fabricate structures on the different kinds of functional materials used in aerospace engineering, information engineering, and microelectronics engineering (Cheng et al., 2022; Hu et al., 2022; Qi et al., 2022). High Manganese Steel possessing excellent wear-resistant performance has been widely used in the industry, but fatigue may occur in the main load-bearing structures under alternating loads during service (Prysyazhnyuk et al., 2022). As such, it is particularly important to improve the fatigue performance of High Manganese Steel by surface strengthening treatment (Syed et al., 2021).
Shot peening technology is a surface strengthening technology that can effectively enhance the ability of mechanical parts to resist fatigue failure and wear failure. It has been widely used in the aerospace automobile industries as well as other fields (Balbaa et al., 2022; Unal et al., 2022; Zhao et al., 2022). Menezes et al. found that the wear resistance of AISI316L steel after shot peening was improved due to the formation of a certain thickness hardening layer on its surface (Menezes et al., 2017). Li et al. found that the shot peening technique can significantly improve the fatigue strength of gear made of 20CrMnMo, thereby increasing its service life (Li and Liu, 2018). Moreover, the shot peening treatment of 17CrNiMo6 steel can introduce higher residual compressive stress and refine the target surface grain, which could improve the target fatigue life. It has also been found that secondary shot peening can further improve the residual compressive stress field, microstructure and surface morphology on the basis of the first shot peening process, to further improve its fatigue life (Sun et al., 2016). Yan et al. found that a certain thickness of the nanocrystalline layer was formed on the surface of ZGMn13 steel after the shot peening treatment, and the grain was refined and the surface was strengthened. After a certain period of shot peening, the wear resistance of ZGMn13 steel is significantly improved. However, if the shot peening time was too long, the wear resistance can decrease due to the formation of microcracks (Yan et al., 2007). According to the above analysis, the fundaments of the shot peening technology are properly investigated.
Shot peening coverage is another important factor affecting the effect of shot peening. Insufficient shot peening coverage cannot achieve the strengthening effect of the workpiece, while excessive shot peening coverage causes burrs on the surface of the workpiece and microcracks (Maleki and Unal, 2018). Furthermore, the influence of shot peening coverage on the evolution of residual stress and surface morphology is not fully clear (Wu et al., 2020; Qin et al., 2022). It is therefore necessary to conduct in-depth research on reasonable shot peening coverage, and to further understanding of the relation between induced residual stress by shot peening and the failure of the target materials. Generally, the surface residual compressive stress (σs), the maximum residual compressive stress (σm), the depth of maximum residual compressive stress (Zm). and the depth of residual compressive stress layer (Z0), as shown in Figure 1, are the four essential factors that affect the performance of the shot peening process. However, further exploration of the best way to comprehensively consider the coupling effects of these values on the shot peening performance with respect to its coverage is needed.
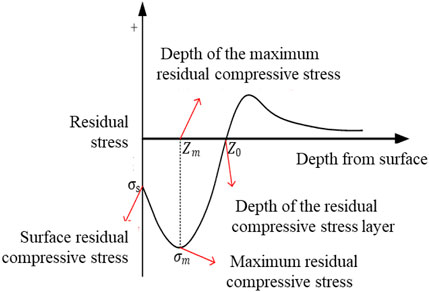
FIGURE 1. Evaluation of shot peening performance based on distribution of residual stress on target.
In this paper numerical and experimental studies were performed to explore the reasonable coverage of shot peening on ZGMn13 High Manganese Steel. Firstly, a numerical model was developed in ABAQUS to consider the random shot peening process and observe the residual stress both on the surface and subsurface. Then the Entropy Method was employed to evaluate the shot peening performance based on these numerical results. Finally, corresponding experiments were carried out to verify the numerical results and explore the reasonable coverage of shot peening on ZGMn13 High Manganese Steel.
This study used ABAQUS Software to conduct the numerical study. The geometry of the target is modelled as shown in Figure 2A with the dimensions 5 mm × 5 mm × 2.4 mm. Zone I is the coarsening mesh and Zone II is the refined mesh used for the shot peening. The mesh independence test was conducted in the Zone II with mesh sizes of 0.04, 0.03 and, 0.02 mm, respectively. We found that the difference of numerical results between adjacent mesh densities is less than 3.2%. A mesh size of 0.04 mm in Zone II with dimensions of 2 mm × 2 mm × 2.4 mm was selected for the model to achieve an accurate solution and reduce the computation time.
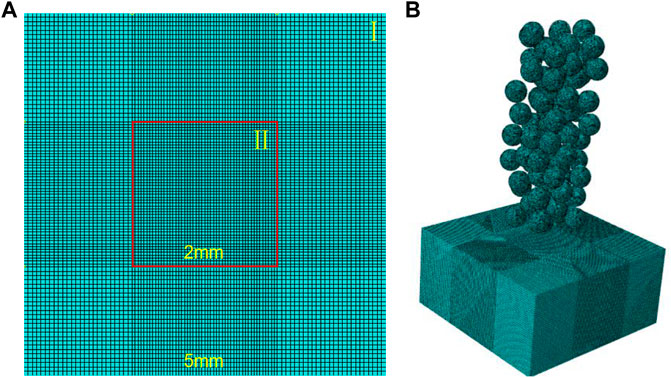
FIGURE 2. Model geometry and boundary conditions. (A) Target model, (B) Multiple balls impact model.
The balls used for the shot peening in the simulation can be randomly generated up Zone II by defining the related functions in ABAQUS. The constitutive model for the target, ZGMn13 High Manganese Steel, is Johnson-Cook model and its parameters are shown in Table 1. In the simulation, the ZGMn13 high manganese steel was considered as the target material, whose density is 7.98 × 10⁻⁶ kg/mm3, Elastic Modulus is 210 GPa and Poisson ratio is 0.3, and the Steel Cut Wire Shot, with density of 7.8 × 10⁻⁶ kg/mm3, Elastic Modulus of 210 GPa and Poisson ratio of 0.3, was used to model the shot peening ball. The boundary conditions are as follows: the top face of the target is set free, which is impacted by the shot peening balls, while the other five exterior faces of the target are set at zero freedom in both translational and angular velocities. This paper used a shot peening ball size of 0.6 mm, and the its impact speed and angle were 80 m/s and 90°, respectively.

TABLE 1. J-C model parameters of ZGMn13 High Manganese Steel (Teng, 2011).
The coverage of shot peening was defined as the ratio of the total area of the impacting ball on the target to the whole area of the target. According to previous studies, the ratio needs to be changed often by using different numbers of shot peening balls, but it is hard to quantitatively obtain the relation between the number of balls and coverage. In this study this relationship was quantitatively given as follows: firstly, the pit diameter of the shot peening ball on the target was calculated by modeling the single ball impact on the target with the above-mentioned parameters, as shown in Figure 3A. This value can be measured as 0.3 mm, seen in Figure 3B. Then, inside the impact area with dimensions of 1.6 mm × 1.6 mm, the random circles with a diameter of 0.3 mm were generated by responding to the number of balls, as shown in Figure 3C, and the coverage was also taken. Finally, by repeating this calculation more than 1,000 times, the relation between the number of balls and the coverage was calculated, as shown in Table 2. The numerical work was carried out according to the parameters in Table 2, and the effect of the coverage on the target residual stress was analyzed to explore the reasonable coverage of shot peening of ZGMn13 High Manganese Steel.
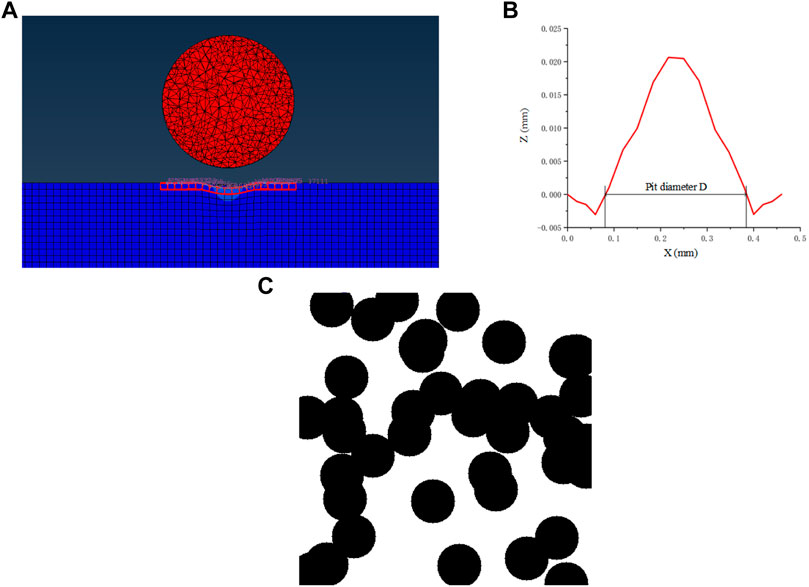
FIGURE 3. Calculation of the pit diameter of the shot peening ball on the target. (A) Simulation of single ball impacts, (B) Measurement of pit diameter, (C) Calculation of coverage with respect to the number of balls.
A typical distribution of residual stress on target is shown in Figure 4 under the coverage of 100%. It can be seen from this figure that the shot peening process mainly induces the residual compressive stress on the target, and a layer of residual compressive stress may be formed due to the impact of many balls, where the maximum residual compressive stress can be found in the subsurface of the target. It is also interesting to notice from the target surface that the residual tensile stress is observed due to the interaction of shot peening balls, and in the target subsurface, the residual tensile stress was also found to achieve a balance.
Figure 5 shows the different distributions of the surface residual stress for coverage from 23 to 250%. We found that the surface residual stress increases with the increase of the coverage from 23 to 100%. When the coverage is more than 100% there is almost no variation of surface residual stress, which indicates that this value was stable. Moreover, it is noteworthy that the surface residual tensile stress had a coverage of 100%, and can be reduced by further increasing the coverage.
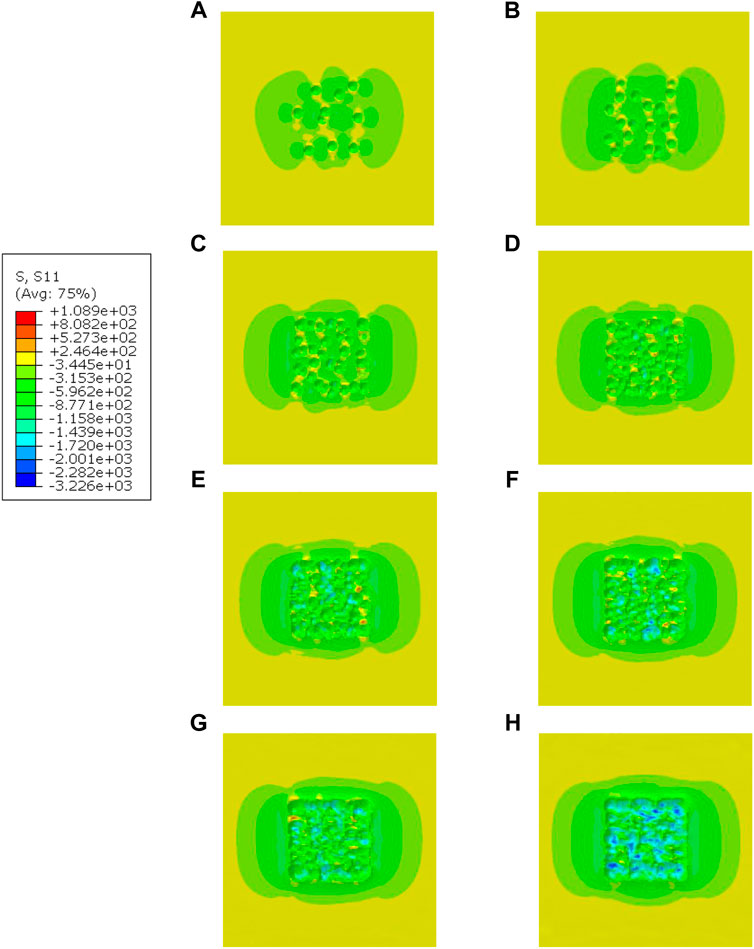
FIGURE 5. Distributions of the surface residual stress for coverage from 23 to 250%. (A) 23%, (B) 40%, (C) 64%, (D) 87%, (E) 100%, (F) 150%, (G) 200%, (H) 250%.
Figure 6 shows the different distributions of subsurface residual stress concerning coverage from 23 to 250%. In general, a layer of residual compressive stress was generated under the impact zone. To be specific, the subsurface residual compressive stress increases with the increase of coverage from 23 to 100%, while when the coverage is more than 100% there is almost no variation of subsurface residual compressive stress that demonstrates that this value was stable. The subsurface residual tensile stress increases with an increase of the coverage up to 100%, but this trend stabilizes when the coverage is more than 100%. Furthermore, by comparing Figures 6A–H it is interesting to note that all the maximum residual compressive stress occurs in the subsurface of the target, except the condition with coverage of 250%, where its maximum residual compressive stress is found to be at the target surface. This indicates that further increasing the coverage could result in the failure of the target material, which is not expected in shot peening.
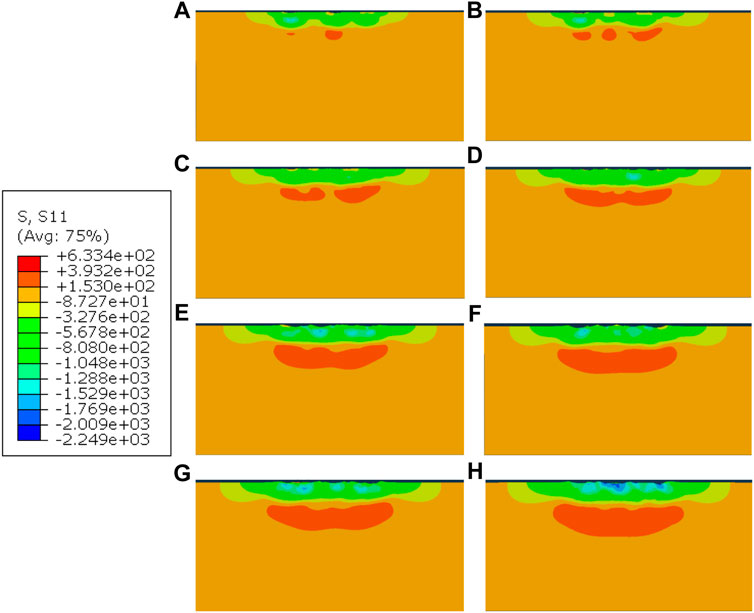
FIGURE 6. Distribution of subsurface residual stress with respect to coverage from 23 to 250%. (A) 23%, (B) 40%, (C) 64%, (D) 87%, (E) 100%, (F) 150%, (G) 200%, (H) 250%
The surface residual compressive stress (σs), the maximum residual compressive stress (σm), the depth of the maximum residual compressive stress (Zm), and the depth of the residual compressive stress layer (Z0) are the four essential factors that affect the performance of the shot peening process. As mentioned in the introduction, their relations concerning coverage can be numerically summarized, as shown in Figure 7. This figure shows that the surface residual compressive stress, the maximum residual compressive stress, and the depth of the residual compressive stress layer all increase by increasing the coverage. To be specific, the variation of the maximum residual compressive stress and the depth of the residual compressive stress layer is larger when the coverage is less than 100%. While the depth of the maximum residual compressive stress gradually increases from 0.119 to 0.121 mm concerning the coverage from 23 to 100%. It then gradually reduces to 0 when the coverage is 250%. This demonstrates that with an increase in coverage, the position of the maximum residual compressive stress could move to the target surface gently and that further increasing coverage may induce the surface damage and result in the failure of the target.
To assess the performance of the shot peening process considered in this study, further quantitative analysis is conducted based on the distribution of the residual compressive stress concerning the corresponding coverage. The original simulation results of the σs, σm, Zm, and Z0 can be obtained as shown in Table 3. These data are then treated as dimensionless values (see Table 4), which are convenient for the following comparisons. The Entropy Method is a commonly used weighting method that measures value dispersion in decision-making. The greater the degree of dispersion, the greater the degree of differentiation, meaning more information can be derived. Meanwhile, higher weight should be given to the index, and vice versa (Zhu et al., 2020). Thus, it is employed to process these dimensionless values to evaluate the weight of the residual compressive stress for different corresponding coverages (Li et al., 2022), the scores are given in Table 5. According to the rule of the Entropy Method the higher the score the better the performance. Under the shot peening parameters considered in the simulation, the coverage of 200% is found to be best for the shot peening of ZGMn13 High Manganese Steel.
ZGMn13 High Manganese Steel with dimensions of 5 mm × 5 mm × 6 mm is selected as the target, that is, fixed in the central impact zone (20 mm × 20 mm) as shown in Figure 8, and the major material properties of the target are given in Table 6. In the experiment, all tests were carried out on a pneumatic shot peening machine (SP1200-V20/1/2X) with the procedure shown in Figure 9. In terms of the performance of this shot peening machine, the processing parameter settings considered in the experiment are given in Table 7, which corresponds to the numerical study in this paper.

TABLE 6. Material properties of ZGMn13 High Manganese Steel (by mass%) (Teng, 2011).
After each test, the surface and subsurface residual stress were measured using X-ray diffraction (XRD), which is one of the most extensively used techniques for the evaluation of residual stress due to its accurate, effective, and non-destructive measurement (Alhumaidan et al., 2015). In this study, the GNR EDGE Residual Stress-Retained Austenite XRD was used to measure the residual stress. However, the penetrability of this machine into the ZGMn13 High Manganese Steel is limited, and the surface residual stress alone cannot reflect the distribution of the residual stress for the thickness. Electrolytic polishing etching was needed to treat the target surface layer by layer since this process does not induce the mechanical force, which means it does not induce new residual stress and that it cannot affect the measurement results. Therefore, under different coverages, i.e., 100, 150, 200, and 250%, the residual stresses were measured at 0, 30, 60, 90, 120, 240, and 360 μM from surface to the subsurface, respectively.
The overall observations of the target surface morphologies after the shot peening process are shown in Figure 10. When the coverage is 100%, the distribution of the pits caused by the impacts seems to be uniform without obvious uplift and depression. With an increase in coverage, the uplift and depression become more obvious, which induces larger plastic deformations. A comparison between Figures 10C,D indicates that when the coverage reaches approximately 200% the surface morphology seems to be stable even by further increasing the coverage as per the numerical results.
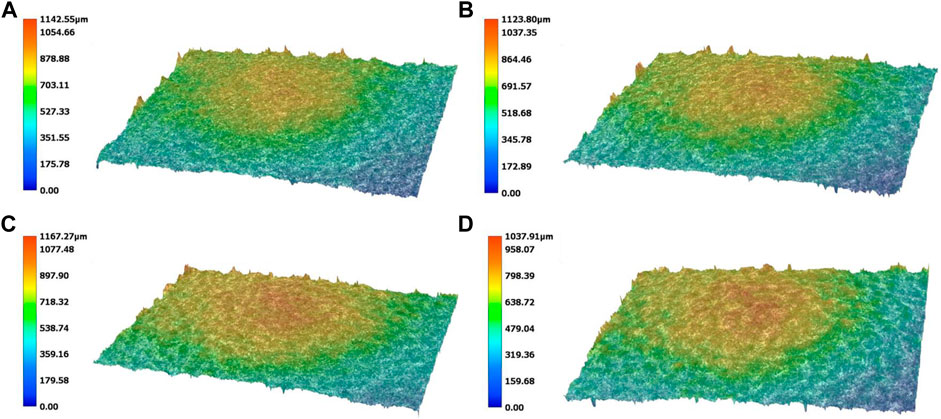
FIGURE 10. The overall observations of target surface morphologies under different coverages. (A) 100%, (B) 150%, (C) 200%, (D) 250%.
A quantitative comparison was then carried out. Table 8 shows that the experimental results are in general in agreement with corresponding numerical data for the residual stresses at varied depths from surface to subsurface with errors of less than 25%. It is also interesting to notice that some errors are larger than 100%. These were mainly caused by the experimental measurements and these results have not been considered in further analysis. As can be seen from Figure 11, for each coverage the overall residual compressive stress increases with an increase of the depth from the surface until reaching the maximum value, and then it gradually reduces. The surface residual compressive stress and the maximum residual compressive stress show an increasing trend with the increase of the coverage. It can therefore be deduced that the depth of the residual compressive stress layer should have a similar trend. Moreover, the depth of the maximum residual compressive stress first increases in terms of coverage to 150% before then reducing gradually. These findings show the overall trend with corresponding numerical results. Figure 11 also indicates 11 that when the coverage is 100% the overall value of the residual compressive stress from the surface to the subsurface is larger than that with other coverages, which indicates that in this situation further increasing the coverage can increase the shot peening performance. However, when the coverage is more than 150% the overall values of the residual compressive stress from the surface to the subsurface are similar, which demonstrates that in this situation further increasing the coverage may not improve the shot peening performance but induce the failure of the target. Therefore, considering the processing parameters in this study and its effect on the distribution of the residual compressive stress, it can be that reasonable coverage in the shot peening of ZGMn13 High Manganese Steel is between 150 and 200%, which agrees with the numerical study.
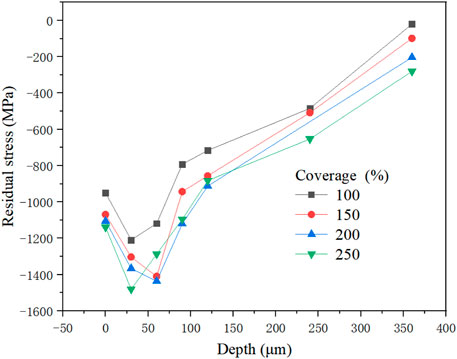
FIGURE 11. Relations between residual stress and depth from the surface to subsurface under different coverages.
Shot peening technology is a surface strengthening technology that can effectively enhance the ability of mechanical parts to resist fatigue failure and wear failure, but the influence of shot peening coverage on the evolution of residual stress and surface morphology is not fully clear. In this study, a comprehensive numerical and experimental study were conducted to explore the reasonable coverage of shot peening on ZGMn13 High Manganese Steel. The quantitative relation between the number of balls and the coverage were obtained in simulation and from the numerical study, indicating that both the surface and subsurface residual stress increases with the increase of the coverage before stabilizing. By using the Entropy Method the quantitative analysis has been conducted to explore the effects of the surface residual compressive stress, the maximum residual compressive stress, the depth of the maximum residual compressive stress, and the depth of the residual compressive stress layer on the performance of the shot peening process, which indicates that under the shot peening parameters considered in simulation the coverage of 200% is found to be best for the shot peening of ZGMn13 High Manganese Steel. Finally, a corresponding experimental study was carried out to verify the numerical results, and the results agreed well with the corresponding numerical data for the residual stresses at varied depths from the surface to the subsurface with errors of less than 25%. These research outcomes provide guidance on the shot peening process in obtaining the optimized surface strengthening of the target.
The raw data supporting the conclusions of this article will be made available by the authors, without undue reservation.
Conceptualization, HY; Data curation, YZ; Formal analysis, XY; Investigation, LZ; Software, LZ; Supervision, HY; Writing-original draft, ZY; Writing—review and editing, ZY.
This research was funded by the Natural Science Foundation of Zhejiang Province (LY20E050002, LZ21F020003, and LGG18E050001). The authors received support for experiments from Zhejiang Guanlin Machinery Inc. under the grant Key Research and Development Program of Zhejiang Province (2021C04011).
Authors LZ and WY are employed by the Zhejiang Guanlin Machinery Inc., Anji, China.
The remaining authors declare that the research was conducted in the absence of any commercial or financial relationships that could be construed as a potential conflict of interest.
All claims expressed in this article are solely those of the authors and do not necessarily represent those of their affiliated organizations, or those of the publisher, the editors and the reviewers. Any product that may be evaluated in this article, or claim that may be made by its manufacturer, is not guaranteed or endorsed by the publisher.
Alhumaidan, F. S., Hauser, A., Rana, M. S., Lababidi, H. M. S., and Behbehani, M. (2015). Changes in Asphaltene Structure during Thermal Cracking of Residual Oils: XRD Study. Fuel 150, 558–564. doi:10.1016/j.fuel.2015.02.076
Balbaa, M., Ghasemi, A., Fereiduni, E., Al-Rubaie, K., and Elbestawi, M. (2022). Improvement of Fatigue Performance of Laser Powder Bed Fusion Fabricated IN625 and IN718 Superalloys via Shot Peening. J. Mater. Process. Technol. 304, 117571. doi:10.1016/j.jmatprotec.2022.117571
Cheng, Z., Qin, S., and Fang, Z. (2022). Numerical Modeling and Experimental Study on the Material Removal Process Using Ultrasonic Vibration-Assisted Abrasive Water Jet. Front. Mater. 9, 895271. Accepted for Publication. doi:10.3389/fmats.2022.895271
Hu, W., Teng, Q., Hong, T., Saetang, V., and Qi, H. (2022). Stress Field Modeling of Single-Abrasive Scratching of BK7 Glass for Surface Integrity Evaluation. Ceram. Int. 48, 12819–12828. doi:10.1016/j.ceramint.2022.01.153
Ji, R., Zhang, L., Zhang, L., Li, Y., Lu, S., and Fu, Y. (2022). Processing Method for Metallic Substrate Using the Liquid Metal Lapping-Polishing Plate. Front. Mater. 9, 896346. doi:10.3389/fmats.2022.896346
Li, G., Wang, Y. X., Zeng, Y., and He, W. X. (2022). A New Maximum Entropy Method for Estimation of Multimodal Probability Density Function. Appl. Math. Model. 102, 137–152. doi:10.1016/j.apm.2021.09.029
Li, W., and Liu, B. (2018). Experimental Investigation on the Effect of Shot Peening on Contact Fatigue Strength for Carburized and Quenched Gears. Int. J. Fatigue 106, 103–113. doi:10.1016/j.ijfatigue.2017.09.015
Maleki, E., and Unal, O. (2018). Roles of Surface Coverage Increase and Re-peening on Properties of AISI 1045 Carbon Steel in Conventional and Severe Shot Peening Processes. Surfaces Interfaces 11, 82–90. doi:10.1016/j.surfin.2018.03.003
Menezes, M. R., Godoy, C., Buono, V. T. L., Schvartzman, M. M. M., and Avelar-Batista Wilson, J. C. (2017). Effect of Shot Peening and Treatment Temperature on Wear and Corrosion Resistance of Sequentially Plasma Treated AISI 316L Steel. Surf. Coatings Technol. 309, 651–662. doi:10.1016/j.surfcoat.2016.12.037
Prysyazhnyuk, P., Ivanov, O., Matvienkiv, O., Marynenko, S., Korol, O., and Koval, I. (2022). Impact and Abrasion Wear Resistance of the Hardfacings Based on High-Manganese Steel Reinforced with Multicomponent Carbides of Ti-Nb-Mo-V-C System. Procedia Struct. Integr. 36, 130–136. doi:10.1016/j.prostr.2022.01.014
Qi, H., Shi, L., Teng, Q., Hong, T., Tangwarodomnukun, V., Liu, G., et al. (2022). Subsurface Damage Evaluation in the Single Abrasive Scratching of BK7 Glass by Considering Coupling Effect of Strain Rate and Temperature. Ceram. Int. 48, 8661–8670. doi:10.1016/j.ceramint.2021.12.077
Qin, Z., Li, B., Zhang, H., Youani Andre Wilfried, T., Gao, T., and Xue, H. (2022). Effects of Shot Peening with Different Coverage on Surface Integrity and Fatigue Crack Growth Properties of 7B50-T7751 Aluminum Alloy. Eng. Fail. Anal. 133, 106010. doi:10.1016/j.engfailanal.2021.106010
Sun, H. X., Zhu, Y. L., Hou, S., Wang, Y. L., and Wang, W. (2016). Effects of Fatigue Load on Residual Stress and Microstructure of 17CrNiMo6 Shot Peening Strengthened Laye. China Surf. Eng. 29, 43–48. doi:10.11933/j.issn.1007-9289.2016.04.006
Syed, B., Maurya, P., Lenka, S., Padmanabham, G., and Shariff, S. (2021). Analysis of High Strength Composite Structure Developed for Low-Carbon-Low-Manganese Steel Sheet by Laser Surface Treatment. Opt. Laser Technol. 143, 107285. doi:10.1016/j.optlastec.2021.107285
Teng, T. (2011). Simulation Research of ZGMn13 Drilling Force and Temperature Based on ABAQUS. Master. Dalian, China: Dalian Jiaotong University.
Unal, O., Maleki, E., Karademir, I., Husem, F., Efe, Y., and Das, T. (2022). Effects of Conventional Shot Peening, Severe Shot Peening, Re-shot Peening and Precised Grinding Operations on Fatigue Performance of AISI 1050 Railway Axle Steel. Int. J. Fatigue 155, 106613. doi:10.1016/j.ijfatigue.2021.106613
Wu, J., Liu, H., Wei, P., Zhu, C., and Lin, Q. (2020). Effect of Shot Peening Coverage on Hardness, Residual Stress and Surface Morphology of Carburized Rollers. Surf. Coatings Technol. 384, 125273. doi:10.1016/j.surfcoat.2019.125273
Yan, W., Fang, L., Sun, K., and Xu, Y. (2007). Effect of Surface Nanocrystallization on Abrasive Wear Properties in Hadfield Steel. J. Xi'an Jiaot. Univ. 41, 611–615. doi:10.3321/j.issn:0253-987X.2007.05.024
Zhang, L., Zheng, B., Xie, Y., Ji, R., Li, Y., and Mao, W. (2022). Control Mechanism of Particle Flow in the Weak Liquid Metal Flow Field on Non-uniform Curvature Surface Based on Lippmann Model. Front. Mater. 9, 895263. Accepted for publication. doi:10.3389/fmats.2022.895263
Zhao, J., Tang, J., Zhou, W., Jiang, T., Liu, H., and Xing, B. (2022). Numerical Modeling and Experimental Verification of Residual Stress Distribution Evolution of 12Cr2Ni4A Steel Generated by Shot Peening. Surf. Coatings Technol. 430, 127993. doi:10.1016/j.surfcoat.2021.127993
Keywords: shot peening, residual stress, reasonable coverage, entropy method, ZGMn13
Citation: Yuan H, You Z, Zhuo Y, Ye X, Zhu L and Yang W (2022) Numerical and Experimental Study on Reasonable Coverage of Shot Peening on ZGMn13 High Manganese Steel. Front. Mater. 9:897718. doi: 10.3389/fmats.2022.897718
Received: 16 March 2022; Accepted: 06 April 2022;
Published: 19 May 2022.
Edited by:
Guijian Xiao, Chongqing University, ChinaReviewed by:
Shibo Kuang, Monash University, AustraliaCopyright © 2022 Yuan, You, Zhuo, Ye, Zhu and Yang. This is an open-access article distributed under the terms of the Creative Commons Attribution License (CC BY). The use, distribution or reproduction in other forums is permitted, provided the original author(s) and the copyright owner(s) are credited and that the original publication in this journal is cited, in accordance with accepted academic practice. No use, distribution or reproduction is permitted which does not comply with these terms.
*Correspondence: Zhangping You, eW91enBpbmdAMTYzLmNvbQ==
Disclaimer: All claims expressed in this article are solely those of the authors and do not necessarily represent those of their affiliated organizations, or those of the publisher, the editors and the reviewers. Any product that may be evaluated in this article or claim that may be made by its manufacturer is not guaranteed or endorsed by the publisher.
Research integrity at Frontiers

Learn more about the work of our research integrity team to safeguard the quality of each article we publish.