
95% of researchers rate our articles as excellent or good
Learn more about the work of our research integrity team to safeguard the quality of each article we publish.
Find out more
ORIGINAL RESEARCH article
Front. Mater. , 03 December 2021
Sec. Environmental Degradation of Materials
Volume 8 - 2021 | https://doi.org/10.3389/fmats.2021.794701
This article is part of the Research Topic Machining Technology and Environmental Degradation Mechanism of Surface Microstructure of Special Materials View all 10 articles
Machine parts made of nickel-based alloys usually work in high-temperature service environments such as aircraft turbines. The mechanical properties and antioxidant properties of materials tend to be reduced at high temperatures. Therefore, it is of great practical significance to reveal the wear mechanisms of materials at different temperatures. In the present investigation, the tribological behaviour of an Inconel 718 superalloy at different temperatures was investigated. First, the coefficient of friction curves obtained under different test conditions were analysed in detail to illustrate the dynamic change process of friction at high temperature. Next, the morphology of the wear surface, surface morphology of friction pairs and material transfer during friction were analysed via scanning electron microscopy 3D morphology and energy dispersive spectroscopy measurements to reveal the wear mechanisms of materials in a high-temperature environment. Finally, the microstructure of the cross section of the wear tracks was analysed by using optical microscopy electron back-scattered diffraction etc., to clarify the mechanisms of crack initiation and material removal. The results show that the friction properties of the Inconel 718 superalloy have differences at different test temperatures. Although increasing the test temperature does not necessarily aggravate the wear of the material, the oxidation of the wear surface during the friction process significantly increases. In addition, when the contact load increases, the thickness of the oxide layer and wear of the material simultaneously increase.
High-temperature alloys are materials with excellent strength, creep resistance and fatigue resistance at working temperatures above 600°C (Reed, 2008). A nickel-based superalloy is a preferred material with excellent mechanical capability and mechanical performance when it needs long service in harsh environments such as high-temperature and high-pressure situations (Pollock and Tin, 2006; González-Fernández et al., 2012; Zheng et al., 2012). However, because the material has long been serving under high temperature and harsh conditions, the actual service life of components is much lower than the design life in practical engineering applications (Mazur et al., 2005; Vardar and Ekerim, 2007). In addition, the material surface damage caused by friction, especially the wear damage under high temperature conditions, causes the early failure of components (Laguna-Camacho et al., 2016). The early fracture and failure of these components seriously restrict the service safety of the equipment. For example, when an aero engine serves in a high-temperature environment for a long time, the turbine and blades of the engine are prone to damage due to fretting wear and fretting fatigue (Lavella and Botto, 2019). Thus, accidents and exposed hidden dangers can hinder passenger safety and the development of the national economy. Therefore, it has great practical significance to reveal the wear mechanisms of materials at different temperatures. In previous studies, many researchers have investigated the mechanical properties of nickel-based superalloys, e.g., the influence of high temperature on the microstructure of materials (Lu et al., 2013; Deng et al., 2015; An et al., 2019; Gao et al., 2019). Liu (Lu et al., 2013) studied the microstructure, tension and stress rupture properties of GH4169 superalloys after long-term thermal exposure. These authors found that the tensile strength at room temperature and 650°C slowly decreased and the stress rupture life remarkably decreased with increasing thermal exposure time. An (An et al., 2019) investigated the evolution of the microstructures and properties of a GH4169 superalloy during high-temperature processing. These researchers found that superalloys decreased the tensile strength and yield strength and increased the ductility with increasing temperature and time. Due to strengthening, precipitates such as the γ′ and γ″ phases in the grains and carbides in the grain boundaries gradually dissolve in the matrix. Other researchers have studied the fatigue and mechanical properties of superalloys from the viewpoint of high-temperature creep (Lund and Nix, 1976; Yeh et al., 2011; Chen et al., 2016; Long et al., 2019). Chen et al. (2016) studied the low cycle fatigue and creep-fatigue interaction behaviour of the nickel-base superalloy GH4169 at an elevated temperature of 650°C. They concluded that creep and oxidation at high temperatures greatly affected the fatigue life, especially for long holding periods. The effect of temperature on the wear mechanism of materials is also a focus of researchers (Günen, 2020; Li et al., 2020; Döleker et al., 2021). Zhen (Döleker et al., 2021) studied the influence of the test temperature on the tribological properties of nickel-based alloys. Through observation and analysis, the mechanism of friction wear was discussed. These scholars found that the composite had a good lubrication effect in a wide temperature range of 25–800°C. Ali Günen (2020) used a ball-on-disk tribometer under dry sliding conditions at temperatures of 25°C, 400°C, and 750°C, and the high-temperature dry sliding wear mechanism of Inconel 718 was investigated. These investigators thought that two-body abrasion was the effective wear mechanism in the superalloy, and the wear increased when the temperature increased. However, fewer researchers have investigated the effects of temperature on its wear mechanism from the viewpoint of microstructural evolution.
Inconel 718 is a precipitation-reinforced superalloy (Li et al., 2019) that is widely used in aerospace applications, the nuclear power industry and national defence technology due to its good high-temperature structural stability, oxidation resistance, and excellent fatigue and creep resistance (Chen et al., 2015; Lin et al., 2015). Therefore, the microstructure evolution was examined to explore the effect of temperature on the wear properties of the Inconel 718 superalloy. This approach can effectively reveal the wear mechanism of materials in different temperature environments and ultimately provide scientific guidance to improve their service life at high temperatures.
In the present study, the blades of assembled turbines are often coated with ceramic coatings. The primary chemical compositions of the Inconel 718 superalloy are listed in Table 1. The chemical compositions of the material are within the standard. The metallurgical structure of the material is shown in Figure 1. The preparation of test materials and the test methods are described in Ref. (Xu et al., 2021). Namely, the high-temperature friction tests were examined on a rotating tribo-tester system (Bruker, UMT-TriboLab, United States) via a ball-to-plate contact mode. The testing device are shown in Figure 2A. By rotating the disk, motion between friction pairs can be realized. Friction tests were conducted for 15 min at test temperatures of 500°C and 700°C. A high-temperature friction test schematic diagram is shown in Figure 2B. The Inconel 718 superalloy specimen included a round plate with a diameter and height of Φ20 and 5 mm, respectively. A Si3N4 ball with a diameter of 9 mm was selected. In the tests, the wear track diameter is Φ10 mm. The rate of rotation (ω) was selected to be 200 rpm. The normal loads were selected to be 3 and 5 N, which corresponded to maximum contact stresses of 801 and 950 MPa, respectively.
In the high-temperature friction test, the coefficient of friction (COF) curve during the test was recorded in real time. An analysis of the value and change in COF can reveal the mechanism of friction and wear. The COF curves under different test conditions are shown in Figure 3. From Figure 3A, the COF curve progresses through three typical stages: 1) In the initial stage, the COF curve sharply rises. With the beginning of the high-temperature friction test, the contact pair is in direct contact with the matrix, and the typical two-body contact causes a sharp increase in friction coefficient. 2) In the decreasing stage, when the test continues, the oxidized debris produced by friction and wear enters the contact zone. The two-body contact model becomes a typical three-body contact model. The oxidized debris plays the role of lubrication and effectively improves the state of dry friction. Thus, the COF slowly decreases. 3) In the stabilization stage, the COF value is stable, and the friction experiment enters a stable period. Figure 3A also shows that the COF curve requires a shorter time to enter the stabilization stage at 700°C. A possible reason is that compared with those at 500°C, the mechanical properties of the material were reduced, and it was easier to yield at 700°C. In other words, it was easier to produce oxidized debris in the process of friction and wear when the material became soft. Therefore, the friction experiment can more quickly transition from the second stage to the third stage. Combined with Figures 3(A,B) , the average COF in the friction process is lower when the temperature is higher. This phenomenon occurred in the friction tests regardless of the normal load at 3 and 5 N. In addition, at the same temperature, a high normal load, which corresponded to a lower average COF, was observed. These phenomena will be discussed in the analysis of surface wear tracks. Further analysis will be combined with the COF and evolution of surface wear to reveal the wear mechanism of the 718 alloy at different temperatures.
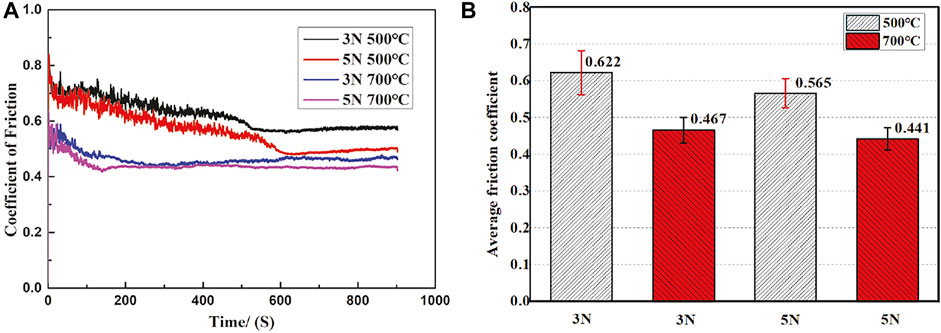
FIGURE 3. The coefficient of frictional curves and average friction coefficient under different conditions during the tribological tests: (A) coefficient of friction curves; (B) average friction coefficient.
After the high-temperature friction experiments, the morphology and 3D profile of the wear surface are shown in Figure 4. The wear surface of the Inconel 718 alloy at 500°C was more irregular than that at 700°C. However, under identical test temperature conditions, the wear of the material increased with increasing normal load. By more intuitively comparing the wear tracks under different conditions, Figure 5 shows the 2D profile of the wear surface. As shown in Figure 5, both depth and width of the wear tracks were larger at 500°C than at 700°C under identical normal load conditions. Thus, the wear of the material is more serious at 500°C. Combined with the results of Figure 4 and Figure 5, the damage states of the wear surface at the two temperatures were not identical. At 500°C, the main worn mechanisms were abrasive wear, stripping and oxidative wear. At 700°C, there was mainly adhesive wear, oxidative wear and thermal creep of the materials. Therefore, the wear was more serious, and the wear tracks were more irregular when the temperature was 500°C.
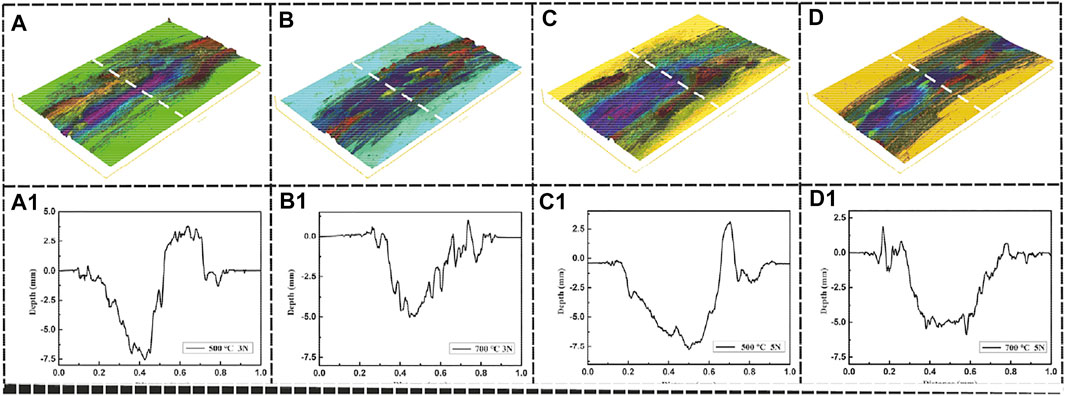
FIGURE 4. 3D morphology and 2D profile of worm surface: (A), (a1):Fn = 3N, T = 500°C; (B), (b1): Fn = 3N, T = 700°C; (C), (c1): Fn = 5N, T = 500°C; (D), (d1): Fn = 5N, T = 700°C.
To reveal the wear mechanisms, after the friction test, the worn surface was observed by scanning electron microscopy (SEM), as shown in Figure 6. In Figures 6A,B, the wear surface of the specimens was irregular at 500°C. The wear damage of tracks was also uneven. As shown in Figure 6(A-1) and Figure 6(B-1), some areas have severe spalling, and other areas show the characteristics of abrasive wear. Figure 6(A-1) also presents the characteristics of adhesive wear. Therefore, with an increase in normal load from 3 to 5 N, the adhesive wear in the wear mechanism is more obvious.
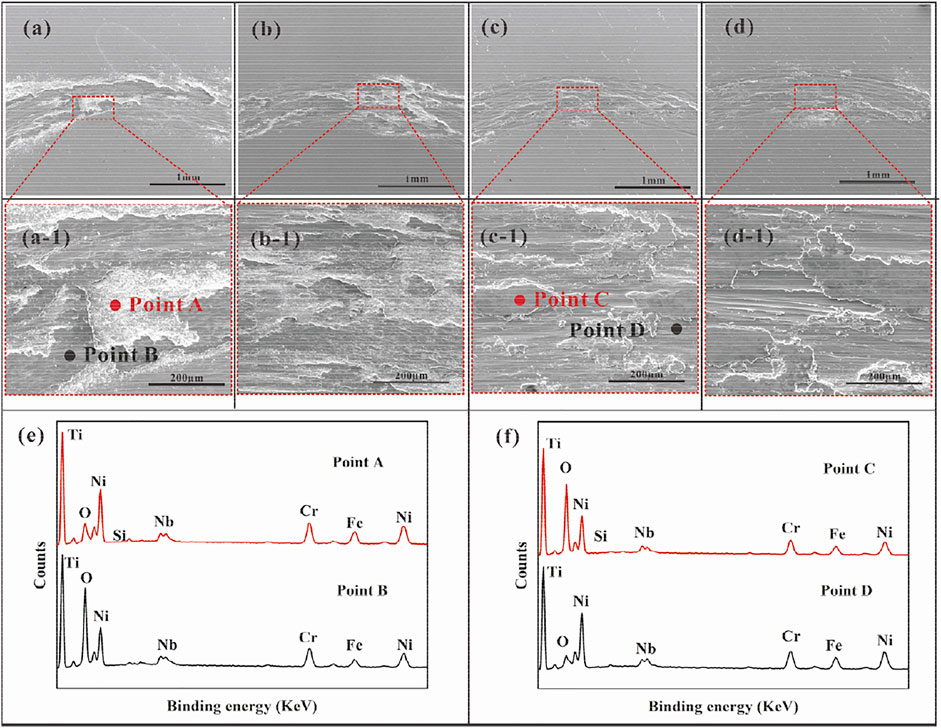
FIGURE 6. SEM picture of worn surface: (A): Fn = 3N, T = 500°C; (B): Fn = 5N, T = 500°C; (C): Fn = 3N, T = 700°C; (D): Fn = 5N, T = 700°C.
The energy dispersive spectroscopy (EDS) testing results in Figure 6A show that O was present on the surface, as shown in Figure 6E. This result indicates that oxidation wear occurred during friction, and the peeling debris was oxidized. However, the width of the wear tracks decreased but was more well distributed at 700°C. The wear surface also exhibited abrasive wear, but the main wear mechanism was adhesive wear. The EDS testing results showed that the oxidation reaction also occurred on the worn surface, as shown in Figure 6F. Moreover, the surface of the material shows high-temperature creep under the action of a contact load. Comparing the two-dimensional depth in Figure 5, the depth of the wear marks is deeper at 500°C than that under identical conditions at 700°C. The main reason for this difference may be temperature. The hardness of the material decreases at 700°C compared to that at 500°C. The softer material has better plastic deformation, and it is more difficult to produce cracks and surface peeling during friction. Moreover, the abrasive wear of the material is more serious at 500°C, which leads to an increase in wear. As a result, when the friction test was conducted at 700°C, the wear of the material slowed compared to that at 500°C. The EDS test results show that Si was found at the wear surface at both temperatures, which indicates material transfer between the sample and the friction pairs. A further analysis of the material transfer will be presented in the next section.
Figure 7 shows the wear morphology of the friction pairs under different test conditions. Due to the point contact mode between the friction pairs and the test sample, the wear spot of the friction ball presents an irregular ellipse. As shown in Figure 7, the morphology of the wear spot is typical of dry friction. Thus, there is an obvious phenomenon of material transfer on the surface. Accordingly, the EDS results also demonstrate that the alloy material was transferred to the surface of the friction pairs during the friction process. In addition, the results show that the normal load has no obvious effect on the size of the wear spot. However, the temperature directly affects the wear spot size of the friction ball. At 500°C, there is a larger area of wear spot for the friction pairs. However, the material transfer in the wear spot is more dispersed. This is not like a phenomenon of bulk accumulation at 700°C. The main reason is that the hardness of the matrix material at 500°C is high. The main wear mechanism is abrasive wear. Abrasive wear leads to the dispersion of minute wear debris. At 700°C, the matrix material becomes soft. The abrasion wear decreases with increasing adhesion wear. Therefore, the morphology of wear spots mainly shows characteristics of adhesion wear.
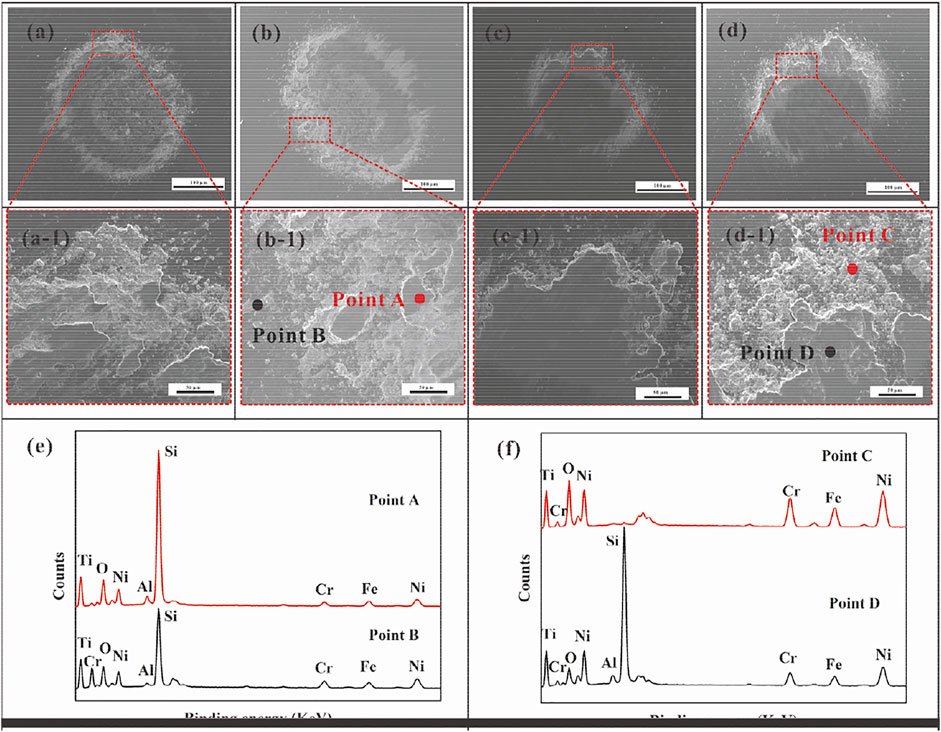
FIGURE 7. SEM images and EDS analysis of the wear scars on the counterpart Si3N4 ball under different conditions: (A): 3N, 500°C; (B): 5N, 500°C; (C): 3N, 700°C; (D): 5N, 700°C; (E) (F): the element content map of EDS.
The analysis of the cross section of wear tracks mainly clarifies the microstructure evolution and crack initiation mechanism during friction. At 500°C, the morphology of the cross section under different contact loads is shown in Figure 8. In Figures 8(A–D), the groove formed by wear can be found on the surface layer of the sample. Some cracks can also be found in the surface layer. The cracks were distributed at different depths on the surface layer of the sample, as shown in Figure 8C. The EDS tests were performed on different depth surface layers of the sample in Figure 8(C), which shows that the presence of O elements was detected in the surface layer that formed the crack. Thus, it can be speculated that the crack layer is an oxide layer that formed on the sample surface during high-temperature friction. The metallurgical structure of the cross section was prepared using a corrosion solution (copper sulfate pentahydrate + hydrochloric acid + alcohol), as shown in Figures 8B,D. The metallurgical image results verified the previous calculation that the sample surface contained an oxide layer. The surface of the material was subjected to the combined action of the normal stress and friction shear stress, which initiated and propagated microcracks. Simultaneously, oxidation of the sample surface occurred due to the high temperature and dry friction action. When the cracks propagated and connected with one another, the oxidation layer stripped the sample surface and eventually formed oxidation debris. The oxidation layer thickened with increasing normal loads. Thus, the thickness of the oxidation layer is affected by the normal loads. The high normal load acts on the sample surface and produces a higher contact stress and a deeper influence depth. The sample surface has a thicker oxidation layer.
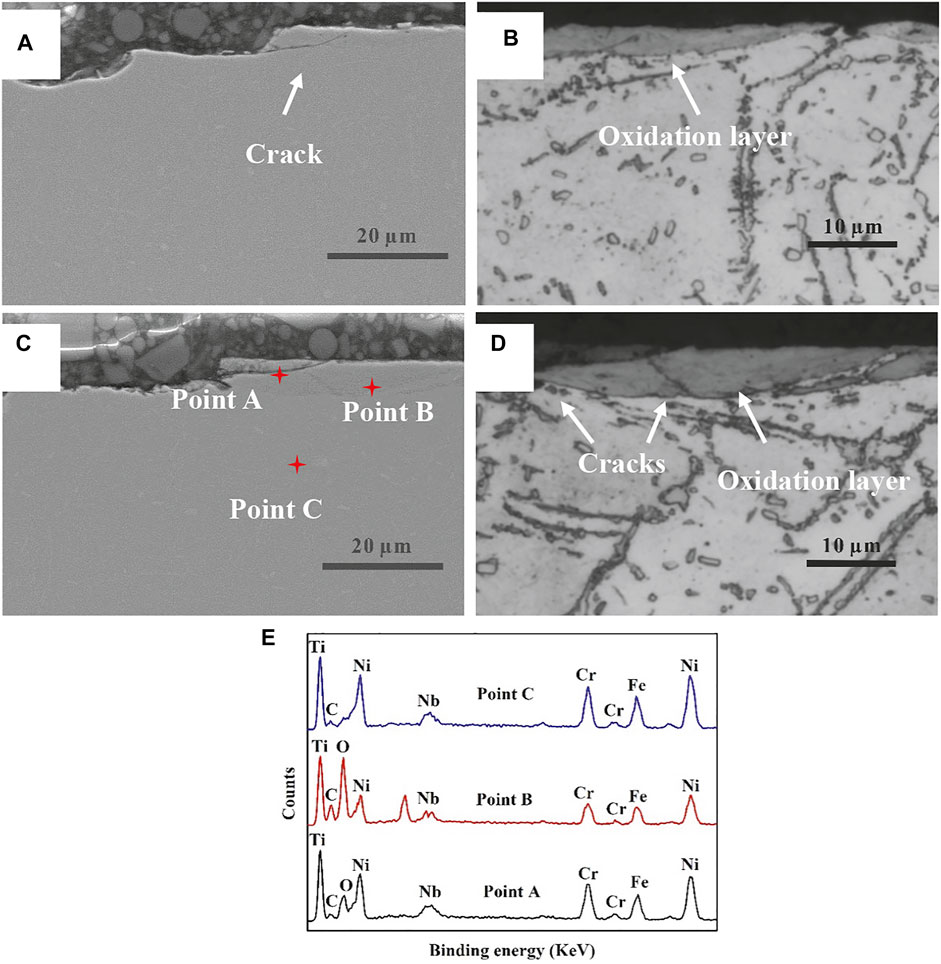
FIGURE 8. SEM picture of the cross-section (T = 500°C): (A),(B) Fn = 3N; (C),(D) Fn = 5N; (E) eds-point.
These phenomena can also be found at 700°C. The difference is that the thickness of the oxidation layer significantly increases at higher temperatures, as shown in Figure 9, possibly because the rate of oxidation is faster on the material surface. Therefore, the material surface oxidation increases during the same friction time. Another reason is that the material becomes softer at 700°C than at 500°C, and the depth affected by the contact stress increases, which thickens the oxidation layer of the sample surface. The EDS map analysis results of the cross section are shown in Figure 9(E). The Ni, Fe, and Cr contents are higher in the matrix material. There is hardly any O present. However, a large amount of O can be found on the surface of the sample. This result validates the previous inference that oxide layers appeared on the surface.
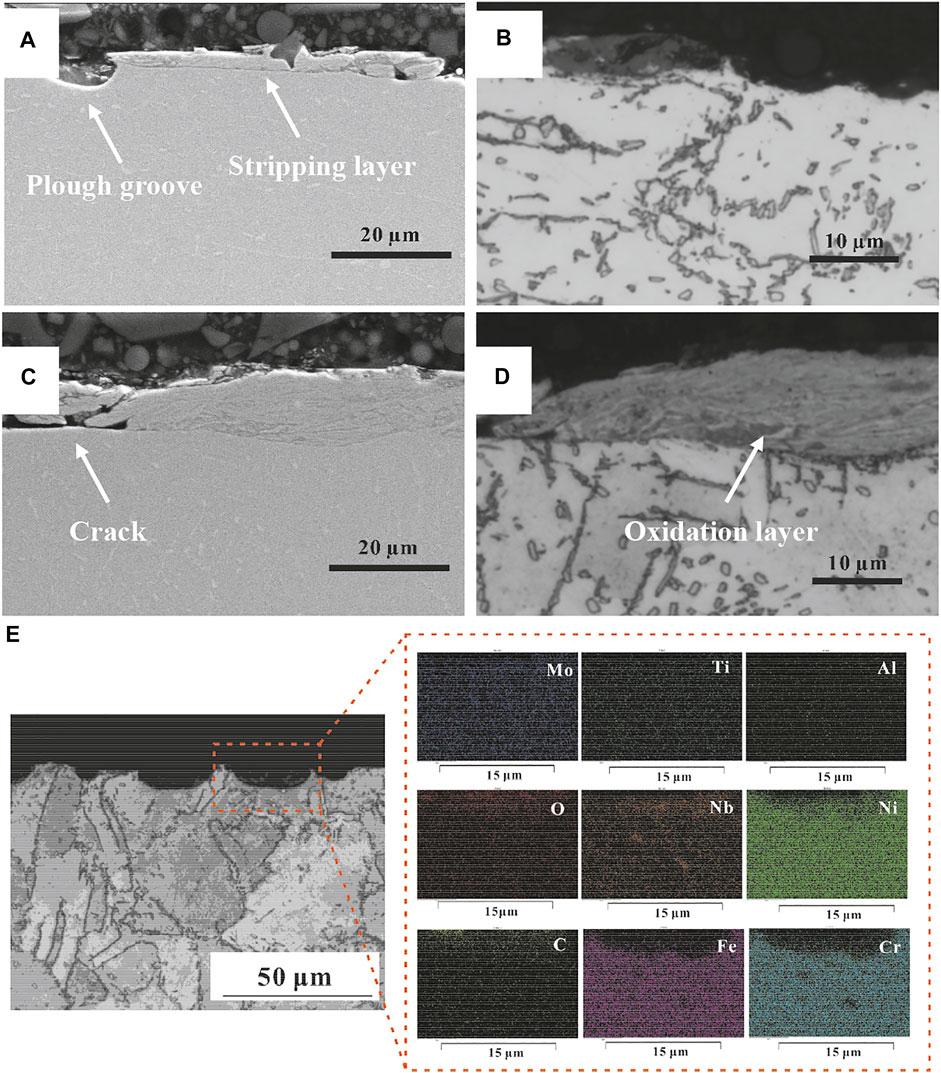
FIGURE 9. SEM picture of the cross-section (T = 700°C): (A), (B) Fn = 3N; (C),(D) Fn = 5N; (E) eds-maps.
The EBSD results of the cross section at different temperatures are shown in Figure 10 and Figure 11. Figure 10 shows the cross section of the wear track when the contact load Fn = 5 N and the test temperature is 500°C. Many grains are observed in Figure 10(A) with dislocation accumulation at the grain boundaries. Additionally, some twins were found in the grain. The appearance of twins indicates the stress concentration in the contact area. This result was mainly caused by the stress deformation of the material. Figure 10(B) shows that in the region of the cross section, high-angle grain boundaries (HAGBs) and angles greater than 10° (the yellow lines) dominate. Low-angle grain boundaries (LAGBs, with angles of 0–10°) form the subgrain boundaries by dislocation pile-up near the HAGBs. Geometrically necessary dislocations (GNDs) also confirm that dislocations accumulate near the grain boundaries. In Figure 10D, the GND value at the grain boundary is higher, especially at the location where the LAGB was formed. When the test temperature increases to 700°C, the EBSD result of the cross section is shown in Figure 11. Many dislocation cell structures were formed due to the generation and accumulation of dislocations, as seen in the subgrains in Figure 11A. The LAGB significantly increases at 500 °C, as shown in Figure 11B. Significant recrystallization occurs in the microstructure of the material at higher temperatures. The phenomena correspond to the previous results of wear analysis. Although the test temperature increases, the wear of the material does not increase. The main reason is that the material is softer at higher temperatures, so the material deforms more at identical contact loads. Finally, severe recrystallization occurs at 700°C. Thus, the recrystallization of the material is mainly affected by the temperature. The action of contact stress mainly produces twin crystals and dislocations. The dislocations accumulate near the HAGBs, forming LAGBs (subgrain boundaries). The properties change due to the formation of cell structures in the microstructures of the material. Finally, the material effectively reduces wear damage through deformation.
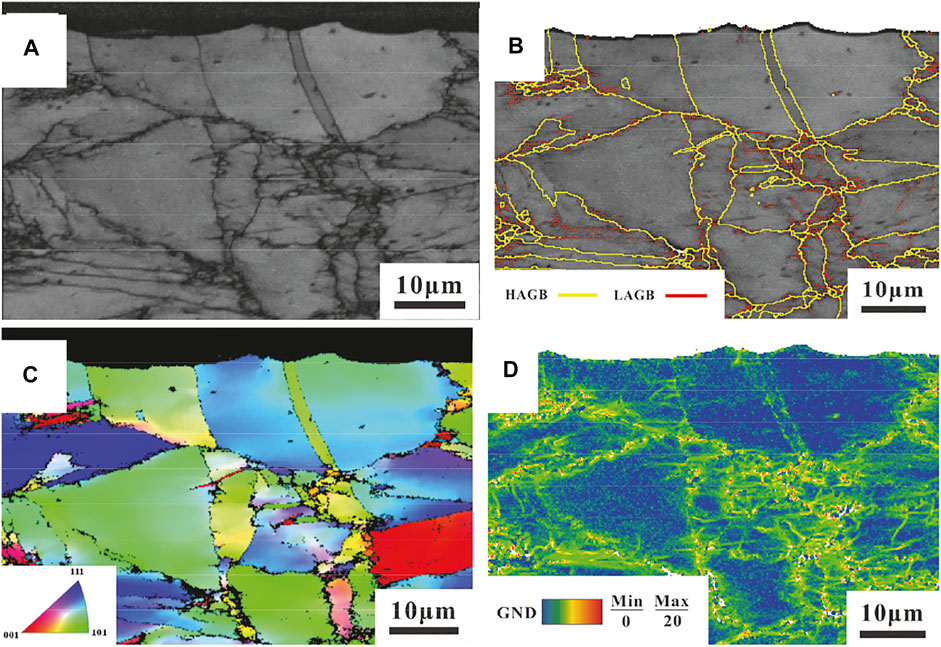
FIGURE 10. The EBSD results of cross section of worn surface at 500°C: (Fn = 5N: (A) (B) EBSD band contrast and phase map; (C) Inverse pole figure (IPF) map; (D) Geometrically necessary dislocation (GND) map).
(Fn = 5N:(a) (b) EBSD band contrast and phase map; (c) Inverse pole figure (IPF) map; 4) Geometrically necessary dislocation (GND) map;
In this study, the wear mechanisms and tribological behaviours of Inconel 718 against Si3N4 balls at different temperatures were investigated in detail. The conclusions are summarized as follows:
1. The wear mechanisms of the Inconel 718 superalloy materials are different at elevated temperatures. The wear mechanisms mainly include abrasive wear, oxidation wear and delamination wear at 500°C. However, the adhesive wear and oxidation wear became dominant in the wear mechanisms at 700°C. An oxide layer with a lubricating function appeared on the surface of the material under high-temperature conditions. Therefore, when the test temperature increases, the wear of the material decreases.
2. With increasing test temperature, the oxide layer significantly thickened. With increasing normal load, the oxide layer at identical test temperatures also thickened.
3. The microstructure of the material presents different changes under identical contact stress at different temperatures. At 500°C, the microstructure consists mainly of a twin structure and HAGBs. At 700°C, it mainly consists of the dislocation structure of LAGBs and dislocation cells.
The original contributions presented in the study are included in the article/Supplementary Material, further inquiries can be directed to the corresponding author.
ZX: Experiment, Investigation, Method, Writing—original draft, Writing—review and editing, Funding acquisition. ZL: Experiment, Data handing, Formal analysis, Investigation. JZ: Formal analysis, Method. DL: Formal analysis, Investigation. JL: Investigation, Supervision. CL: Revision manuscript, Guidance, Funding acquisition.
The work was supported by National Natural Science Foundation of China (No. 52105202), Guangdong Basic and Applied Basic Research Foundation (No. 2020A1515011407), China Postdoctoral Science Foundation (2020M682631).
JZ was employed by AECC Aero Science and Technology Co.,Ltd.
The remaining authors declare that research was conducted in the absence of any commercial or financial relationship that could be construed as a potential conflict of interest.
All claims expressed in this article are solely those of the authors and do not necessarily represent those of their affiliated organizations, or those of the publisher, the editors and the reviewers. Any product that may be evaluated in this article, or claim that may be made by its manufacturer, is not guaranteed or endorsed by the publisher.
An, X. L., Zhang, B., Chu, C. L., Zhou, L., and Chu, P. K. (2019). Evolution of Microstructures and Properties of the GH4169 Superalloy during Short-Term and High-Temperature Processing. Mater. Sci. Eng. A 744, 255–266. doi:10.1016/j.msea.2018.12.019
Chen, F., Liu, J., Ou, H., Lu, B., Cui, Z., and Long, H. (2015). Flow Characteristics and Intrinsic Workability of IN718 Superalloy. Mater. Sci. Eng. A 642, 279–287. doi:10.1016/j.msea.2015.06.093
Chen, G., Zhang, Y., Xu, D. K., Lin, Y. C., and Chen, X. (2016). Low Cycle Fatigue and Creep-Fatigue Interaction Behavior of Nickel-Base Superalloy GH4169 at Elevated Temperature of 650 °C. Mater. Sci. Eng. A 655, 175–182. doi:10.1016/j.msea.2015.12.096
Deng, D.-W., Wang, C.-G., Liu, Q.-Q., and Niu, T.-T. (2015). Effect of Standard Heat Treatment on Microstructure and Properties of Borided Inconel 718. Trans. Nonferrous Met. Soc. China 25 (2), 437–443. doi:10.1016/s1003-6326(15)63621-4
Döleker, K. M., Erdogan, A., Yener, T., Karaoglanlı, A. C., Uzun, O., Gök, M. S., et al. (2021). Enhancing the Wear and Oxidation Behaviors of the Inconel 718 by Low Temperature Aluminizing. Surf. Coat. Technol. 412, 127069. doi:10.1016/j.surfcoat.2021.127069
Gao, Y., Zhang, D., Cao, M., Chen, R., Feng, Z., Poprawe, R., et al. (2019). Effect of δ Phase on High Temperature Mechanical Performances of Inconel 718 Fabricated with SLM Process. Mater. Sci. Eng. A 767, 138327. doi:10.1016/j.msea.2019.138327
González-Fernández, L., Del Campo, L., Pérez-Sáez, R. B., and Tello, M. J. (2012). Normal Spectral Emittance of Inconel 718 Aeronautical alloy Coated with Yttria Stabilized Zirconia Films. J. alloys Compd. 513, 101–106. doi:10.1016/j.jallcom.2011.09.097
Günen, A. (2020). Properties and High Temperature Dry Sliding Wear Behavior of Boronized Inconel 718. Metallurgical Mater. Trans. A 51 (2), 927–939. doi:10.1007/s11661-019-05577-3
Laguna-Camacho, J. R., Villagrán-Villegas, L. Y., Martínez-García, H., Juárez-Morales, G., Cruz-Orduña, M. I., Vite-Torres, M., et al. (2016). A Study of the Wear Damage on Gas Turbine Blades. Eng. Fail. Anal. 61, 88–99. doi:10.1016/j.engfailanal.2015.10.002
Lavella, M., and Botto, D. (2019). Fretting Wear of alloy Steels at the Blade Tip of Steam Turbines. Wear 426-427, 735–740. doi:10.1016/j.wear.2019.01.039
Li, L., He, K., Sun, S., Yang, W., Yue, Z., and Wan, H. (2020). High-Temperature Friction and Wear Features of Nickel-Based Single Crystal Superalloy. Tribology Lett. 68 (1), 1–12. doi:10.1007/s11249-020-1266-4
Li, X., Shi, J. J., Cao, G. H., Russell, A. M., Zhou, Z. J., Li, C. P., et al. (2019). Improved Plasticity of Inconel 718 Superalloy Fabricated by Selective Laser Melting through a Novel Heat Treatment Process. Mater. Des. 180, 107915. doi:10.1016/j.matdes.2019.107915
Lin, Y. C., Li, K.-K., Li, H.-B., Chen, J., Chen, X.-M., and Wen, D.-X. (2015). New Constitutive Model for High-Temperature Deformation Behavior of Inconel 718 Superalloy. Mater. Des. 74, 108–118. doi:10.1016/j.matdes.2015.03.001
Long, H., Mao, S., Liu, Y., Wei, H., Deng, Q., Chen, Y., et al. (2019). Effect of Pre-Straining Treatment on High Temperature Creep Behavior of Ni-Based Single crystal Superalloys. Mater. Des. 167, 107633. doi:10.1016/j.matdes.2019.107633
Lu, X. D., Du, J. H., and Deng, Q. (2013). High Temperature Structure Stability of GH4169 Superalloy. Mater. Sci. Eng. A 559, 623–628. doi:10.1016/j.msea.2012.09.001
Lund, R. W., and Nix, W. D. (1976). High Temperature Creep of Ni-20Cr-2ThO2 Single Crystals. Acta Metallurgica 245, 469–481. doi:10.1016/0001-6160(76)90068-7
Mazur, Z., Luna-Ramírez, A., Juárez-Islas, J. A., and Campos-Amezcua, A. (2005). Failure Analysis of a Gas Turbine Blade Made of Inconel 738LC Alloy. Eng. Fail. Anal. 12 (3), 474–486. doi:10.1016/j.engfailanal.2004.10.002
Pollock, T. M., and Tin, S. (2006). Nickel-Based Superalloys for Advanced Turbine Engines: Chemistry, Microstructure and Properties. J. propulsion Power 22 (2), 361–374. doi:10.2514/1.18239
Reed, R. C. (2008). The Superalloys: Fundamentals and Applications. Cambridge: Cambridge University Press.
Vardar, N., and Ekerim, A. (2007). Failure Analysis of Gas Turbine Blades in a Thermal Power Plant. Eng. Fail. Anal. 14 (4), 743–749. doi:10.1016/j.engfailanal.2006.06.001
Xu, Z., Huang, Z., Zhang, J., Xu, X., Li, P., Su, F., et al. (2021). Tribological Behaviors and Microstructure Evolution of Inconel 718 Superalloy at Mid-High Temperature. J. Mater. Res. Technol. 14, 2174–2184. doi:10.1016/j.jmrt.2021.07.102
Yeh, A.-C., Lu, K.-W., Kuo, C.-M., Bor, H.-Y., and Wei, C.-N. (2011). Effect of Serrated Grain Boundaries on the Creep Property of Inconel 718 Superalloy. Mater. Sci. Eng. A 530, 525–529. doi:10.1016/j.msea.2011.10.014
Keywords: Inconel 718 superalloy, friction behaviours, wear mechanism, elevated temperature, EBSD
Citation: Xu Z, Lu Z, Zhang J, Li D, Liu J and Lin C (2021) The Friction and Wear Behaviours of Inconel 718 Superalloys at Elevated Temperature. Front. Mater. 8:794701. doi: 10.3389/fmats.2021.794701
Received: 14 October 2021; Accepted: 10 November 2021;
Published: 03 December 2021.
Edited by:
Guijian Xiao, Chongqing University, ChinaReviewed by:
Xia Jing, Jiangsu University of Science and Technology, ChinaCopyright © 2021 Xu, Lu, Zhang, Li, Liu and Lin. This is an open-access article distributed under the terms of the Creative Commons Attribution License (CC BY). The use, distribution or reproduction in other forums is permitted, provided the original author(s) and the copyright owner(s) are credited and that the original publication in this journal is cited, in accordance with accepted academic practice. No use, distribution or reproduction is permitted which does not comply with these terms.
*Correspondence: Chengxiong Lin, bGN4MzYyNUAxMjYuY29t
Disclaimer: All claims expressed in this article are solely those of the authors and do not necessarily represent those of their affiliated organizations, or those of the publisher, the editors and the reviewers. Any product that may be evaluated in this article or claim that may be made by its manufacturer is not guaranteed or endorsed by the publisher.
Research integrity at Frontiers

Learn more about the work of our research integrity team to safeguard the quality of each article we publish.