- College of Mechatronics and Control Engineering, Shenzhen University, Shenzhen, China
In this work, a rapid and controllable ultrasonic vibration method for forming Al-based metallic glass at room temperature is proposed. This method can dramatically improve the forming ability of Al-based metallic glasses, which are virtually brittle at room temperature and have almost no supercooled liquid region at high temperatures. Under ultrasonic vibration, Al-based metallic glasses exhibited obvious plastic flow, with a maximum deformation degree up to 58% and an average deformation degree up to 43%. It is worth mentioning that no crystalline peaks were found on the X-ray diffraction patterns after deformation under ultrasonic vibration, and the mechanical properties remained the same as the primary sample. The present results provide a new approach for the deformation and forming of Al-based metallic glasses, which can significantly broaden their applications.
Introduction
Since amorphous alloys were first explored in 1960 (Klement et al., 1960), their unique performance made them increasingly popular both in scientific research and engineering applications (Löffler, 2003; Inoue and Takeuchi, 2011; Lin et al., 2012). Their advantages include high strength, excellent magnetic properties, corrosion resistance, and wear resistance (Schuh et al., 2007; Gao et al., 2012; Gerard et al., 2020; Li et al., 2021; Wu et al., 2021). Since its discovery in 1988, Al-based metallic glass (MG) has attracted much attention due to its high specific strength and huge potential applications (He et al., 1988). In addition, the tensile strength of bulk Al-based MG at room temperature can reach 1,200 MPa (He et al., 1993; Inoue, 1998), which has a good application prospect in aviation, marine, and other fields (Inoue et al., 1989; Kim et al., 1991; Inoue, 1998; Ashby and Greer, 2006; Li et al., 2013). Currently, the main methods for preparing Al-based MG include rapid solidification and mechanical alloying (Guo et al., 2000; Choi et al., 2007; Sasaki et al., 2008; Mula et al., 2010). A common method for the preparation of amorphous alloy ribbons is the melt spinning method of rapid solidification. It is well known that Al-based MG has a relatively weak glass-forming ability (GFA) (Greer, 2014; Wu et al., 2016), and there is still a great difficulty in bulk preparation. Therefore, to investigate the properties of Al-based MGs, an easy-forming melt spinning method was used to prepare Al-based MG ribbons. Moreover, at room temperature, the plasticity of Al-based bulk MG is extremely low. The MG plasticity of Al-rich is only 4% (Yang et al., 2009). The tensile ductility is only 5% at high temperature (He et al., 2020). Furthermore, at high temperatures, Al-based MGs have a very narrow supercooled liquid region (SLR) (Yang et al., 2019), resulting in the lack of thermoplastic forming ability compared to Zr and novel metal based MGs (Inoue and Takeuchi, 2011; Lucena et al., 2020). This induces a great difficulty in processing and forming of Al-based MGs, even after their successful preparation, which limits the development of Al-based MGs. Consequently, it is of great significance to develop a suitable processing method for Al-based MGs.
In recent years, Ma et al. (2019) proposed a method for ultrasonic vibration (UV) processing of MGs at room temperature (Li et al., 2020a; Li et al., 2020b), which is called ultrasonic plasticity. Ultrasonic plasticity means that metallic glass exhibits a plasticity beyond the usual one under the environment of ultrasonic vibration, and this superplasticity can be applied to most metallic glasses. UV processing is a facile, cost-effective, and flexible approach for forming MG. By activating the stress relaxation within the ultra-thin surface layer under UV, the MG can soften and flow. Through this method, MGs can be processed by rapid fusion, welding, blanking, and compression (Li et al., 2020c; Liang et al., 2020; Sun et al., 2020). Even if the temperature does not increase above glass transition temperature (Tg), MG can undergo superplastic flow and “ultrasonic plastic” molding through UV. This way, MGs can be processed at room temperature without undergoing crystallization, and the forming ability of amorphous alloys can be significantly improved under ultrasonic conditions. Experimental UV treatment of Al-based metal glasses has been reported to be feasible (Li et al., 2019), but the extent to which forming ability can be improved by UV is still unknown. In the present work, the ultrasonic plastic forming method was applied to Al-based MGs, aiming at solving the problem of low forming ability at room temperature and poor SLR during forming. This study on the forming ability of Al-based MG under UV has great significance for the extensive applications of Al-based MG.
Experiment
Materials
In this work, a typical Al86Ni9La5 (at%) amorphous alloy ribbon with a width of 2–2.5 mm and a thickness of 30–50 μm was prepared through a conventional melt spinning process due to the weak forming ability of Al-based MGs. For the convenience of the experiment, the ribbons were cut into a length of about 15 mm.
Characterizations
X-ray diffraction (XRD; Rigaku MiniFlex600; Cu Kα) was used to determine the intrinsic nature of the Al-Ni-La amorphous alloy ribbons. The microstructure of the ribbons before and after UV was characterized using a FEI Quanta 450 FEG scanning electron microscope (SEM). The mechanical properties at the nanoscale were tested using a Hysitron TI 950 nanoindentation system (Bruck, Germany) equipped with a Berkovich tip. Differential scanning calorimetry (DSC; Perkin-Elmer DSC-8000) was used to detect the amorphous state of the Al-based ribbon samples at a temperature rate of 20°C/min. The focused ion beam (FIB; Gallium, Ga) was used to prepare the samples. The electron diffraction pattern acquisition and energy dispersive spectrometry were performed with a JEOL 2100F transmission electron microscope (TEM) equipped with an energy dispersive spectrometer (EDS). First, two ribbons with a length of approximately 15 mm were placed vertically into a mold. After fixing the position of the ribbons, an ultrasonic sonotrode (∼20,000 Hz) was used to apply vibration pressure to the ribbons for several seconds through the hole of the mold.
Experimental Setup
Figure 1A illustrates a schematic diagram of the experimental process on the amorphous alloy ribbons.
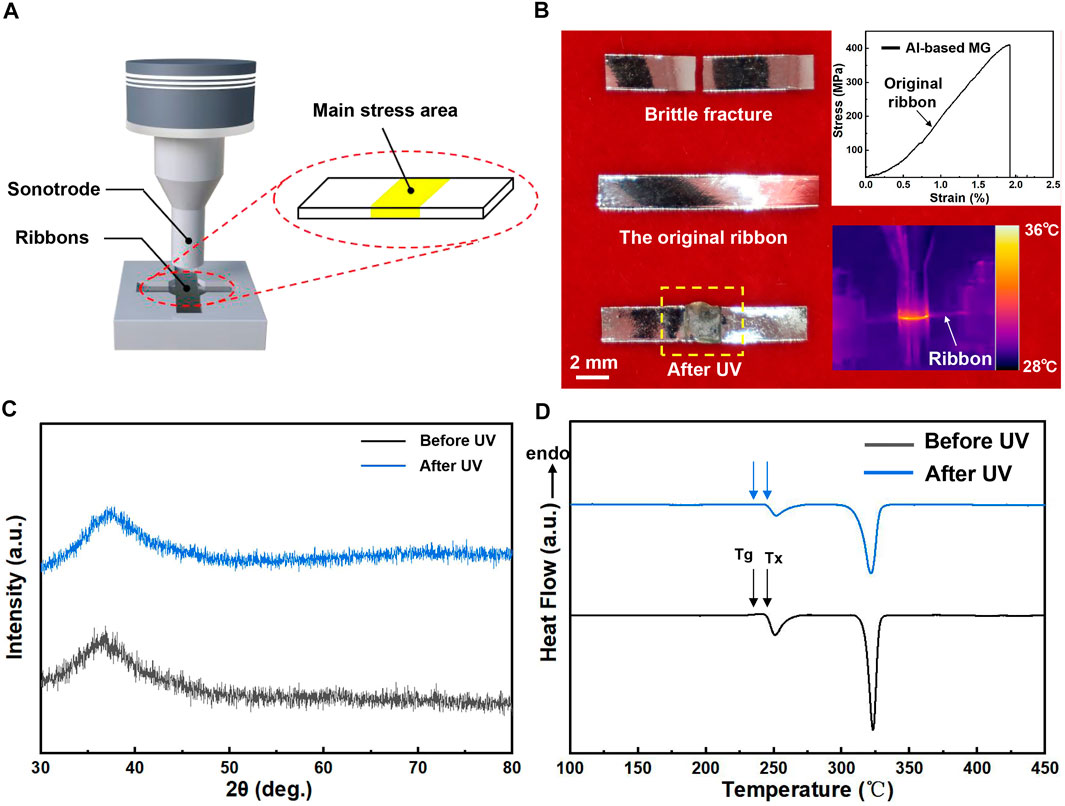
FIGURE 1. The forming ability of Al-based MG. (A) Schematic diagram of the experimental set-up. (B) Comparison of Al-based amorphous alloy ribbon samples before and after UV. Tensile ribbon exhibiting brittle fracture and the corresponding tensile stress-strain diagram. (C) and (D) XRD pattern and DSC curve of the amorphous alloy ribbon before and after UV, respectively.
Using an UV device. The experiments were conducted in a well-controlled energy mode, and the vibration was stopped only when the energy released from the ultrasonic sonotrode (Φ5 mm) reached the set value. Table 1 shows the results obtained after stepwise adjustment of energy, pressure and amplitude for part of this experiment. Samples one to four were arranged in the shape of “−“ for experiments, but the results were not satisfactory. Samples five to eight are the results obtained in a modified way, arranged in a “+” shape as shown in the schematic diagram of Figure 1A. Further analysis shows that this way the sample is subjected to more concentrated energy and pressure, and by boosting the energy but turning down the pressure and amplitude, the ribbon is able to flow and deform after a large area of softening. On the contrary, increasing the energy with excessive pressure and amplitude will cause the surface of the sample to crack before it can soften. Finally, the most appropriate outcome, where the deformation degree of the ribbon reaches its maximum without cracking, was determined. In general, it can be assumed that too much amplitude will make the ribbon break easily, while increasing the energy will soften the ribbon surface sufficiently before the maximum deformation is achieved.

TABLE 1. Some of the sample results obtained after adjusting the capacity, pressure and amplitude of the UV.
Results and Discussion
The Ribbons Before and After Ultrasonic Vibration
Figure 1B shows the ribbons before and after UV, and the ribbon fractured after stretching, while the inset shows the corresponding tensile stress-strain diagram. From the latter, it is evident that the original ribbon underwent brittle fracture after stretching. The original ribbon does not exhibit any ductility. After UV, the ribbon underwent large deformation, and the edge of the ribbon exhibited an overflowing phenomenon. At the macroscopic level, ultrasonic plasticity has been shown to occur in Al-based MGs after UV. The inset also shows the UV thermography of the ribbon at an energy of 300J, an amplitude of 80 μm, and a pressure of 100 KPa. The maximum temperature in the ribbon deformation zone is only 36°C, which is sufficient to show that our experiments are possible at room temperature.
Intrinsic Structure and Micro Morphology
Cut out the plastically deformed area of the ribbons for XRD and DSC, and compare the results with the original sample. Figure 1C compares the XRD patterns of the ribbons before and after UV. It can be observed that both patterns had only one broad diffraction peak and no crystalline peak, which is a typical characteristic of amorphous structures. In other words, after UV, the ribbons maintained their amorphous properties, and the UV did not induce crystallization to the Al-based MGs. DSC was performed on the samples, and Figure 1D illustrates the typical glass transition and crystallization curves of the Al-based MGs. The Tg of the Al-based MG was 232 °C, and the crystallization temperature (Tx) was 246°C.
After ultrasonic excitation of plasticity, the deformed morphology of the samples was observed by SEM. Figure 2A presents a cross-section of the ribbon after UV, where a narrow middle section and wide side can be observed. Figures 2B,C demonstrate the clearer deformation morphological views. T1 on the graph indicates the thickness of the ribbon without treatment with UV, while T2 indicates the thickness of the ribbon after UV. It can be seen that, after UV, the amorphous alloy ribbon underwent significant plastic deformation. The largest deformation zone can be observed in Figure 2B, where the deformation rate was a whopping 58.37%, while the lowest deformation rate in other regions reached 28.74%. By calculating the deformation of the ribbons in Figures 2B–E-2(e), the arithmetic average value can be obtained, which can be expressed as (Dodge, 2008):
Where Ɛ = the average deformation rate,
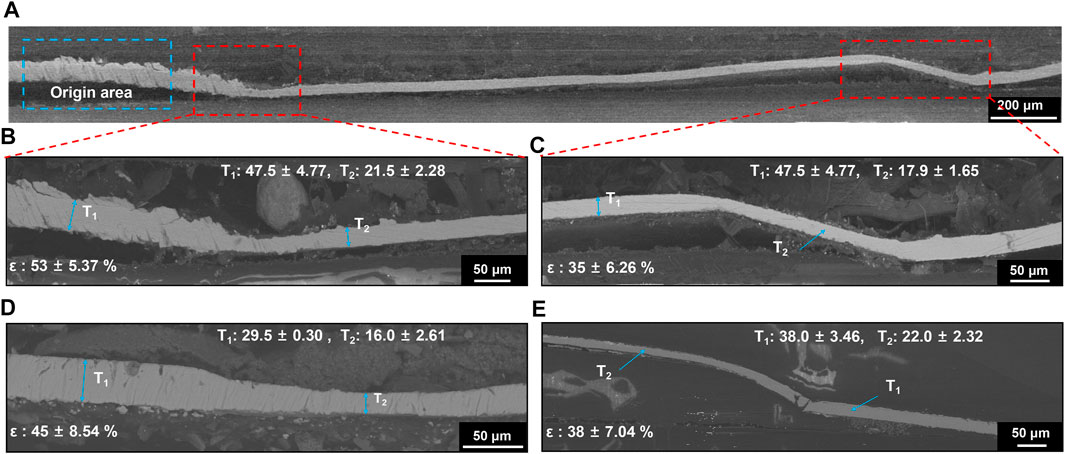
FIGURE 2. (A) Cross section deformation diagram of ribbon. (B)–(E) High-definition images of local deformation, and relevant data of ribbons deformation are given in the figure, where (B) and (C) are local enlarged images of (A).
Mechanical Property
To investigate the mechanical properties of the Al-based MG bars before and after UV, the nanoindentation method we used. The inset in Figure 3A shows the puncturing method by using nanoindentation. The first hole is 10 μm from the ribbon boundary and the subsequent indentation positions are arranged at 10 μm intervals. The yellow area in the middle of the inset indicates the UV treated area, while the two ends show the original area. Figure 3A demonstrates the load-depth curves of certain data points in the two regions, which exhibited almost the same mechanical properties. The surface hardness (H) and reduced modulus (Er) of the samples were obtained according to the Oliver-Pharr’s method (Oliver and Pharr, 1992), and then, the Young’s modulus (E) was calculated. Figure 3B shows the change in the hardness and reduced modulus of the ribbon with surface displacement. It can be observed that the modulus of the sample before and after UV was not much different. The average elastic modulus value measured before UV was E = 48.98 GPa, and that after UV was E = 51.82 GPa. The hardness of the sample before and after UV changed slightly. More specifically, in Figure 3B, it can be seen that the hardness after UV was slightly increased. The average hardness (H) measured before UV was H = 2.39 GPa, and that after UV was H = 3.58 GPa. The increase in hardness can be most likely attributed to the activation of loosely stacked regions and enhanced atomic alignment under high-frequency UV, which leads to the acceleration of the relaxation process and the dense stacking of regions (Chen et al., 2020; Zhao et al., 2021).
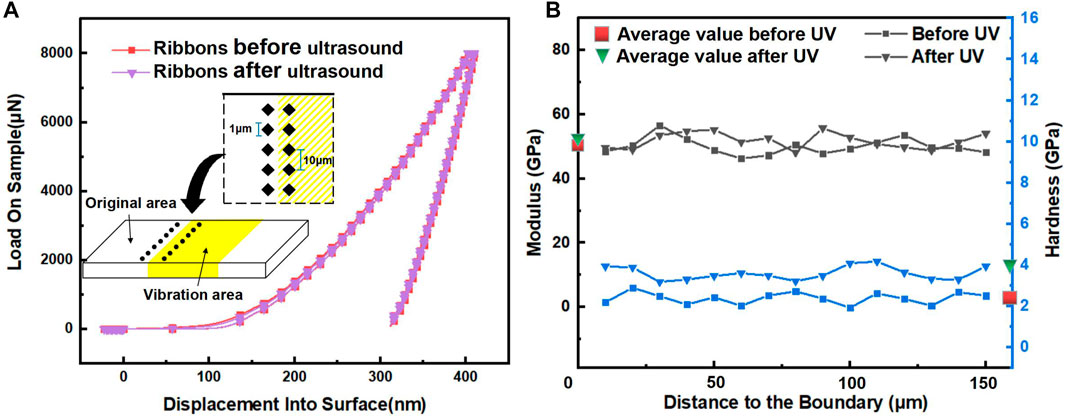
FIGURE 3. (A) Load-depth curves of the ribbons, the inset shows the nanoindentation dotting method. (B) Changes in the hardness and elastic modulus of the ribbon with surface displacement.
Transmission Electron Microscopy and Elemental Distributions
In order to further confirm whether the Al-based MG ribbons underwent crystallization after UV, TEM observations of the ribbons before and after UV were conducted. Before the observations, FIB was used to prepare the ribbon samples, and two samples with a size of 4 × 4 μm before and after UV were successfully obtained. In Figures 4A,C show the microscopic surface morphologies of the Al-based MG ribbons, respectively. Subsequently, the samples were observed by TEM, and the high-resolution atomic structures and diffraction patterns were obtained (Figures 4B,D). Noticeably, the distribution of atoms in both images was irregular, which clearly indicates the atomic sequence-free arrangement of a typical amorphous alloy. Moreover, the chosen electron diffraction pattern further demonstrates the amorphous properties of the Al-based MG before and after UV. On the contrary, the atomic distribution of the alloy in the crystalline state was neat and regular, and diffraction spots appeared on the diffraction pattern. This result reveals that the high-frequency UV does not change the fundamental properties of Al-based MGs. Meanwhile, the elemental distribution of the ribbons was also analyzed by EDS. Figures 4E,F show the elemental distribution of the ribbons in the microregion before and after UV, respectively. The chemical composition of this area was confirmed to be Al86Ni9La5. In general, the elemental distributions before and after UV were found pretty homogeneous.
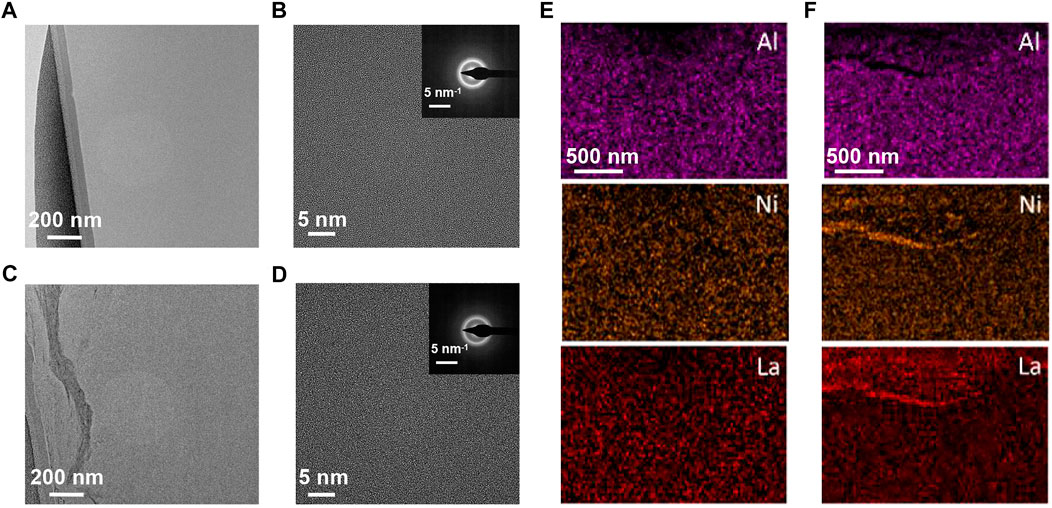
FIGURE 4. TEM and EDS patterns of Al-based MG ribbons before and after UV. (A) Microscopic surface topography of the amorphous alloy ribbons prepared by FIB. (B) High-resolution atomic structure and elemental distributions of the amorphous alloy ribbon. The inset shows the corresponding selected area electron diffraction pattern. (E) Element Distribution in microregions of the amorphous alloy ribbon. (C), (D), and (F) Corresponding data of the amorphous alloy ribbon after UV.
Mechanisms
UV is a high-frequency and low-stress processing method, which is different from the traditional high-stress processing methods such as compression, extrusion and stretching. The high-frequency low stress will cause the sample surface to soften first like a liquid flowing deformation, as the process of change shown in schematic Figure 5A. And the high stress will cause the sample surface to show a step-like structure as shown in Figure 5B. In contrast, the surface of the sample after UV is observed to be flattened (Figure 5C), as well as smooth (Figure 5E) under SEM, and these phenomena have similarities to those described in Ref. (Sun et al., 2020). The voids and flake-like regions that appear in Figure 5C were formed when the ultrasonic vibration treatment flattened the small hills on the untreated surface. Further evidence we are convinced that UV softens Al-based MGs follows the observation of the morphology in Figure 5D, where overflow and flanging of the sample end surfaces can be clearly seen in enlarged Figures 5F,G, respectively. When the ribbon reaches a state of softened flow, its forming ability will far exceed the limits that can be reached in its normal state. Under high-frequency vibrations, dynamic heterogeneity and prolonged cycling of the atoms inside t
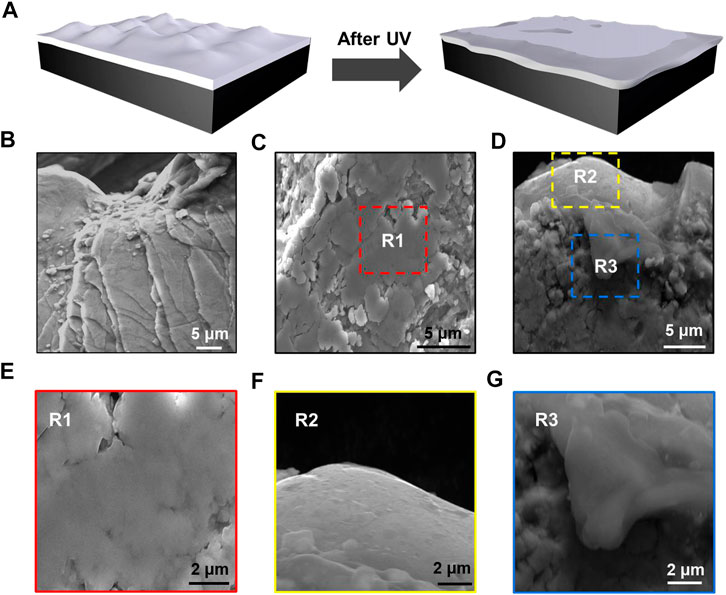
FIGURE 5. Sample surface morphology. (A) Schematic diagram of sample microsurface changes before and after UV. (B) Typical extrusion deformation morphology of amorphous alloy. (C) and (D) SEM morphology of the sample surface after UV. (E–G) are enlarged views of the areas corresponding to those in (C) and (D).
He sample induce atomic-scale dilations (Li et al., 2020b), which either triggers rejuvenation or relaxation of the amorphous structure, and eventually collapse and flow under stress. It is worth noting that the above state can only be achieved in a very short period of time by the excitation of the fast surface dynamics (Ma et al., 2019), and the conventional processing method is still difficult to overcome the problem of extremely low forming ability at room temperature.
Conclusion
In summary, the forming ability of Al-based MGs is significantly improved under UV. The degree of deformation improved from nearly none to 43.14% at room temperature, with a maximum improvement to 58.37%. Following the high deformation, the sample remained amorphous, and the SEM observations demonstrated that the amorphous sample underwent a flow-type deformation with no obvious cracks. Moreover, in terms of mechanical properties, the samples after UV exhibited a slight increase in hardness, while the modulus of elasticity remained almost unchanged. The results of the present research provide a novel approach for overcoming the difficulties in machining Al-based MGs.
Data Availability Statement
The original contributions presented in the study are included in the article/supplementary material, further inquiries can be directed to the corresponding author.
Author Contributions
XL and HS conceived the idea. HS, CF, SR, ZZ and supervised the work. CF and JF carried out the ultrasonic vibration experiments and ZL designed and completed the experimental setup. CF performed XRD, DSC, nanoindentation and TEM. XL and HS wrote the manuscript. All authors contributed to the discussion and analysis of the results.
Funding
The work was supported by the Key Basic and Applied Research Program of Guangdong Province, China (Grant Nr. 2019B030302010), the National Natural Science Foundation of China (Grant Nr. 51971150, 51871157 and 52075344), Guangdong Basic and Applied Basic Research Foundation (Grant Nr. 2020B1515120092), the Science and Technology Innovation Commission Shenzhen (Grants No. JCYJ20170412111216258), the National Key Research and Development Program of China (Grant No. 2018YFA0703604). The authors also thank the assistance on microscope observation received from the Electron Microscope Center of the Shenzhen University.
Conflict of Interest
The authors declare that the research was conducted in the absence of any commercial or financial relationships that could be construed as a potential conflict of interest.
Publisher’s Note
All claims expressed in this article are solely those of the authors and do not necessarily represent those of their affiliated organizations, or those of the publisher, the editors and the reviewers. Any product that may be evaluated in this article, or claim that may be made by its manufacturer, is not guaranteed or endorsed by the publisher.
References
Ashby, M., and Greer, A. (2006). Metallic Glasses as Structural Materials. Scripta Materialia 54, 321–326. doi:10.1016/j.scriptamat.2005.09.051
Chen, S., Li, S., Ma, J., Yu, H., Liu, H., and Peng, H. (2020). Ultrasonic Vibration Accelerated Aging in La-Based Bulk Metallic Glasses. J. Non-Crystalline Sol. 535, 119967. doi:10.1016/j.jnoncrysol.2020.119967
Choi, P. P., Kim, J. S., Nguyen, O. T. H., Kwon, D. H., Kwon, Y. S., and Kim, J. C. (2007). Al-La-Ni-Fe Bulk Metallic Glasses Produced by Mechanical Alloying and Spark-Plasma Sintering. Mater. Sci. Eng. A 449-451, 1119–1122. doi:10.1016/j.msea.2006.02.264
Gao, M., Sun, B. A., Yuan, C. C., Ma, J., and Wang, W. H. (2012). Hidden Order in the Fracture Surface Morphology of Metallic Glasses. Acta Materialia 60, 6952–6960. doi:10.1016/j.actamat.2012.08.046
Gerard, A. Y., Lutton, K., Lucente, A., Frankel, G. S., and Scully, J. R. (2020). Progress in Understanding the Origins of Excellent Corrosion Resistance in Metallic Alloys: From Binary Polycrystalline Alloys to Metallic Glasses and High Entropy Alloys. Corrosion 76, 485–499. doi:10.1016/j.jnucmat.2013.02.080
Guo, F. Q., Poon, S. J., and Shiflet, G. J. (2000). Glass Formability in Al-Based Multinary Alloys. Mater. Sci. Forum 331-337, 31–42. doi:10.4028/www.scientific.net/msf.331-337.31
He, T., Chen, S., Lu, T., Zhao, P., Chen, W., and Scudino, S. (2020). High-Strength and Ductile Ultrafine-Grained Al-Y-Ni-Co alloy for High-Temperature Applications. J. Alloys Compd. 848, 156655. doi:10.1016/j.jallcom.2020.156655
He, Y., Dougherty, G. M., Shiflet, G. J., and Poon, S. J. (1993). Unique Metallic Glass Formability and Ultra-High Tensile Strength in Al-Ni-Fe-Gd Alloys. Acta Metallurgica et Materialia 41, 337–343. doi:10.1016/0956-7151(93)90064-Y
He, Y., Poon, S. J., and Shiflet, G. J. (1988). Synthesis and Properties of Metallic Glasses that Contain Aluminum. Science 241, 1640–1642. doi:10.1126/science.241.4873.1640
Inoue, A. (1998). Amorphous, Nanoquasicrystalline and Nanocrystalline Alloys in Al-Based Systems. Prog. Mater. Sci. 43, 365–520. doi:10.1016/S0079-6425(98)00005-X
Inoue, A., and Takeuchi, A. (2011). Recent Development and Application Products of Bulk Glassy Alloys. Acta Materialia 59, 2243–2267. doi:10.1016/j.actamat.2010.11.027
Inoue, A., Zhang, T., and Masumoto, T. (1989). Al–La–Ni Amorphous Alloys with a Wide Supercooled Liquid Region. Mater. Trans. JIM 30, 965–972. doi:10.2320/matertrans1989.30.965
Kim, Y.-H., Inoue, A., and Masumoto, T. (1991). Increase in Mechanical Strength of Al–Y–Ni Amorphous Alloys by Dispersion of Nanoscale Fcc-Al Particles. Mater. Trans. JIM 32, 331–338. doi:10.2320/matertrans1989.32.3315
Klement, W., Willens, R. H., and Duwez, P. (1960). Non-crystalline Structure in Solidified Gold-Silicon Alloys. Nature 187, 869–870. doi:10.1038/187869b0
Li, H., Li, Z., Yang, J., Ke, H. B., Sun, B., Yuan, C. C., et al. (2021). Interface Design Enabled Manufacture of Giant Metallic Glasses. Sci. China Mater. 64, 964–972. doi:10.1007/s40843-020-1561-x
Li, H., Yan, Y., Sun, F., Li, K., Luo, F., and Ma, J. (2019). Shear Punching of Amorphous Alloys under High-Frequency Vibrations. Metals 9, 1158. doi:10.3390/met9111158
Li, X., Liang, X., Zhang, Z., Ma, J., and Shen, J. (2020). Cold Joining to Fabricate Large Size Metallic Glasses by the Ultrasonic Vibrations. Scripta Materialia 185, 100–104. doi:10.1016/j.scriptamat.2020.03.059
Li, X. P., Yan, M., Imai, H., Kondoh, K., Wang, J. Q., Schaffer, G. B., et al. (2013). Fabrication of 10mm Diameter Fully Dense Al86Ni6Y4.5Co2La1.5 Bulk Metallic Glass with High Fracturestrength. Mater. Sci. Eng. A 568, 155–159. doi:10.1016/j.msea.2013.01.041
Li, X., Wei, D., Zhang, J. Y., Liu, X. D., Li, Z., Wang, T. Y., et al. (2020). Ultrasonic Plasticity of Metallic Glass Near Room Temperature. Appl. Mater. Today 21, 100866. doi:10.1016/j.apmt.2020.100866
Li, Z., Huang, Z., Sun, F., Li, X., and Ma, J. (2020). Forming of Metallic Glasses: Mechanisms and Processes. Mater. Today Adv. 7, 100077. doi:10.1016/j.mtadv.2020.100077
Liang, X., Zhu, X., Li, X., Mo, R., Liu, Y., Wu, K., et al. (2020). High-Entropy alloy and Amorphous alloy Composites Fabricated by Ultrasonic Vibrations. Sci. China Phys. Mech. Astron. 63, 116111. doi:10.1007/s11433-020-1560-4
Lin, B., Bian, X., Wang, P., and Luo, G. (2012). Application of Fe-Based Metallic Glasses in Wastewater Treatment. Mater. Sci. Eng. B 177, 92–95. doi:10.1016/j.mseb.2011.09.010
Löffler, J. F. (2003). Bulk Metallic Glasses. Intermetallics 11, 529–540. doi:10.1016/s0966-9795(03)00046-3
Lucena, F. A. D., Kiminami, C. S., and Ramos Moreira Afonso, C. (2020). New Compositions of Fe-Co-Nb-B-Y BMG with Wide Supercooled Liquid Range, Over 100 K. J. Mater. Res. Technol. 9 (4), 9174–9181. doi:10.1016/j.jmrt.2020.06.035
Ma, J., Yang, C., Liu, X., Shang, B., He, Q., Li, F., et al. (2019). Fast Surface Dynamics Enabled Cold Joining of Metallic Glasses. Sci. Adv. 5, eaax7256. doi:10.1126/sciadv.aax7256
Mula, S., Mondal, K., Ghosh, S., and Pabi, S. K. (2010). Structure and Mechanical Properties of Al-Ni-Ti Amorphous Powder Consolidated by Pressure-Less, Pressure-Assisted and Spark Plasma Sintering. Mater. Sci. Eng. A 527, 3757–3763. doi:10.1016/j.msea.2010.03.068
Oliver, W. C., and Pharr, G. M. (1992). An Improved Technique for Determining Hardness and Elastic Modulus Using Load and Displacement Sensing Indentation Experiments. J. Mater. Res. 7 (6), 1564–1583. doi:10.1557/JMR.1992.1564
Sasaki, T. T., Hono, K., Vierke, J., Wollgarten, M., and Banhart, J. (2008). Bulk Nanocrystalline Al85Ni10La5 alloy Fabricated by Spark Plasma Sintering of Atomized Amorphous Powders. Mater. Sci. Eng. A 490, 343–350. doi:10.1016/j.msea.2008.01.059
Schuh, C., Hufnagel, T., and Ramamurty, U. (2007). Mechanical Behavior of Amorphous Alloys. Acta Materialia 55, 4067–4109. doi:10.1016/j.actamat.2007.01.052
Sun, F., Wang, B., Luo, F., Yan, Y. Q., Ke, H. B., Ma, J., et al. (2020). Shear Punching of Bulk Metallic Glasses under Low Stress. Mater. Des. 190, 108595. doi:10.1016/j.matdes.2020.108595
Wu, N. C., Zuo, L., Wang, J. Q., and Ma, E. (2016). Designing Aluminum-Rich Bulk Metallic Glasses via Electronic-Structure-Guided Microalloying. Acta Materialia 108, 143–151. doi:10.1016/j.actamat.2016.02.012
Wu, Y., Zhang, Y., and Zhang, T. (2021). Application of 3D Balanced Growth Theory to the Formation of Bulk Amorphous Alloys. Front. Mater. 8, 268. doi:10.3389/fmats.2021.694920
Y. Dodge (2008). "Arithmetic Mean," in The Concise Encyclopedia of Statistics (New York: New Springer), 15–18. doi:10.1007/978-0-387-32833-1_12
Yang, B. J., Yao, J. H., Zhang, J., Yang, H. W., Wang, J. Q., and Ma, E. (2009). Al-Rich Bulk Metallic Glasses with Plasticity and Ultrahigh Specific Strength. Scripta Materialia 61 (4), 423–426. doi:10.1016/j.scriptamat.2009.04.035
Yang, Q., Huang, J., Qin, X.-H., Ge, F.-X., and Yu, H.-B. (2019). Revealing Hidden Supercooled Liquid States in Al-Based Metallic Glasses by Ultrafast Scanning Calorimetry: Approaching Theoretical Ceiling of Liquid Fragility. Sci. China Mater. 63, 157–164. doi:10.1007/s40843-019-9478-3
Keywords: al-based metallic glass, ultrasonic vibration, Forming ability, room temperature deformation, transmission electron microscope
Citation: Liang X, Fan C, Fu J, Liu Z, Zhang Z, Ren S, Ruan W and Shi H (2021) Improve the Forming Ability of Al-Based Metallic Glass Under Ultrasonic Vibration at Room Temperature. Front. Mater. 8:746955. doi: 10.3389/fmats.2021.746955
Received: 25 July 2021; Accepted: 13 August 2021;
Published: 24 August 2021.
Edited by:
Huai-Jun Lin, Jinan University, ChinaReviewed by:
Meng Gao, University of Wisconsin-Madison, United StatesKaikai Song, Shandong University, China
Copyright © 2021 Liang, Fan, Fu, Liu, Zhang, Ren, Ruan and Shi. This is an open-access article distributed under the terms of the Creative Commons Attribution License (CC BY). The use, distribution or reproduction in other forums is permitted, provided the original author(s) and the copyright owner(s) are credited and that the original publication in this journal is cited, in accordance with accepted academic practice. No use, distribution or reproduction is permitted which does not comply with these terms.
*Correspondence: Hongyan Shi, c2hpaG9uZ3lhbkBzenUuZWR1LmNu
 Xiong Liang
 Zhenxuan Zhang
 Hongyan Shi