95% of researchers rate our articles as excellent or good
Learn more about the work of our research integrity team to safeguard the quality of each article we publish.
Find out more
ORIGINAL RESEARCH article
Front. Mater. , 24 February 2021
Sec. Structural Materials
Volume 7 - 2020 | https://doi.org/10.3389/fmats.2020.620500
This article is part of the Research Topic Lightweight Structural Metallic Materials View all 13 articles
In order to enhance the wear resistance without changing the mechanical properties of the substrate, the aluminum-bronze alloy was siliconized by pack cementation in this paper. Its surface hardness was improved by a certain thickness of siliconized layer. The different processes and their influences on the siliconized layer and the substrate were investigated by changing the ratio of siliconizing powder. The microstructure and phase composition of the siliconized layer was detected and analyzed. Compared with the non-siliconized sample, the hardness of the siliconized layer of 30% Si content is increased by 93.54%, and the average friction coefficient is reduced to 40.38%. The maximum thickness of siliconized layer in the experiment is 200 μm when the silicon powder content is 30%. It can be concluded that surface siliconizing is effective to reduce the friction coefficient of aluminum-bronze and improve wear resistance.
Compared with simple aluminum-bronze, complex aluminum-bronze has better wear resistance. It is mostly used to make frictional parts in the mechanical transmission system, such as screw and nut (Wharton et al., 2005; Equey et al., 2011; Wu et al., 2015). When used as a friction pair with harder parts, complex aluminum-bronze is easy to wear out by producing a lot of wear debris (Zhou et al., 2015) which affects the service life of the parts.
The wear resistance of copper alloys can be improved through adding alloying elements (Buchely et al., 2005), suitable heat treatment processes and the surface coating technology (Yang et al., 2005). There is evidence to suggest that the friction and wear properties of copper alloys are mainly determined by the plastic deformation and cracks of the surface layer (Mohseni et al., 2015; Rigney and Glaeser, 1978; Hirth and Rigney, 1976). Compared with heat treatment technology, the surface coating technology can improve the surface hardness and wear resistance without changing the performance of the aluminum bronze alloy. Among surface coating technologies, electroplating technology has a large environmental pollution, and laser cladding technology is costly. Chemical heat treatment uses chemical reaction and physical adsorption to deposit the infiltrated elements on the surface of the substrate, and gradually diffuse to the substrate with the extension of heating and holding time, and finally form a certain thickness of infiltration layer. The infiltration layer obtained by the chemical heat treatment has continuous structure, which belongs to metallurgical bonding, high bonding strength, and not easy to exfoliate (Qiao and Zhou, 2012; Aragoudakisa et al., 2003; Koo and Yu, 2000). Therefore, the method of chemical heat treatment of pack cementation is used in this study to reduce the cost while effectively improving the surface properties. To achieve the chemical heat treatment for the metal surface, the atoms that need to be infiltrated are first deposited on the metal surface, and infiltrated into metal surface from penetrant through chemical reaction. When the surface atoms reach a certain concentration, they begin to infiltrate and diffuse into the metal substrate. The speed of chemical reaction and the diffusion rate of atoms in the metal substrate are mainly affected by the concentration of atoms and the heat treatment process. Parlikar et al. (Parlikar et al., 2013) obtained the Al3Ti layer by pack cementation aluminizing with nearly α-Ti29A alloy and explored its effect on alloy tensile properties. In a major advance in 1983, Frank et al. (Frank and Falconer, 1983) revealed that Si and Cu form ordered compounds Cu3Si and Solid solution alloy Cu0.95Si0.05 when Si atoms penetrate and diffuse into the copper alloy matrix. Wang et al. (Wang et al., 2009) achieved pack siliconizing on the surface of pure copper with nickel plating, and the siliconized layer improved the surface hardness and wear resistance of pure copper. The average micro hardness value of the surface reached HV760, and the friction coefficient was about 0.3.
In this paper, the Si content with different ratio were prepared for pack cementation. Si atoms are adsorbed on the surface of the aluminum bronze substrate and diffuse to form a silicon infiltration layer, which aims to improve the wear resistance of aluminum bronze’s layer, reduce the amount of wear, and extend the life of the aluminum bronze friction pair. This article deals with the quality evaluation of some layers prepared in different Si content in terms of layer thickness, number of holes, hardness. Besides, the microstructure of siliconized aluminum bronze is analyzed. The wear resistance of the siliconized layer was investigated with hardness and friction coefficient.
The aluminum bronze (QAl10-5-5) samples were taken from a nut in a mechanical servo press. Its chemical composition is shown in Table 1. The size of aluminum bronze sample is shown in Figure 1A. The samples were taken as the lower friction pair for the friction and wear test after pack siliconizing. Before siliconizing, the samples are mechanically polished and then removes surface stains in absolute ethanol using ultrasonic.
In this experiment, the penetrant is composed of three parts: the main penetrant, accelerator and filler. The main penetrant is Si powder with a purity of 99.99%. Its particle size is 40–200 mesh. NaF and NH4Cl were used as accelerator to react with Si powder producing SiCl2 and SiF2 and the resulting compound replaces Cu with active Si atoms to penetrate into copper alloy substrate and form intermetallic compounds [16]. The role of SiC as a filler is to prevent powder sintering from affecting the reaction of active Si atoms.
The process of siliconizing test is shown in Figure 1B. Fill the prepared and mixed penetrant powder into a container with preloading samples and compact it. Ensure that the thickness of the powder on the top of the sample is more than 30 mm. Then seal the container with refractory mud, and keep the container without any gas leaking. Finally, put the container into a rapid heating box-type electric furnace for heat treatment. The heating rate was 3°C/s and the holding time was 12 h. Cool down the container within the furnace. The parameters of the test are shown in Table 2. The content of Si and SiC are mainly changed in the experiment. When the content of Si powder increases, the content of filler SiC decreases accordingly. The content of osmotic agent NH4Cl and NaF each contains 3%.
In the friction test, the lower friction pair was siliconized aluminum bronze plates and non-siliconized aluminum bronze plates. The upper friction pair was used 38GrMoAl high-grade nitride steel pin, which has high wear resistance, high fatigue strength and high strength, with a diameter of 6.3 mm and a length of 22 mm. The actual contact pressure between the actual force transmitting screw and nut in the mechanical servo press was 15 MPa∼20 MPa, so the load applied to the pin should be in the range of 467.6N∼623.4N. Friction and wear test parameters were shown in Table 3. Before the test, the lower friction pair was soaked in lubricating oil for 1 min to cover the surface of the sample with an oil film, and no lubricating oil was added during the test. Different lower friction pairs were tested three times and the average value was taken.
The Vickers hardness was measured using an applied load of 500 g for 15 s. At least three tests were carried out at different positions of the specimen, and the average value of hardness was obtained.
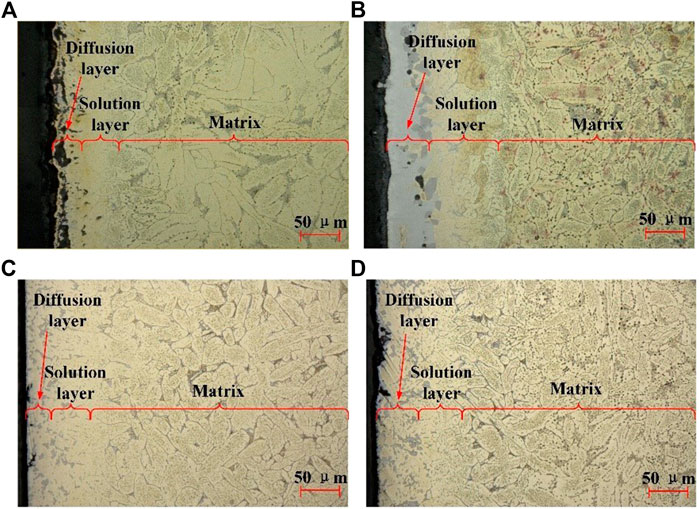
Four penetrants with different ratios of Si content of 10%, 30%, 50% and 70% were applied to carry out the siliconizing. The microstructures of siliconized layer by different Si content were presented in Figure 2. The siliconized layer is discontinuous and contains many voids and holes when the Si content is 10% (Figure 2A). The maximum depth of the holes is 70 μm and the total thickness of the siliconized layer is about 100 μm. In Figure 2B, the diffusion layer and the solid solution layer can be distinguished. The layer is continuous and relatively smooth, but there are still holes in the siliconized layer. The maximum depth of the holes is 50 μm and the thickness of the diffusion layer and the solid solution layer is about 200 μm. As shown in Figures 2C,D, the phase in the diffusion layer have uneven distribution. When the Si content is 50% and 70%, the siliconized layer is about 140 μm, 130 μm, respectively. Significantly reduction of holes is observed in Figures 2C,D compared with Figure 2A.

FIGURE 2. Microstructure of the siliconized layer under the condition of different Si powder ratio. (A) 10%; (B) 30%; (C) 50%; (D) 70%.
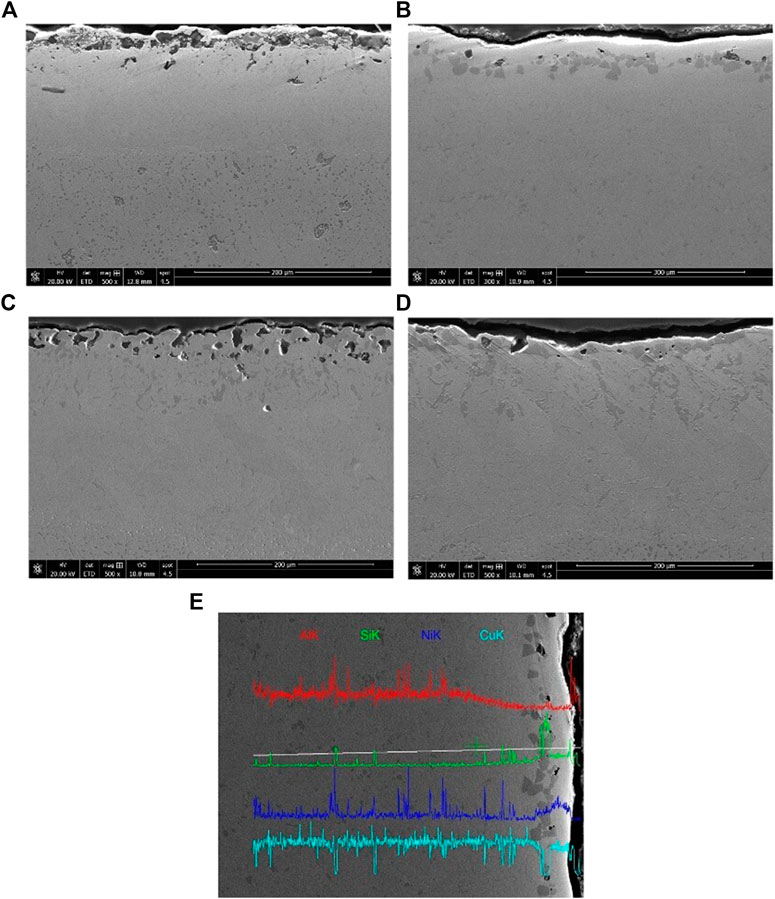
The SEM images of the siliconized layer under different penetrants are shown in Figure 3. The upper layer is the siliconized layer and the lower layer is the copper alloy substrate. When the Si content is 30%, 50%, 70%, the block structure appears in the siliconized layer. No clear block structure is found in the siliconized layer of 10% Si content of 10% (Figure 3A). There are two kinds of large blocks with different colors in Figure 3B. In the siliconized layers of 50% and 70% Si content (Figures 3C,D), the blocks are smaller than Figure 3B and distributed more scattered. It can be seen from Figure 3E that the Si content is the highest in the diffusion layer of the infiltration layer.

FIGURE 3. Surfaces of the siliconized layer under the condition of different Si powder ratio. (A) 10%; (B) 30%; (C) 50%; (D) 70%; (E) EDS mapping of 30% Si content.
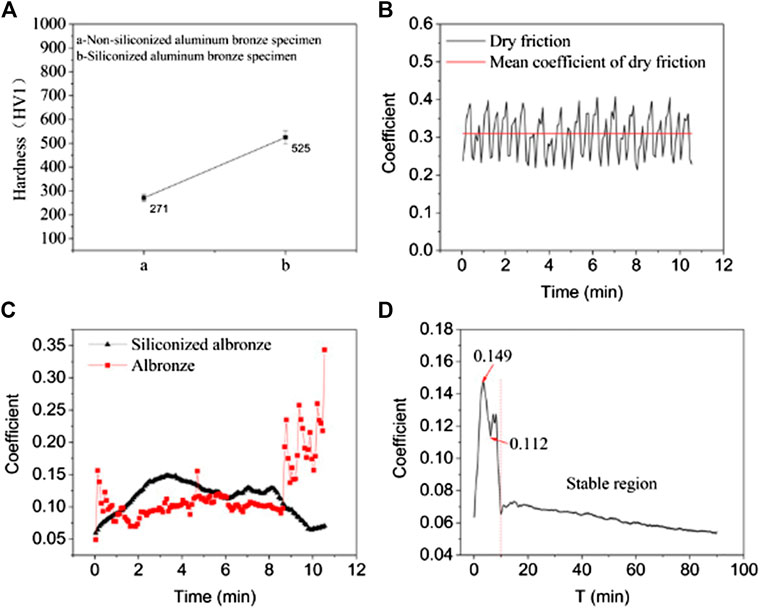
A Vickers hardness was used to measure the macroscopic hardness of the siliconized aluminum bronze and the non-siliconized aluminum bronze sample. The surface hardness is shown in Figure 4A by comparing the siliconized sample of 30% Si content and the non-siliconized aluminum bronze sample. The average Vickers hardness of the non-siliconized sample is 271HV1 and the siliconized sample is 525HV1. Compared with the non-siliconized sample, the hardness of the siliconized layer with the Si content of 30% is increased by 93.54%.

FIGURE 4. (A) A Vickers hardness of the siliconized aluminum bronze and the non-siliconized aluminum bronze sample (30% Si content). (B) The dry friction test of the non-siliconized sample. (C) The Lubrication friction of the siliconized aluminum bronze and the non-siliconized aluminum. (D) The lubrication friction coefficient of the siliconized sample in 90 min.
Lubricant failure may occur in the lubrication friction test. After the lubricating oil fails in the lubrication friction test, the friction gradually changes from the lubrication to the dry friction, and the friction coefficient changes drastically. The dry friction test is carried out on the non-siliconized sample firstly, and the dry friction coefficient is obtained, as shown in Figure 4B. The dry friction coefficient fluctuates in the range of 0.214∼0.427, the fluctuation range is 0.213, and the average friction coefficient is 0.310.
The lubrication friction coefficient of the samples in the siliconized layer of 30% Si content and non-siliconized aluminum bronze is depicted in Figure 4C. It can be seen that the lubrication friction coefficient of the non-siliconized sample began to rise sharply after 8.79 min. At 12 min, the lubrication friction coefficient is 0.343, which exceeds the average value of the dry friction coefficient. The lubrication friction coefficient of siliconized aluminum bronze did not show lubrication failure within the first 11 min. Although the lubrication friction coefficient curve is not flat enough, the friction coefficient fluctuates more smoothly than the non-siliconized sample.
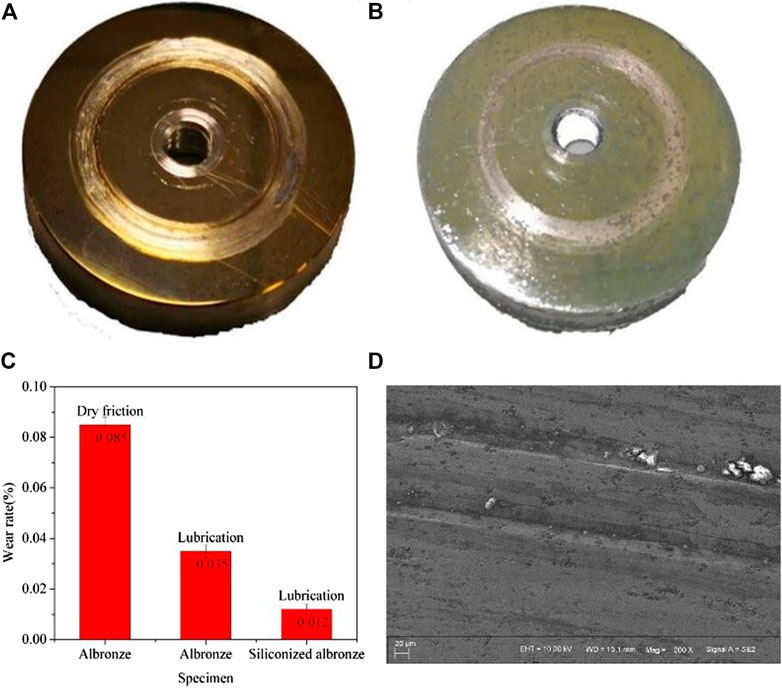
To understand the influence of the siliconized layer on the lubrication friction coefficient, the lubrication friction coefficient of the siliconized sample is observed for a longer time. The result, as shown in Figures 4D, is that the friction coefficient fluctuates greatly in the first 10 min, and the fluctuation range is between 0.112∼0.149. After 10 min, the friction lubrication coefficient decreased to the stable region, and the average lubrication friction coefficient in the stable area is 0.063. The curve was shown a stable downward trend from 10 min to 90 min, and the fluctuation range is 0.020. The results have shown that the oil film on the surface of siliconized aluminized bronze remained undamaged within 90 min, and the two surfaces have not reached stage of the boundary lubrication. The samples after the 90 min friction test were shown in Figures 5A,B. It can be found that the wear marks on the surface of the non-siliconized sample were deep, and those on the surface of the siliconized sample were shallow. In Figure 5C, the wear rate of the non-siliconized sample is 0.085% under dry lubrication. Under lubricating conditions, the wear rate of the non-siliconized sample is 0.035% and the siliconized sample of 30% Si content is 0.012%. In Figure 5D, the wide of wear track is about 20 μm. There are a large number of small debris and a small part of large debris on the friction surface and the inside of the groove. The smallest particle diameter is less than 1 μm, and the large particle diameter is about 10 μm. And the wear debris is generally granular and cannot form a large adhesion layer like the wear debris of the non-siliconized sample.

FIGURE 5. The scratch on the surface of friction specimen: (A) non-siliconized sample; (B) siliconized sample aluminum bronze sample; (C) wear rate; (D) the SEM of the wear track.
1) When content of Si powder is small, the proportion of filler increases which cause the activity of Si atoms to penetrate into the aluminum bronze surface to decrease. Therefore, the infiltration layer is too thin in low Si powder content. On the other hand, Si powder is sintered due to too little filler which also reduce the generation of active Si atoms when the content of Si powder is high. The appropriate ratio of Si powder and filler is beneficial to obtain a thicker infiltrated layer. Therefore, when the siliconizing powder is composed by 30% Si + 3% NaF +3% NH4Cl + 64% SiC, the heating temperature is 850°C, and the holding time is 18 h, a certain thickness of high-quality siliconized layer will be obtained and the substrate will not be affected.
2) The average Vickers hardness of the non-siliconized sample is 271HV1 and the siliconized sample is 524.5HV1. It can be concluded that the siliconized layer increases 93.54% of the hardness of the aluminum bronze alloy surface.
3) The average friction coefficient of the siliconized sample is reduced to 40.38% of that of the non-siliconized sample. In the 90 min friction test, the lubricating oil film did not break and fail and the coefficient of friction was extremely stable. The result proves that the siliconized layer can reduce the friction coefficient and improve wear resistance.
4) The surface of aluminum bronze forms a large adhesion layer after plastic deformation during friction and shows the characteristics of viscous wear. When the surface of aluminum bronze is siliconized, the plastic deformation area of the micro-protrusions becomes smaller, and the macroscopic performance is that the hardness of the siliconized surface increases. Therefore, wear debris is reduced during the friction process and wear resistance is improved.
The original contributions presented in the study are included in the article/Supplementary Material, further inquiries can be directed to the corresponding author.
The corresponding author is responsible for ensuring that the descriptions are accurate. FT: writing original draft and data processing. CW: implementation of the experiments. BZ: modifying and editing. LW: suggestion and resource. YL: experiment design. YZ: supply of aluminum bronze alloy and suggestions for the purpose of this article.
This research work was financially supported by the National Major Science and Technology Project of China (Grant No. 2018ZX04023001).
The authors declare that the research was conducted in the absence of any commercial or financial relationships that could be construed as a potential conflict of interest.
Aragoudakisa, N. M., Stergioudisb, G., Haidara, O., and Tsipas, D. N. (2003). A comparative study of boride coatings obtained by pack cementation method and by fluidized bed technology. Mater. Lett. 57, 2399–2403. doi:10.1016/S0167-577X(02)01243-0
Buchely, M. F., Gutierrez, J. C., León, L. M., and Toro, A. (2005). The effect of microstructure on abrasive wear of hard facing alloys. Wear 259, 52–61. doi:10.1016/j.wear.2005.03.002
Equey, S., Houriet, A., and Mischler, S. (2011). Wear and frictional mechanisms of copper-based bearing alloys. Wear 273, 9–16. doi:10.1016/j.wear.2011.03.030
Frank, T. C., and Falconer, J. L. (1983). Surface compositions of copper-silicon alloys. Appl. Surf. Sci. 14, 359–374. doi:10.1016/0378-5963(83)90049-1
Hirth, J. P., and Rigney, D. A. (1976). Crystal plasticity and the delamination theory of wear. Wear 39, 133–141. doi:10.1016/0043-1648(76)90229-5
Koo, C. H., and Yu, T. H. (2000). Pack cementation coatings on Ti3Al-Nb alloys to modify the high-temperature oxidation properties. Surf. Coat. Tech. 126, 171–180. doi:10.1016/S0257-8972(00)00546-6
Mohseni, H., Mensah, B. A., Gupta, N., Srinivasan, S. G., and Scharf, T. W. (2015). Exceptional friction mitigation via subsurface plastic shear in defective nanocrystalline ceramics. Mater. Res. Lett. 3, 23–29. doi:10.1080/21663831.2014.935968
Parlikar, C., Alam, M. Z., Sarkar, R., and Das, D. K. (2013). Effect of oxidation resistant Al3Ti coating on tensile properties of a near α-Ti alloy. Surf. Coat. Tech. 236, 107–117. doi:10.1016/j.surfcoat.2013.09.036
Qiao, M., and Zhou, C. (2012). Codeposition of Co and Al on nickel base superalloys by pack cementation process. Surf. Coat. Tech. 206, 2899–2904. doi:10.1016/j.surfcoat.-2011.12.01910.1016/j.surfcoat.2011.12.019
Rigney, D. A., and Glaeser, W. A. (1978). The significance of near surface microstructure in the wear process. Wear 46, 241–250. doi:10.1016/0043-1648(78)90125-4
Wang, H., Chu, C., Sheng, X., Lin, P., and Dong, Y. (2009). Siliconizing formation mechanism and its property by slurry pack cementation on electro-deposited nickel layer into copper matrix. J. Wuhan Univ. Technol. 24, 883–887. doi:10.1007/s11595-009-6883-6
Wharton, J. A., Barik, R. C., Kear, G., Wood, R. J. K., Stokes, K. R., and Walsh, F. C. (2005). The corrosion of nickel-aluminium bronze in seawater. Corros. Sci. 47, 3336–3367. doi:10.1016/j.corsci.2005.05.053
Wu, Z., Cheng, Y. F., Liu, L., Lv, W., and Hu, W. (2015). Effect of heat treatment on microstructure evolution and erosion-corrosion behavior of a nickel-aluminum bronze alloy in chloride solution. Corros. Sci. 98, 260–270. doi:10.1016-/j.corsci.2015.05.03710.1016/j.corsci.2015.05.037
Yang, G.-r., Hao, Y., Song, W.-m., and Ma, Y. (2005). An investigation of the structure and properties of infiltrated layer on the surface of copper alloy. Mater. Sci. Eng. A. 399, 206–215. doi:10.1016/j.msea.2005.03.106
Keywords: aluminum-bronze alloy, pack cementation, siliconized layer, lubrication friction coefficient, wear resistance
Citation: Tian F, Wu C, Zhu B, Wang L, Liu Y and Zhang Y (2021) Research of Microstructure, Friction and Wear on Siliconized Aluminum-Bronze With Different Silicon Powder Ratio. Front. Mater. 7:620500. doi: 10.3389/fmats.2020.620500
Received: 23 October 2020; Accepted: 07 December 2020;
Published: 24 February 2021.
Edited by:
Hua Ding, Northeastern University, ChinaReviewed by:
Bingtao Tang, Qilu University of Technology, ChinaCopyright © 2021 Tian, Wu, Zhu, Wang, Liu and Zhang. This is an open-access article distributed under the terms of the Creative Commons Attribution License (CC BY). The use, distribution or reproduction in other forums is permitted, provided the original author(s) and the copyright owner(s) are credited and that the original publication in this journal is cited, in accordance with accepted academic practice. No use, distribution or reproduction is permitted which does not comply with these terms.
*Correspondence: Liang Wang, d2FuZ2xpYW5nQGh1c3QuZWR1LmNu
Disclaimer: All claims expressed in this article are solely those of the authors and do not necessarily represent those of their affiliated organizations, or those of the publisher, the editors and the reviewers. Any product that may be evaluated in this article or claim that may be made by its manufacturer is not guaranteed or endorsed by the publisher.
Research integrity at Frontiers

Learn more about the work of our research integrity team to safeguard the quality of each article we publish.